平台/技术栈
Windows 10(开发)/Ubuntu 18.04(部署)
数据库:MySQL 8.0
Web后端框架:Spring Boot
数据库连接:JDBC + MyBatis Plus
安全验证:JWT
日志管理:Slf4j
Web前端框架:Vue
UI:Element UI
前后端数据交互:axios
简介
实现一个小型的数据库后台管理系统,包括登录和增删改查等基础功能。
数据库配置
首先在Windows上安装并配置好数据库MySQL服务,并安装数据库软件。
这里只是演示开发流程,只建立了2个表,即用户配置表和用户信息表。
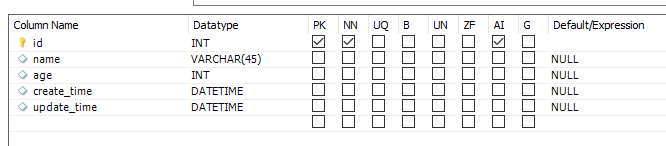
这里采用阿里巴巴数据库代码规范,即数据表必须包含3个字段:id、create_time和update_time,且字段全部为小写,用下划线分割。且主键设置为自增。
在数据库软件中创建数据库Database web_demo,然后导入此sql文件。1
2
3
4
5
6
7
8
9
10
11
12
13
14
15
16
17
18
19
20
21
22
23
24
25
26
27
28
29
30
31
32
33
34
35
36
37
38
39
40
41
42
43
44
45
46
47
48
49
50
51
52
53
54
55
56
57
58
59
60
61
62
63
64
65
66
67
68
69
70
71
72
73
74
75
76
77
78
79
80-- MySQL dump 10.13 Distrib 8.0.26, for Win64 (x86_64)
--
-- Host: localhost Database: web_demo
-- ------------------------------------------------------
-- Server version 8.0.27
/*!40101 SET @OLD_CHARACTER_SET_CLIENT=@@CHARACTER_SET_CLIENT */;
/*!40101 SET @OLD_CHARACTER_SET_RESULTS=@@CHARACTER_SET_RESULTS */;
/*!40101 SET @OLD_COLLATION_CONNECTION=@@COLLATION_CONNECTION */;
/*!50503 SET NAMES utf8 */;
/*!40103 SET @OLD_TIME_ZONE=@@TIME_ZONE */;
/*!40103 SET TIME_ZONE='+00:00' */;
/*!40014 SET @OLD_UNIQUE_CHECKS=@@UNIQUE_CHECKS, UNIQUE_CHECKS=0 */;
/*!40014 SET @OLD_FOREIGN_KEY_CHECKS=@@FOREIGN_KEY_CHECKS, FOREIGN_KEY_CHECKS=0 */;
/*!40101 SET @OLD_SQL_MODE=@@SQL_MODE, SQL_MODE='NO_AUTO_VALUE_ON_ZERO' */;
/*!40111 SET @OLD_SQL_NOTES=@@SQL_NOTES, SQL_NOTES=0 */;
--
-- Table structure for table `user_config`
--
DROP TABLE IF EXISTS `user_config`;
/*!40101 SET @saved_cs_client = @@character_set_client */;
/*!50503 SET character_set_client = utf8mb4 */;
CREATE TABLE `user_config` (
`id` int NOT NULL AUTO_INCREMENT COMMENT '表ID',
`username` varchar(45) DEFAULT NULL COMMENT '用户名',
`password` varchar(45) DEFAULT NULL COMMENT '密码',
`create_time` datetime DEFAULT NULL COMMENT '创建时间',
`update_time` datetime DEFAULT NULL COMMENT '更新时间',
PRIMARY KEY (`id`)
) ENGINE=InnoDB DEFAULT CHARSET=utf8mb3;
/*!40101 SET character_set_client = @saved_cs_client */;
--
-- Dumping data for table `user_config`
--
LOCK TABLES `user_config` WRITE;
/*!40000 ALTER TABLE `user_config` DISABLE KEYS */;
/*!40000 ALTER TABLE `user_config` ENABLE KEYS */;
UNLOCK TABLES;
--
-- Table structure for table `user_info`
--
DROP TABLE IF EXISTS `user_info`;
/*!40101 SET @saved_cs_client = @@character_set_client */;
/*!50503 SET character_set_client = utf8mb4 */;
CREATE TABLE `user_info` (
`id` int NOT NULL AUTO_INCREMENT,
`name` varchar(45) DEFAULT NULL,
`age` int DEFAULT NULL,
`create_time` datetime DEFAULT NULL,
`update_time` datetime DEFAULT NULL,
PRIMARY KEY (`id`)
) ENGINE=InnoDB AUTO_INCREMENT=2 DEFAULT CHARSET=utf8mb3;
/*!40101 SET character_set_client = @saved_cs_client */;
--
-- Dumping data for table `user_info`
--
LOCK TABLES `user_info` WRITE;
/*!40000 ALTER TABLE `user_info` DISABLE KEYS */;
INSERT INTO `user_info` VALUES (1,'Cxx',18,'2021-11-10 17:31:55','2021-11-10 17:31:55');
/*!40000 ALTER TABLE `user_info` ENABLE KEYS */;
UNLOCK TABLES;
/*!40103 SET TIME_ZONE=@OLD_TIME_ZONE */;
/*!40101 SET SQL_MODE=@OLD_SQL_MODE */;
/*!40014 SET FOREIGN_KEY_CHECKS=@OLD_FOREIGN_KEY_CHECKS */;
/*!40014 SET UNIQUE_CHECKS=@OLD_UNIQUE_CHECKS */;
/*!40101 SET CHARACTER_SET_CLIENT=@OLD_CHARACTER_SET_CLIENT */;
/*!40101 SET CHARACTER_SET_RESULTS=@OLD_CHARACTER_SET_RESULTS */;
/*!40101 SET COLLATION_CONNECTION=@OLD_COLLATION_CONNECTION */;
/*!40111 SET SQL_NOTES=@OLD_SQL_NOTES */;
-- Dump completed on 2021-11-11 8:37:38
Web后端
基本配置环境搭建
这里采用Spring Boot V2.5.6版本和Java 1.8版本。
添加依赖
在pom.xml中添加以下依赖:1
2
3
4
5
6
7
8
9
10
11
12
13
14
15
16
17
18
19
20
21
22
23
24
25
26
27
28
29
30
31
32
33
34
35
36
37
38
39
40
41
42
43
44
45
46
47
48
49
50
51
52
53
54
55
56
57
58
59
60
61
62
63
64
65
66
67
68
69
70
71
72
73
74
75
76
77
78
79
80
81
82
83
84
85
86
87
88
89
90
91
92
93
94
95
96
97
98
99
100
101
102
103
104
105
106
107
108
109
110
111
112
113
114
115
116
117
118
119
120
121
122
123
124
125
126
127
128
129
130
131
132
133
134
135
136
137
138
139
140
141
142
143<!-- 依赖版本管理 -->
<properties>
<java.version>1.8</java.version>
<mybatis-plus.version>3.3.1</mybatis-plus.version>
<velocity.version>2.0</velocity.version>
<swagger.version>2.9.2</swagger.version>
<aliyun.oss.version>3.1.0</aliyun.oss.version>
<jodatime.version>2.10.1</jodatime.version>
<commons-fileupload.version>1.3.1</commons-fileupload.version>
<commons-io.version>2.6</commons-io.version>
<commons-lang.version>3.9</commons-lang.version>
<httpclient.version>4.5.1</httpclient.version>
<jwt.version>0.7.0</jwt.version>
<aliyun-java-sdk-core.version>4.3.3</aliyun-java-sdk-core.version>
<aliyun-java-sdk-vod.version>2.15.2</aliyun-java-sdk-vod.version>
<aliyun-sdk-vod-upload.version>1.4.11</aliyun-sdk-vod-upload.version>
<fastjson.version>1.2.28</fastjson.version>
<gson.version>2.8.2</gson.version>
<json.version>20170516</json.version>
<commons-dbutils.version>1.7</commons-dbutils.version>
<canal.client.version>1.1.0</canal.client.version>
<docker.image.prefix>zx</docker.image.prefix>
<alibaba.easyexcel.version>2.1.1</alibaba.easyexcel.version>
<apache.xmlbeans.version>3.1.0</apache.xmlbeans.version>
</properties>
<dependencies>
<dependency>
<groupId>org.springframework.boot</groupId>
<artifactId>spring-boot-starter</artifactId>
</dependency>
<dependency>
<groupId>org.springframework.boot</groupId>
<artifactId>spring-boot-starter-test</artifactId>
<scope>test</scope>
</dependency>
<!-- Spring Boot Web 依赖 -->
<dependency>
<groupId>org.springframework.boot</groupId>
<artifactId>spring-boot-starter-thymeleaf</artifactId>
</dependency>
<dependency>
<groupId>org.springframework.boot</groupId>
<artifactId>spring-boot-starter-web</artifactId>
</dependency>
<!--mysql JDBC驱动 -->
<dependency>
<groupId>mysql</groupId>
<artifactId>mysql-connector-java</artifactId>
</dependency>
<!--mybatis-plus 持久层-->
<dependency>
<groupId>com.baomidou</groupId>
<artifactId>mybatis-plus-boot-starter</artifactId>
<version>${mybatis-plus.version}</version>
</dependency>
<dependency>
<groupId>com.baomidou</groupId>
<artifactId>mybatis-plus-generator</artifactId>
<version>${mybatis-plus.version}</version>
</dependency>
<!-- velocity 模板引擎, Mybatis Plus 代码生成器需要 -->
<dependency>
<groupId>org.apache.velocity</groupId>
<artifactId>velocity-engine-core</artifactId>
<version>${velocity.version}</version>
</dependency>
<!--swagger-->
<dependency>
<groupId>io.springfox</groupId>
<artifactId>springfox-swagger2</artifactId>
<version>${swagger.version}</version>
</dependency>
<!--swagger ui-->
<dependency>
<groupId>io.springfox</groupId>
<artifactId>springfox-swagger-ui</artifactId>
<version>${swagger.version}</version>
</dependency>
<!-- lombok -->
<dependency>
<groupId>org.projectlombok</groupId>
<artifactId>lombok</artifactId>
<version>1.18.12</version>
</dependency>
<dependency>
<groupId>com.github.jsqlparser</groupId>
<artifactId>jsqlparser</artifactId>
<version>3.1</version>
<scope>test</scope>
</dependency>
<!--json-->
<dependency>
<groupId>com.alibaba</groupId>
<artifactId>fastjson</artifactId>
<version>${fastjson.version}</version>
</dependency>
<dependency>
<groupId>org.json</groupId>
<artifactId>json</artifactId>
<version>${json.version}</version>
</dependency>
<dependency>
<groupId>com.google.code.gson</groupId>
<artifactId>gson</artifactId>
<version>${gson.version}</version>
</dependency>
<dependency>
<groupId>commons-io</groupId>
<artifactId>commons-io</artifactId>
<version>2.6</version>
</dependency>
<!-- ======BEGIN jwt ====== -->
<dependency>
<groupId>com.auth0</groupId>
<artifactId>java-jwt</artifactId>
<version>3.10.3</version>
</dependency>
<dependency>
<groupId>io.jsonwebtoken</groupId>
<artifactId>jjwt</artifactId>
<version>0.9.1</version>
</dependency>
<!-- ======END jwt ====== -->
<dependency>
<groupId>org.springframework.boot</groupId>
<artifactId>spring-boot-configuration-processor</artifactId>
<optional>true</optional>
</dependency>
</dependencies>
Swagger UI配置
在工程目录下,新建service->base->config->Myconfig.java(这里表示包的结构,下文有总的工程目录结构图。):1
2
3
4
5
6
7
8
9
10
11
12
13
14
15
16
17
18
19
20
21
22
23
24
25
26
27
28
29
30
31
32
33
34
35
36
37
38
39
40import org.springframework.context.annotation.Bean;
import org.springframework.context.annotation.Configuration;
import springfox.documentation.builders.ApiInfoBuilder;
import springfox.documentation.builders.PathSelectors;
import springfox.documentation.builders.RequestHandlerSelectors;
import springfox.documentation.service.ApiInfo;
import springfox.documentation.service.Contact;
import springfox.documentation.spi.DocumentationType;
import springfox.documentation.spring.web.plugins.Docket;
import springfox.documentation.swagger2.annotations.EnableSwagger2;
2
public class MyConfig {
//配置swagger2核心配置docket
//修改默认配置bean
public Docket myDocket(){
return new Docket(DocumentationType.SWAGGER_2) //指定API类型为swagger2
.apiInfo(apiInfo()) //用于定于api文档汇总信息
.select()
.apis(RequestHandlerSelectors
.basePackage("com.web.demo.service.controller")) //指定controller包
.paths(PathSelectors.any()) // 所有controller
.build();
}
private ApiInfo apiInfo(){
return new ApiInfoBuilder()
.title("Web前后端基础开发实战") // 文档页标题
.contact(new Contact("Cxx", // 联系人信息
"www.baidu.com",
"@email"))
.description("Web前后端基础开发实战") // 详细信息
.version("1.0.1") // 文档版本号
.termsOfServiceUrl("www.baidu.com") //网站地址
.build();
}
}
注意更改myDocket()的包扫描位置basePackage参数为实际的工程目录。
数据库连接配置
包扫描位置配置
在工程目录下,新建service->base->config->MybatisPlusConfig.java:1
2
3
4
5
6
7
8
9
10
11
12import com.baomidou.mybatisplus.extension.plugins.PaginationInterceptor;
import org.mybatis.spring.annotation.MapperScan;
import org.springframework.context.annotation.Bean;
import org.springframework.context.annotation.Configuration;
import org.springframework.transaction.annotation.EnableTransactionManagement;
("com.web.demo.service.mapper")
public class MybatisPlusConfig {
}
注意更改注解参数MapperScan为实际的工程目录。
自动填充字段插件
在工程目录下,新建service->base->handler->CommonMetaObjectHandler.java:1
2
3
4
5
6
7
8
9
10
11
12
13
14
15
16
17
18
19
20
21
22
23
24import com.baomidou.mybatisplus.core.handlers.MetaObjectHandler;
import lombok.extern.slf4j.Slf4j;
import org.apache.ibatis.reflection.MetaObject;
import org.springframework.stereotype.Component;
import java.util.Date;
4j
public class CommonMetaObjectHandler implements MetaObjectHandler {
public void insertFill(MetaObject metaObject) {
//log.info("start insert fill ....");
this.setFieldValByName("createTime", new Date(), metaObject);
this.setFieldValByName("updateTime", new Date(), metaObject);
}
public void updateFill(MetaObject metaObject) {
//log.info("start update fill ....");
this.setFieldValByName("updateTime", new Date(), metaObject);
}
}
yaml数据库连接配置
在工程文件中,删除原有的resources->application.properties文件,并新建application.yaml文件:1
2
3
4
5
6
7
8
9
10
11
12
13
14
15spring:
profiles:
active: dev # 环境设置
application:
name: web # 服务名
datasource: # mysql数据库连接
driver-class-name: com.mysql.cj.jdbc.Driver
url: jdbc:mysql://localhost:3306/web_demo?serverTimezone=GMT%2B8&useUnicode=true&characterEncoding=UTF-8
username: root
password:
#返回json的全局时间格式
#spring:
jackson:
time-zone: GMT+8
date-format: yyyy-MM-dd HH:mm:ss
注意更改这里的url地址、数据库名称、账号和密码。
拦截器配置
token生成
在工程文件夹下,新建service->utils-JWTUtil.java:1
2
3
4
5
6
7
8
9
10
11
12
13
14
15
16
17
18
19
20
21
22
23
24
25
26
27
28
29
30
31
32
33
34
35
36
37
38
39
40
41
42
43
44
45
46
47
48
49
50
51
52
53
54import com.auth0.jwt.JWT;
import com.auth0.jwt.JWTCreator;
import com.auth0.jwt.algorithms.Algorithm;
import com.auth0.jwt.interfaces.DecodedJWT;
import java.util.Calendar;
import java.util.Map;
public class JWTUtil {
// 私有签名
private static final String SING = "6Dx8SIuaHXJYnpsG18SSpjPs50lZcT52";
/*
* 生成token
*/
public static String getToken(Map<String, String> map){
String token = null;
Calendar instance = Calendar.getInstance();
// 默认7天过期
instance.add(Calendar.DATE, 7);
// 创建jwt builder
JWTCreator.Builder builder = JWT.create();
// 添加payload
map.forEach((k, v) -> {
builder.withClaim(k, v);
});
// 指定令牌过期时间
builder.withExpiresAt(instance.getTime());
// sign
token = builder.sign(Algorithm.HMAC256(SING));
return token;
}
/*
* 验证token
*/
public static void verify(String token) throws Exception{
JWT.require(Algorithm.HMAC256(SING)).build().verify(token);
}
/*
* 获取信息
*/
public static DecodedJWT getTokenInfo(String token) {
return JWT.require(Algorithm.HMAC256(SING)).build().verify(token);
}
}
拦截器配置
在工程文件夹下,新建service->interceptor-JwtInterceptor.java:1
2
3
4
5
6
7
8
9
10
11
12
13
14
15
16
17
18import org.springframework.web.servlet.handler.HandlerInterceptorAdapter;
import javax.servlet.http.HttpServletRequest;
import javax.servlet.http.HttpServletResponse;
// 拦截器,解决每个接口都需要token导致的代码冗余问题
public class JwtInterceptor extends HandlerInterceptorAdapter {
public boolean preHandle(HttpServletRequest request, HttpServletResponse response, Object handler) throws Exception {
// 获取请求头中的令牌
String token = request.getHeader("token");
// 验证令牌
JWTUtil.verify(token);
return true;
}
}
在工程文件夹下,新建service->base->config->WebConfig.java:1
2
3
4
5
6
7
8
9
10
11
12
13
14
15
16
17
18
19
20
21
22
23import org.springframework.context.annotation.Configuration;
import org.springframework.web.servlet.config.annotation.CorsRegistry;
import org.springframework.web.servlet.config.annotation.InterceptorRegistry;
import org.springframework.web.servlet.config.annotation.WebMvcConfigurer;
public class WebConfig implements WebMvcConfigurer {
//配置跨域请求
public void addCorsMappings(CorsRegistry registry) {
registry.addMapping("/**")
.allowedOrigins("*")
.allowedHeaders("*")
.allowedMethods("*");
}
// 拦截器
public void addInterceptors(InterceptorRegistry registry) {
registry.addInterceptor(new JwtInterceptor())
.addPathPatterns("/user-info/**") // 拦截的接口
.excludePathPatterns("/user-config/login"); // 登录接口
}
}
注意这里拦截器的路径为实际的controller接口地址。
统一返回值配置
在工程文件夹下,新建service->result->R.java:1
2
3
4
5
6
7
8
9
10
11
12
13
14
15
16
17
18
19
20
21
22
23
24
25
26
27
28
29
30
31
32
33
34
35
36
37
38
39
40
41
42
43
44
45
46
47
48
49
50
51
52
53
54
55
56
57
58
59
60
61
62
63
64
65
66
67
68
69
70
71
72
73
74
75
76
77
78
79
80
81
82
83
84
85
86
87
88
89
90
91
92
93
94
95
96
97
98
99
100
101
102
103
104
105
106import io.swagger.annotations.ApiModel;
import io.swagger.annotations.ApiModelProperty;
import lombok.Data;
import java.util.HashMap;
import java.util.Map;
(value = "全局统一返回结果")
public class R {
(value = "是否成功")
private Boolean success;
(value = "返回码")
private Integer code;
(value = "返回消息")
private String message;
(value = "返回数据")
private Map<String, Object> data = new HashMap<String, Object>();
public R(){}
public static R ok(){
R r = new R();
r.setSuccess(ResultCodeEnum.SUCCESS.getSuccess());
r.setCode(ResultCodeEnum.SUCCESS.getCode());
r.setMessage(ResultCodeEnum.SUCCESS.getMessage());
return r;
}
public static R error(){
R r = new R();
r.setSuccess(ResultCodeEnum.UNKNOWN_REASON.getSuccess());
r.setCode(ResultCodeEnum.UNKNOWN_REASON.getCode());
r.setMessage(ResultCodeEnum.UNKNOWN_REASON.getMessage());
return r;
}
public static R setResult(ResultCodeEnum resultCodeEnum){
R r = new R();
r.setSuccess(resultCodeEnum.getSuccess());
r.setCode(resultCodeEnum.getCode());
r.setMessage(resultCodeEnum.getMessage());
return r;
}
public R success(Boolean success){
this.setSuccess(success);
return this;
}
public R message(String message){
this.setMessage(message);
return this;
}
public Boolean getSuccess() {
return success;
}
public void setSuccess(Boolean success) {
this.success = success;
}
public Integer getCode() {
return code;
}
public void setCode(Integer code) {
this.code = code;
}
public String getMessage() {
return message;
}
public void setMessage(String message) {
this.message = message;
}
public Map<String, Object> getData() {
return data;
}
public void setData(Map<String, Object> data) {
this.data = data;
}
public R code(Integer code){
this.setCode(code);
return this;
}
public R data(String key, Object value){
this.data.put(key, value);
return this;
}
public R data(Map<String, Object> map){
this.setData(map);
return this;
}
}
在工程文件夹下,新建service->result->ResultCodeEnum.java:1
2
3
4
5
6
7
8
9
10
11
12
13
14
15
16
17
18
19
20
21
22
23
24
25
26
27
28
29
30
31
32
33
34
35
36
37
38
39
40
41
42
43
44
45
46
47
48
49
50
51
52import lombok.Getter;
import lombok.ToString;
public enum ResultCodeEnum {
SUCCESS(true, 20000,"成功"),
UNKNOWN_REASON(false, 20001, "未知错误"),
NullPointerException(false, 20001, "空对象错误"),
SQLSyntaxErrorException(false, 20001, "SQL语法错误"),
AlgorithmMismatchException(false, 20001, "token算法不一致错误"),
TokenExpiredException(false, 20001, "token过期错误"),
SignatureVerificationException(false, 20001, "签名认证错误"),
JWTDecodeException(false, 20001, "JWT解析错误");
private Boolean success;
private Integer code;
private String message;
public Boolean getSuccess() {
return success;
}
public void setSuccess(Boolean success) {
this.success = success;
}
public Integer getCode() {
return code;
}
public void setCode(Integer code) {
this.code = code;
}
public String getMessage() {
return message;
}
public void setMessage(String message) {
this.message = message;
}
ResultCodeEnum(Boolean success, Integer code, String message) {
this.success = success;
this.code = code;
this.message = message;
}
}
统一异常处理
在工程文件夹下,新建service->base->handler->GlobalExceptionHandler.java:1
2
3
4
5
6
7
8
9
10
11
12
13
14
15
16
17
18
19
20
21
22
23
24
25
26
27
28
29
30
31
32
33
34
35
36
37
38
39
40
41
42
43
44
45
46
47
48
49
50
51
52
53
54
55
56
57
58
59import com.auth0.jwt.exceptions.AlgorithmMismatchException;
import com.auth0.jwt.exceptions.JWTDecodeException;
import com.auth0.jwt.exceptions.SignatureVerificationException;
import com.auth0.jwt.exceptions.TokenExpiredException;
import org.springframework.web.bind.annotation.ControllerAdvice;
import org.springframework.web.bind.annotation.ExceptionHandler;
import org.springframework.web.bind.annotation.ResponseBody;
public class GlobalExceptionHandler {
(Exception.class)
@ResponseBody
public R error(Exception e){
// e.printStackTrace(); // 是否需要在终端显示错误信息
return R.setResult(ResultCodeEnum.UNKNOWN_REASON);
}
(NullPointerException.class)
@ResponseBody
public R error(NullPointerException e) {
// e.printStackTrace();
return R.setResult(ResultCodeEnum.NullPointerException);
}
(SQLSyntaxErrorException.class)
@ResponseBody
public R error(SQLSyntaxErrorException e) {
// e.printStackTrace();
return R.setResult(ResultCodeEnum.SQLSyntaxErrorException);
}
(JWTDecodeException.class)
@ResponseBody
public R error(JWTDecodeException e){
// e.printStackTrace();
return R.setResult(ResultCodeEnum.JWTDecodeException);
}
(SignatureVerificationException.class)
@ResponseBody
public R error(SignatureVerificationException e){
//e.printStackTrace();
return R.setResult(ResultCodeEnum.SignatureVerificationException);
}
(TokenExpiredException.class)
@ResponseBody
public R error(TokenExpiredException e){
//e.printStackTrace();
return R.setResult(ResultCodeEnum.TokenExpiredException);
}
(AlgorithmMismatchException.class)
@ResponseBody
public R error(AlgorithmMismatchException e){
//e.printStackTrace();
return R.setResult(ResultCodeEnum.AlgorithmMismatchException);
}
}
这里返回值中的常量为之前ResultCodeEnum类中定义好的,可以根据实际项目需求添加自定义异常处理。
统一日志处理
首先安装IDEA彩色日志插件:grep console。
在resources目录新建logback-spring.xml(只能是这个名字):1
2
3
4
5
6
7
8
9
10
11
12
13
14
15
16
17
18
19
20
21
22
23
24
25
26
27
28
29
30
31
32
33
34
35
36
37
38
39
40
41
42
43
44
45
46
47
48
49
50
51
52
53
54
55
56
57
58
59
60
61
62
63
64
65
66
67
68
69
70
71
72
73
74
75
76
77
78
79
80
81
82
83
84
85
86
87
88
89
90
91
92
93
94
95
96
97
98
99
100
101
102
103
104
105
106
107
108
109
110
111
112
113
114
115
116
117
118
119
120
121
122
123
124
125
126
127
128
129
130
131
<configuration scan="true" scanPeriod="10 seconds">
<contextName>logback</contextName>
<property name="log.path" value="D:/Cxx/SpringbootProjects/web_end_demo/log" />
<!--控制台日志格式:彩色日志-->
<!-- magenta:洋红 -->
<!-- boldMagenta:粗红-->
<!-- cyan:青色 -->
<!-- white:白色 -->
<!-- magenta:洋红 -->
<property name="CONSOLE_LOG_PATTERN"
value="%yellow(%date{yyyy-MM-dd HH:mm:ss}) |%highlight(%-5level) |%blue(%thread) |%blue(%file:%line) |%green(%logger) |%cyan(%msg%n)"/>
<!--文件日志格式-->
<property name="FILE_LOG_PATTERN"
value="%date{yyyy-MM-dd HH:mm:ss} |%-5level |%thread |%file:%line |%logger |%msg%n" />
<!--编码-->
<property name="ENCODING"
value="UTF-8" />
<!--输出到控制台-->
<appender name="CONSOLE" class="ch.qos.logback.core.ConsoleAppender">
<filter class="ch.qos.logback.classic.filter.ThresholdFilter">
<!--日志级别-->
<level>DEBUG</level>
</filter>
<encoder>
<!--日志格式-->
<Pattern>${CONSOLE_LOG_PATTERN}</Pattern>
<!--日志字符集-->
<charset>${ENCODING}</charset>
</encoder>
</appender>
<!--输出到文件-->
<appender name="INFO_FILE" class="ch.qos.logback.core.rolling.RollingFileAppender">
<!--日志过滤器:此日志文件只记录INFO级别的-->
<filter class="ch.qos.logback.classic.filter.LevelFilter">
<level>INFO</level>
<onMatch>ACCEPT</onMatch>
<onMismatch>DENY</onMismatch>
</filter>
<!-- 正在记录的日志文件的路径及文件名 -->
<file>${log.path}/log_info.log</file>
<encoder>
<pattern>${FILE_LOG_PATTERN}</pattern>
<charset>${ENCODING}</charset>
</encoder>
<!-- 日志记录器的滚动策略,按日期,按大小记录 -->
<rollingPolicy class="ch.qos.logback.core.rolling.TimeBasedRollingPolicy">
<!-- 每天日志归档路径以及格式 -->
<fileNamePattern>${log.path}/info/log-info-%d{yyyy-MM-dd}.%i.log</fileNamePattern>
<timeBasedFileNamingAndTriggeringPolicy class="ch.qos.logback.core.rolling.SizeAndTimeBasedFNATP">
<maxFileSize>500MB</maxFileSize>
</timeBasedFileNamingAndTriggeringPolicy>
<!--日志文件保留天数-->
<maxHistory>15</maxHistory>
</rollingPolicy>
</appender>
<appender name="WARN_FILE" class="ch.qos.logback.core.rolling.RollingFileAppender">
<!-- 日志过滤器:此日志文件只记录WARN级别的 -->
<filter class="ch.qos.logback.classic.filter.LevelFilter">
<level>WARN</level>
<onMatch>ACCEPT</onMatch>
<onMismatch>DENY</onMismatch>
</filter>
<!-- 正在记录的日志文件的路径及文件名 -->
<file>${log.path}/log_warn.log</file>
<encoder>
<pattern>${FILE_LOG_PATTERN}</pattern>
<charset>${ENCODING}</charset> <!-- 此处设置字符集 -->
</encoder>
<!-- 日志记录器的滚动策略,按日期,按大小记录 -->
<rollingPolicy class="ch.qos.logback.core.rolling.TimeBasedRollingPolicy">
<fileNamePattern>${log.path}/warn/log-warn-%d{yyyy-MM-dd}.%i.log</fileNamePattern>
<timeBasedFileNamingAndTriggeringPolicy class="ch.qos.logback.core.rolling.SizeAndTimeBasedFNATP">
<maxFileSize>100MB</maxFileSize>
</timeBasedFileNamingAndTriggeringPolicy>
<!--日志文件保留天数-->
<maxHistory>15</maxHistory>
</rollingPolicy>
</appender>
<appender name="ERROR_FILE" class="ch.qos.logback.core.rolling.RollingFileAppender">
<!-- 日志过滤器:此日志文件只记录ERROR级别的 -->
<filter class="ch.qos.logback.classic.filter.LevelFilter">
<level>ERROR</level>
<onMatch>ACCEPT</onMatch>
<onMismatch>DENY</onMismatch>
</filter>
<!-- 正在记录的日志文件的路径及文件名 -->
<file>${log.path}/log_error.log</file>
<encoder>
<pattern>${FILE_LOG_PATTERN}</pattern>
<charset>${ENCODING}</charset> <!-- 此处设置字符集 -->
</encoder>
<!-- 日志记录器的滚动策略,按日期,按大小记录 -->
<rollingPolicy class="ch.qos.logback.core.rolling.TimeBasedRollingPolicy">
<fileNamePattern>${log.path}/error/log-error-%d{yyyy-MM-dd}.%i.log</fileNamePattern>
<timeBasedFileNamingAndTriggeringPolicy class="ch.qos.logback.core.rolling.SizeAndTimeBasedFNATP">
<maxFileSize>100MB</maxFileSize>
</timeBasedFileNamingAndTriggeringPolicy>
<!--日志文件保留天数-->
<maxHistory>15</maxHistory>
</rollingPolicy>
</appender>
<!--开发环境-->
<springProfile name="dev">
<!--可以灵活设置此处,从而控制日志的输出-->
<root level="INFO">
<appender-ref ref="CONSOLE" />
<appender-ref ref="INFO_FILE" />
<appender-ref ref="WARN_FILE" />
<appender-ref ref="ERROR_FILE" />
</root>
</springProfile>
<!--生产环境-->
<springProfile name="pro">
<root level="ERROR">
<appender-ref ref="ERROR_FILE" />
</root>
</springProfile>
</configuration>
注意更改这里的log.path路径。
在使用时,在类上面加上注解@Slf4j,然后在相应位置加上log.error("***");或者log.info("***");即可。
如果需要打印出完整的错误信息,需要重写一个错误类,在utils包中新建ExceptionUtil.java:1
2
3
4
5
6
7
8
9
10
11
12
13
14
15
16
17
18
19
20
21
22
23
24
25
26
27
28
29
30
31
32
33import java.io.IOException;
import java.io.PrintWriter;
import java.io.StringWriter;
public class ExceptionUtil {
public static String getMessage(Exception e) {
StringWriter sw = null;
PrintWriter pw = null;
try {
sw = new StringWriter();
pw = new PrintWriter(sw);
// 将出错的栈信息输出到printWriter中
e.printStackTrace(pw);
pw.flush();
sw.flush();
} finally {
if (sw != null) {
try {
sw.close();
} catch (IOException e1) {
e1.printStackTrace();
}
}
if (pw != null) {
pw.close();
}
}
return sw.toString();
}
}
然后在需要的地方加上打印信息:log.error(ExceptionUtil.getMessage(e));。
启动程序,即可在相应的日志文件夹中看到输出的日志文件。
项目配置文件结构
最终的项目文件结构如图所示: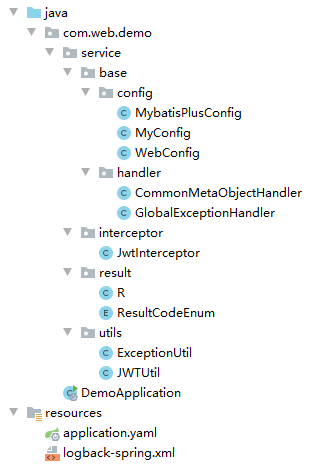
代码生成器
这里使用MyBatis-Plus的代码生成器,通过 AutoGenerator可以快速生成Entity、Mapper、Mapper XML、Service、Controller等各个模块的代码。
Entity为实体类,存放基本的数据定义,Mapper为数据库操作,Service为后端主要逻辑实现,Controller主要提供前端界面的接口。
在工程文件夹下的test目录下面新建CodeGenerator.java文件:1
2
3
4
5
6
7
8
9
10
11
12
13
14
15
16
17
18
19
20
21
22
23
24
25
26
27
28
29
30
31
32
33
34
35
36
37
38
39
40
41
42
43
44
45
46
47
48
49
50
51
52
53
54
55
56
57
58
59
60
61
62
63
64
65
66
67
68
69
70
71
72
73
74
75
76
77
78
79
80
81
82
83
84
85
86
87import com.baomidou.mybatisplus.annotation.DbType;
import com.baomidou.mybatisplus.annotation.FieldFill;
import com.baomidou.mybatisplus.annotation.IdType;
import com.baomidou.mybatisplus.generator.AutoGenerator;
import com.baomidou.mybatisplus.generator.config.DataSourceConfig;
import com.baomidou.mybatisplus.generator.config.GlobalConfig;
import com.baomidou.mybatisplus.generator.config.PackageConfig;
import com.baomidou.mybatisplus.generator.config.StrategyConfig;
import com.baomidou.mybatisplus.generator.config.po.TableFill;
import com.baomidou.mybatisplus.generator.config.rules.DateType;
import com.baomidou.mybatisplus.generator.config.rules.NamingStrategy;
import org.junit.jupiter.api.Test;
import java.util.ArrayList;
public class CodeGenerator {
public void genCode() {
// 执行时 需要删除之前生成的 com包
String prefix = "web_demo"; // 数据表的名字
//String moduleName = "edu";
// 1、创建代码生成器
AutoGenerator mpg = new AutoGenerator();
// 2、全局配置
// 生成文件的路径
GlobalConfig gc = new GlobalConfig();
String projectPath = System.getProperty("user.dir");
gc.setOutputDir(projectPath + "/src/main/java");
gc.setAuthor("Cxx");
gc.setOpen(false); //生成后是否打开资源管理器
gc.setFileOverride(true); //重新生成时文件是否覆盖
gc.setServiceName("%sService"); //去掉Service接口的首字母I
gc.setIdType(IdType.ASSIGN_ID); //主键策略
gc.setDateType(DateType.ONLY_DATE);//定义生成的实体类中日期类型
gc.setSwagger2(true);//开启Swagger2模式
mpg.setGlobalConfig(gc);
// 3、数据源配置
DataSourceConfig dsc = new DataSourceConfig();
//dsc.setUrl("jdbc:mysql://localhost:3306/" + prefix + "guli_" + moduleName + "?serverTimezone=GMT%2B8");
dsc.setUrl("jdbc:mysql://localhost:3306/" + prefix + "?serverTimezone=GMT%2B8");
dsc.setDriverName("com.mysql.cj.jdbc.Driver");
dsc.setUsername("root");
dsc.setPassword("");
dsc.setDbType(DbType.MYSQL);
mpg.setDataSource(dsc);
// 4、包配置
PackageConfig pc = new PackageConfig();
//pc.setModuleName(moduleName); //模块名
pc.setParent("com.web.demo.service");
pc.setController("controller");
pc.setEntity("entity");
pc.setService("service");
pc.setMapper("mapper");
mpg.setPackageInfo(pc);
// 5、策略配置
StrategyConfig strategy = new StrategyConfig();
strategy.setNaming(NamingStrategy.underline_to_camel);//数据库表映射到实体的命名策略
//strategy.setTablePrefix(moduleName + "_");//设置表前缀不生成
strategy.setColumnNaming(NamingStrategy.underline_to_camel);//数据库表字段映射到实体的命名策略
strategy.setEntityLombokModel(true); // lombok 模型 @Accessors(chain = true) setter链式操作
//strategy.setLogicDeleteFieldName("is_deleted");//逻辑删除字段名
//strategy.setEntityBooleanColumnRemoveIsPrefix(true);//去掉布尔值的is_前缀
//自动填充
TableFill createTime = new TableFill("create_time", FieldFill.INSERT);
TableFill updateTime = new TableFill("update_time", FieldFill.INSERT_UPDATE);
ArrayList<TableFill> tableFills = new ArrayList<>();
tableFills.add(createTime);
tableFills.add(updateTime);
strategy.setTableFillList(tableFills);
// controller控制层 换成restcontroller 即返回值都是Json格式的
strategy.setRestControllerStyle(true); //restful api风格控制器
strategy.setControllerMappingHyphenStyle(true); //url中驼峰转连字符
mpg.setStrategy(strategy);
// 6、执行
mpg.execute();
}
}
注意更改相应的数据库和包位置信息。
右击选择run'genCode()'即可。
这里还需要在IDEA中安装lombok插件。并在所有生成的Mapper接口类中增加@Repository注解。
数据库CURD实现
这里只根据Mybatic-plus提供的数据库接口实现简单的增删改查操作,仅供参考。如需复杂的数据库操作,可参考官网案例。MyBatis-Plus
UserInfoController.java:1
2
3
4
5
6
7
8
9
10
11
12
13
14
15
16
17
18
19
20
21
22
23
24
25
26
27
28
29
30
31
32
33
34
35
36
37
38
39
40
41
42
43
44
45
46
47
48
49
50
51
52
53
54
55
56
57
58
59
60
61
62
63
64
65
66
67
68
69
70
71
72
73
74
75
76
77
78
79
80
81
82
83
84
85
86
87
88
89
90
91
92
93
94
95
96
97
98
99
100
101
102
103
104
105
106
107
108
109
110
111
112
113
114
115
116
117
118
119
120
121
122
123
124
125
126
127
128
129
130
131
("/user-info")
public class UserInfoController {
private UserInfoService userInfoService;
private UserInfoMapper userInfoMapper;
("所有用户信息列表")
("listAll")
public R listAll(){
List<UserInfo> userInfoList = userInfoService.list();
return R.ok().data("userInfoList", userInfoList);
}
// Swagger-ui测试接口
("注册用户信息")
("register")
public R register(@ApiParam(value = "用户信息", required = true) @RequestBody UserInfo userInfo){
String name = userInfo.getName();
Integer age = userInfo.getAge();
if(name == null || name.length() == 0 || age == null){
return R.error().message("请输入正确的用户信息");
}
HashMap<String, Object> map = new HashMap<>();
map.put("name", name);
List<UserInfo> userInfoList = userInfoMapper.selectByMap(map);
if(userInfoList.size() != 0){
return R.error().message("用户已存在");
}else{
boolean result = userInfoService.save(userInfo);
if (result) {
return R.ok().message("注册成功");
} else {
return R.error().message("注册失败");
}
}
}
// Postman测试接口
("注册用户信息")
(value = "register2", method = RequestMethod.POST)
public R register2(UserInfo userInfo){
String name = userInfo.getName();
Integer age = userInfo.getAge();
if(name == null || name.length() == 0 || age == null){
return R.error().message("请输入正确的用户信息");
}
HashMap<String, Object> map = new HashMap<>();
map.put("name", name);
List<UserInfo> userInfoList = userInfoMapper.selectByMap(map);
if(userInfoList.size() != 0){
return R.error().message("用户已存在");
}else{
boolean result = userInfoService.save(userInfo);
if (result) {
return R.ok().message("注册成功");
} else {
return R.error().message("注册失败");
}
}
}
// Swagger-ui测试接口
("根据姓名查询用户信息")
("get-userInfo-byName/{name}")
public R getUserInfoByName(@ApiParam(value = "姓名", required = true) @PathVariable String name) {
Map<String, Object> map = new HashMap<>();
map.put("name", name);
List<UserInfo> userInfoList = userInfoMapper.selectByMap(map);
if (userInfoList.size() == 0) {
return R.error().message("查询失败,没有该用户信息");
}else {
return R.ok().data("userInfoList", userInfoList);
}
}
// Postman测试接口
("根据姓名查询用户信息")
(value = "get-userInfo-byName", method = RequestMethod.GET)
public R getUserInfoByName2(String name){
Map<String, Object> map = new HashMap<>();
map.put("name", name);
List<UserInfo> userInfoList = userInfoMapper.selectByMap(map);
if (userInfoList.size() == 0) {
return R.error().message("查询失败,没有该用户信息");
}else {
return R.ok().data("userInfoList", userInfoList);
}
}
("根据用户姓名删除用户信息")
("delete-userInfo-byName/{name}")
public R deleteUserInfoByName(@ApiParam(value = "姓名", required = true) @PathVariable String name) {
Map<String,Object> map = new HashMap<>();
map.put("name", name);
int rows = userInfoMapper.deleteByMap(map);
if(rows == 0){
return R.error().message("该用户名不存在");
}else {
return R.ok().message("删除成功");
}
}
("根据姓名更新用户信息")
("update-userInfo-byName/{name}")
public R updateUserInfoByName(@ApiParam(value = "姓名", required = true) @PathVariable String name,
@ApiParam(value = "用户信息", required = true) @RequestBody UserInfo userInfo) {
UpdateWrapper<UserInfo> userInfoUpdateWrapper = new UpdateWrapper<>();
userInfoUpdateWrapper.eq("name", name);
int row = userInfoMapper.update(userInfo, userInfoUpdateWrapper);
if(row == 0){
return R.error().message("用户名不存在");
}else {
return R.ok().message("修改成功");
}
}
}
这里提供两种写法,主要用于Swagger-ui和Postman两种测试工具的使用。
UserConfigController.java1
2
3
4
5
6
7
8
9
10
11
12
13
14
15
16
17
18
19
20
21
22
23
24
25
26
27
28
29
30
31
32
33
34
35
36
37
38
39
40
41
42
43
44
45
46
47
48
49
50
51
52
53
54
55
56
57
58
59
60
61
62
63
64
65
66
67
68
69
70
71
72
73
74
75
76
77
78
79
80
81
82
83
84
85
86
87
("/user-config")
public class UserConfigController {
private UserConfigService userConfigService;
private UserConfigMapper userConfigMapper;
// Swagger-ui测试接口
("登录")
("/login/{username}/{password}")
public R login(@ApiParam(value = "用户名", required = true) @PathVariable String username,
@ApiParam(value = "密码", required = true) @PathVariable String password){
HashMap<String, Object> map = new HashMap<>();
map.put("username", username);
List<UserConfig> userConfigList = userConfigMapper.selectByMap(map);
if(userConfigList.size() == 0){
return R.error().message("用户不存在");
}else{
String truePassword = userConfigList.get(0).getPassword();
if(password.equals(truePassword)){
HashMap<String, String> tokenMap = new HashMap<>();
map.put("username", username);
return R.ok().data("token", JWTUtil.getToken(tokenMap));
}else {
return R.error().message("密码错误");
}
}
}
// Postman测试接口
("登录")
(value = "login", method = RequestMethod.POST)
public R login2(String username, String password){
HashMap<String, Object> map = new HashMap<>();
map.put("username", username);
List<UserConfig> userConfigList = userConfigMapper.selectByMap(map);
if(userConfigList.size() == 0){
return R.error().message("用户不存在");
}else{
String truePassword = userConfigList.get(0).getPassword();
if(password.equals(truePassword)){
HashMap<String, String> tokenMap = new HashMap<>();
map.put("username", username);
return R.ok().data("token", JWTUtil.getToken(tokenMap));
}else {
return R.error().message("密码错误");
}
}
}
("所有用户配置信息列表")
(value = "listAll", method = RequestMethod.GET)
public R listAll(){
List<UserConfig> userConfigList = userConfigService.list();
return R.ok().data("userConfigList", userConfigList);
}
("注册用户配置信息")
("register")
public R register(@ApiParam(value = "用户信息", required = true) @RequestBody UserConfig userConfig){
String username = userConfig.getUsername();
String password = userConfig.getPassword();
if(username == null || username.length() == 0 || password == null || password.length() == 0){
return R.error().message("请输入正确的用户信息");
}
HashMap<String, Object> map = new HashMap<>();
map.put("username", username);
List<UserConfig> userConfigList = userConfigMapper.selectByMap(map);
if(userConfigList.size() != 0){
return R.error().message("用户已存在");
}else{
boolean result = userConfigService.save(userConfig);
if (result) {
return R.ok().message("注册成功");
} else {
return R.error().message("注册失败");
}
}
}
}
注:这里加了拦截器功能,部分接口在测试时,需要在Headers中提供有效的token。(建议使用Postman测试)
Web前端
这里主要采用目前比较成熟的一个web后台前端解决方案vue-element-admin。本项目主要使用的是其基础模板vue-admin-template。
环境配置
根据官网文档提示,依次输入指令,配置环境。1
2
3
4
5
6
7
8
9
10
11# clone the project
git clone https://github.com/PanJiaChen/vue-admin-template.git
# enter the project directory
cd vue-admin-template
# install dependency
npm install
# develop
npm run dev
更改项目标题名称
在src->settring.js文件中,修改title参数值。
前后端配置
关闭警告提示
在.eslintrc.js中屏蔽ESlint的定义未使用的警告提示:1
"no-unused-vars": 0
关闭Mock虚拟数据
在src->main.js中,注释掉以下内容:1
2
3
4// if (process.env.NODE_ENV === 'production') {
// const { mockXHR } = require('../mock')
// mockXHR()
// }
配置后端接口
在.env.development文件中,将VUE_APP_BASE_API参数更改为自己的后端接口地址,如:http://127.0.0.1:8080
更改后端字段信息
打开src->utils->request.js文件,更改相应的前后端字段信息。
其中request部分主要为token字段信息:1
2// 更改为自己的token参数值
config.headers['token'] = getToken()
response部分需要修改的主要为后端提供的返回值格式和code值的含义信息等。
该文件也是前后端交互的一个重要配置文件,所有的request和response均在这里处理。
这里已经配置了错误信息的Message提示,在处理业务层逻辑时,如无特殊需求,可以不用考虑错误处理。
更改api后端接口
在src->api文件中,每个数据表对应一个js文件,并在每个js文件中将参数设置为自己的实际后端接口。(注意data和params的区别。get/post请求params/data传参总结)
这里也是实际的业务逻辑功能处理,这里仅根据上文提供的后端接口编写部分测试功能,仅供参考。
业务逻辑处理
user.js
1 | import request from '@/utils/request' |
这里主要提供了登录、登出和获取信息的功能接口,其中由于本案例后端提供的登录接口需要的参数格式为(String String),因此这里的前端接口也需要做相应的更改。
在src->store->modules->user.js中修改登录接口:1
2
3
4
5
6
7
8
9
10
11
12
13
14
15
16
17
18// user login
login({ commit }, userInfo) {
const { username, password } = userInfo
return new Promise((resolve, reject) => {
// .trim() 删除多余空格
// 调用api中的user.js
// login({ username: username.trim(), password: password }).then(response => {
login(username.trim(), password).then(response => {
const { data } = response
commit('SET_TOKEN', data.token)
// 存储token
setToken(data.token)
resolve()
}).catch(error => {
reject(error)
})
})
},
这里也需要在后端增加登出接口:
UserConfigController.java1
2
3
4
5("退出登录")
(value = "logout", method = RequestMethod.POST)
public R logout(){
return R.ok().message("退出成功");
}
user_info.js
1 | import request from '@/utils/request' |
注意这里的url、method和params/data参数的格式。
路由配置
这里只是功能测试,可以先暂时注释掉不需要的路由。
src->router->index.js1
2
3
4
5
6
7
8
9
10
11
12
13
14
15
16
17
18
19
20
21
22
23
24
25
26
27
28
29
30
31
32
33
34
35
36
37
38
39
40
41
42
43
44
45
46
47
48
49
50
51
52
53
54
55
56
57import Vue from 'vue'
import Router from 'vue-router'
Vue.use(Router)
/* Layout */
import Layout from '@/layout'
/**
* constantRoutes
* a base page that does not have permission requirements
* all roles can be accessed
*/
export const constantRoutes = [
{
path: '/login',
component: () => import('@/views/login/index'),
hidden: true
},
{
path: '/404',
component: () => import('@/views/404'),
hidden: true
},
{
path: '/',
component: Layout,
redirect: '/dashboard',
children: [{
path: 'dashboard',
name: 'Dashboard',
component: () => import('@/views/dashboard/index'),
meta: { title: 'Dashboard', icon: 'dashboard' }
}]
},
// 404 page must be placed at the end !!!
{ path: '*', redirect: '/404', hidden: true }
]
const createRouter = () => new Router({
// mode: 'history', // require service support
scrollBehavior: () => ({ y: 0 }),
routes: constantRoutes
})
const router = createRouter()
// Detail see: https://github.com/vuejs/vue-router/issues/1234#issuecomment-357941465
export function resetRouter() {
const newRouter = createRouter()
router.matcher = newRouter.matcher // reset router
}
export default router
仅保留登录、404页面和dashboard路由。
前端界面编写
登录界面
src->views->login->index.vue1
2
3
4
5
6
7
8
9
10
11
12
13
14
15
16
17
18
19
20
21
22
23
24
25
26
27
28
29
30
31
32
33
34
35
36
37
38
39
40
41
42
43
44
45
46
47
48
49
50
51
52
53
54
55
56
57
58
59
60
61
62
63
64
65
66
67
68
69
70
71
72
73
74
75
76
77
78
79
80
81
82
83
84
85
86
87
88
89
90
91
92
93
94
95
96
97
98
99
100
101
102
103
104
105
106
107
108
109
110
111
112
113
114
115
116
117
118
119
120
121
122
123
124
125
126
127
128
129
130
131
132
133
134
135
136
137
138
139
140
141
142
143
144
145
146
147
148
149
150
151
152
153
154
155
156
157
158
159
160
161
162
163
164
165
166
167
168
169
170
171
172
173
174
175
176
177
178
179
180
181
182
183
184
185
186
187
188
189
190
191
192
193
194
195
196
197
198
199
200
201
202
203
204
205
206
207
208
209
210
211
212
213
214
215
216
217
218
219
220
221
222
223
224
225
226
227
228
229
230
231
232
233
234
235
236
237
238
239
240
241
242
243
244
245
246
247
248
249
250
251
252
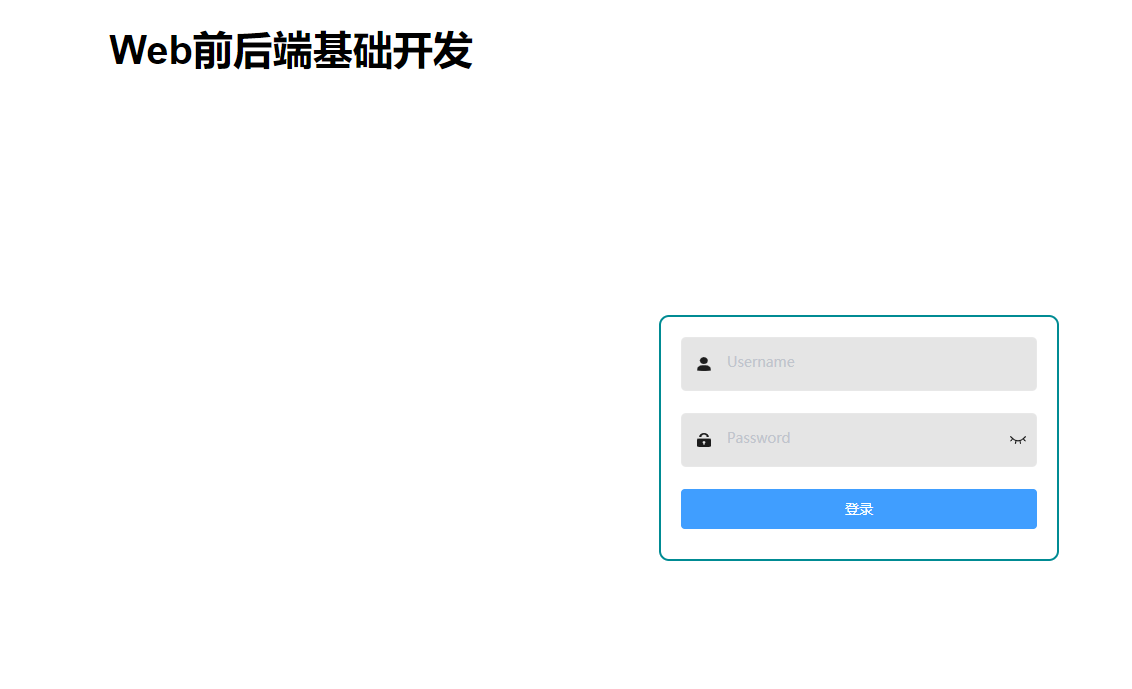
253<template>
<div class="login-container">
<div class="title-container">
<h3 class="title">Web前后端基础开发</h3>
</div>
<el-form ref="loginForm" :model="loginForm" :rules="loginRules" class="login-form" auto-complete="on" label-position="left">
<el-form-item prop="username">
<span class="svg-container">
<svg-icon icon-class="user" />
</span>
<el-input
ref="username"
v-model="loginForm.username"
placeholder="Username"
name="username"
type="text"
tabindex="1"
auto-complete="on"
/>
</el-form-item>
<el-form-item prop="password">
<span class="svg-container">
<svg-icon icon-class="password" />
</span>
<el-input
:key="passwordType"
ref="password"
v-model="loginForm.password"
:type="passwordType"
placeholder="Password"
name="password"
tabindex="2"
auto-complete="on"
@keyup.enter.native="handleLogin"
/>
<span class="show-pwd" @click="showPwd">
<svg-icon :icon-class="passwordType === 'password' ? 'eye' : 'eye-open'" />
</span>
</el-form-item>
<el-button
:loading="loading"
type="primary"
style="width:100%;margin-bottom:30px;"
@click.native.prevent="handleLogin"
>登录</el-button>
<!-- <div class="tips">
<span style="margin-right:20px;">username: admin</span>
<span> password: any</span>
</div> -->
</el-form>
</div>
</template>
<script>
import { validUsername } from '@/utils/validate'
export default {
name: 'Login',
data() {
const validateUsername = (rule, value, callback) => {
if (value.length < 1) {
callback(new Error('请输入用户名'))
} else {
callback()
}
}
const validatePassword = (rule, value, callback) => {
if (value.length < 1) {
callback(new Error('请输入密码'))
} else {
callback()
}
}
return {
loginForm: {
username: '',
password: ''
},
loginRules: {
username: [{ required: true, trigger: 'blur', validator: validateUsername }],
password: [{ required: true, trigger: 'blur', validator: validatePassword }]
},
loading: false,
passwordType: 'password',
redirect: undefined
}
},
watch: {
$route: {
handler: function(route) {
this.redirect = route.query && route.query.redirect
},
immediate: true
}
},
methods: {
showPwd() {
if (this.passwordType === 'password') {
this.passwordType = ''
} else {
this.passwordType = 'password'
}
this.$nextTick(() => {
this.$refs.password.focus()
})
},
handleLogin() {
this.$refs.loginForm.validate(valid => {
if (valid) {
this.loading = true
// 调用store中的user.js
this.$store.dispatch('user/login', this.loginForm).then(() => {
this.$message.success('登录成功!')
this.$router.push({ path: this.redirect || '/' })
this.loading = false
}).catch(() => {
this.loading = false
})
} else {
this.$message.error('提交失败,请检查用户名和密码!')
return false
}
})
}
}
}
</script>
<style lang="scss">
/* 修复input 背景不协调 和光标变色 */
/* Detail see https://github.com/PanJiaChen/vue-element-admin/pull/927 */
$bg:#283443;
$light_gray:#fff;
$cursor: #fff;
$dark_black: #1C1C1C;
@supports (-webkit-mask: none) and (not (cater-color: $cursor)) {
.login-container .el-input input {
color: $cursor;
}
}
/* reset element-ui css */
.login-container {
.el-input {
display: inline-block;
height: 47px;
width: 85%;
input {
background: transparent;
border: 0px;
-webkit-appearance: none;
border-radius: 0px;
padding: 12px 5px 12px 15px;
color: $dark_black;
height: 47px;
caret-color: $cursor;
&:-webkit-autofill {
box-shadow: 0 0 0px 1000px $bg inset !important;
-webkit-text-fill-color: $cursor !important;
}
}
}
.el-form-item {
border: 1px solid rgba(255, 255, 255, 0.1);
background: rgba(0, 0, 0, 0.1);
border-radius: 5px;
color: #454545;
}
}
</style>
<style lang="scss" scoped>
$bg:#2d3a4b;
$dark_gray:#889aa4;
$light_gray:#eee;
$dark_black: #1C1C1C;
.login-container {
min-height: 100%;
width: 100%;
overflow: hidden;
// background-color: #E8E8E8;
background-color: white;
.login-form {
position:absolute;
right:10%;
top:35%;
width: 400px;
max-width: 100%;
padding: 20px 20px 0;
margin: 0 auto;
overflow: hidden;
border-radius: 10px;
border: 2px solid #008B93;
}
.tips {
font-size: 14px;
color: $dark_black;
margin-bottom: 10px;
span {
&:first-of-type {
margin-right: 16px;
}
}
}
.svg-container {
padding: 6px 5px 6px 15px;
color: $dark_black;
vertical-align: middle;
width: 30px;
display: inline-block;
}
.title-container {
position: relative;
margin-top: 40px;
.title {
font-size: 40px;
color: #000000;
margin: 0px auto 40px auto;
text-align: center;
font-weight: bold;
}
}
.show-pwd {
position: absolute;
right: 10px;
top: 7px;
font-size: 16px;
color: $dark_black;
cursor: pointer;
user-select: none;
}
}
</style>
数据库CURD业务逻辑处理
src->views->dashboard->index.vue1
2
3
4
5
6
7
8
9
10
11
12
13
14
15
16
17
18
19
20
21
22
23
24
25
26
27
28
29
30
31
32
33
34
35
36
37
38
39
40
41
42
43
44
45
46
47
48
49
50
51
52
53
54
55
56
57
58
59
60
61
62
63
64
65
66
67
68
69
70
71
72
73
74
75
76
77
78
79
80
81
82
83
84
85
86
87
88
89
90
91
92
93
94
95
96
97
98
99
100
101
102
103
104
105
106
107
108
109
110
111
112
113
114
115
116
117
118
119
120
121
122
123
124
125
126
127
128
129
130
131
132
133
134
135
136
137
138
139
140
141
142
143
144
145
146
147
148
149
150
151
152
153
154
155
156
157
158
159
160
161
162
163
164
165
166
167
168
169
170
171
172
173
174
175
176
177
178
179
180
181
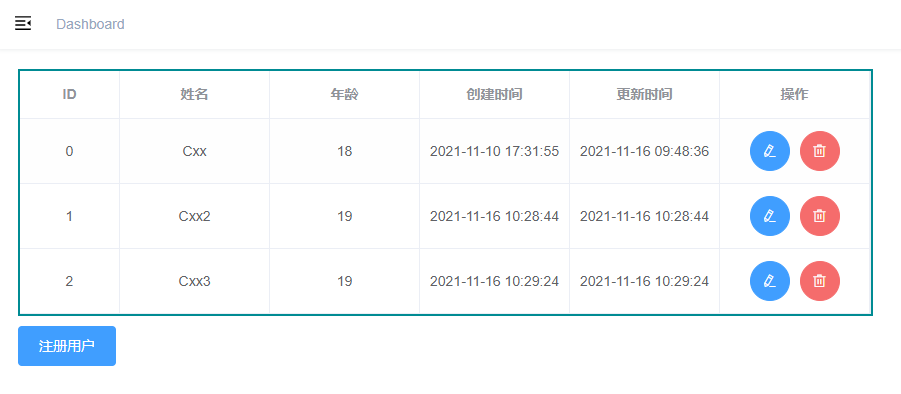
182<template>
<div class="app-container">
<div class="div-table">
<el-table
v-loading="listLoading"
:data="list"
style="width:855px"
element-loading-text="Loading"
border
fit
highlight-current-row
>
<el-table-column align="center" label="ID" width="100">
<template slot-scope="scope">
{{ scope.$index }}
</template>
</el-table-column>
<el-table-column label="姓名" width="150" align="center">
<template slot-scope="scope">
{{ scope.row.name }}
</template>
</el-table-column>
<el-table-column label="年龄" width="150" align="center">
<template slot-scope="scope">
<span>{{ scope.row.age }}</span>
</template>
</el-table-column>
<el-table-column label="创建时间" width="150" align="center">
<template slot-scope="scope">
<span>{{ scope.row.createTime }}</span>
</template>
</el-table-column>
<el-table-column label="更新时间" width="150" align="center">
<template slot-scope="scope">
<span>{{ scope.row.updateTime }}</span>
</template>
</el-table-column>
<el-table-column label="操作" width="150" align="center">
<template slot-scope="scope">
<el-button
type="primary"
icon="el-icon-edit"
circle
@click="handleEdit(scope.$index, scope.row)"
/>
<el-button
type="danger"
icon="el-icon-delete"
circle
@click="handleDelete(scope.$index, scope.row)"
/>
</template>
</el-table-column>
</el-table>
<el-dialog title="用户信息" :visible.sync="dialogUpdateUserInfoFormVisible">
<el-form :model="userInfo">
<el-form-item label="姓名" label-width="120px">
<el-input v-model="userInfo.name" autocomplete="off" :disabled="true" />
</el-form-item>
<el-form-item label="年龄" label-width="120px">
<el-input v-model="userInfo.age" autocomplete="off" />
</el-form-item>
</el-form>
<div slot="footer" class="dialog-footer">
<el-button @click="dialogUpdateUserInfoFormVisible = false">取 消</el-button>
<el-button type="primary" @click="updateUserInfo()">确 定</el-button>
</div>
</el-dialog>
</div>
<div>
<el-button type="primary" style="margin-top:10px" @click="handleRegister">注册用户</el-button>
<el-dialog title="用户信息" :visible.sync="dialogRegisterUserInfoFormVisible">
<el-form :model="userInfo">
<el-form-item label="姓名" label-width="120px">
<el-input v-model="userInfo.name" autocomplete="off" />
</el-form-item>
<el-form-item label="年龄" label-width="120px">
<el-input v-model="userInfo.age" autocomplete="off" />
</el-form-item>
</el-form>
<div slot="footer" class="dialog-footer">
<el-button @click="dialogRegisterUserInfoFormVisible = false">取 消</el-button>
<el-button type="primary" @click="registerUserInfo()">确 定</el-button>
</div>
</el-dialog>
</div>
</div>
</template>
<script>
import { getList, register, deleteByName, updateByName } from '@/api/user_info'
export default {
filters: {
statusFilter(status) {
const statusMap = {
published: 'success',
draft: 'gray',
deleted: 'danger'
}
return statusMap[status]
}
},
data() {
return {
list: null,
listLoading: true,
dialogUpdateUserInfoFormVisible: false,
dialogRegisterUserInfoFormVisible: false,
userInfo: {
'name': null,
'age': null
}
}
},
created() {
this.fetchData()
},
methods: {
fetchData() {
this.listLoading = true
getList().then(response => {
this.list = response.data.userInfoList
this.listLoading = false
})
},
handleEdit(index, row) {
this.dialogUpdateUserInfoFormVisible = true
this.userInfo['name'] = row.name
},
updateUserInfo() {
this.dialogUpdateUserInfoFormVisible = false
updateByName(this.userInfo.name, this.userInfo).then(response => {
this.$message.success('修改成功')
this.userInfo['age'] = null
this.fetchData()
})
},
handleDelete(index, row) {
this.$confirm('此操作将永久删除该数据, 是否继续?', '提示', {
confirmButtonText: '确定',
cancelButtonText: '取消',
type: 'warning'
}).then(() => {
deleteByName(row.name).then(response => {
this.$message.success('删除成功')
this.fetchData()
})
}).catch(() => {
this.$message.info('已取消删除')
})
},
handleRegister() {
this.dialogRegisterUserInfoFormVisible = true
},
registerUserInfo() {
this.dialogRegisterUserInfoFormVisible = false
register(this.userInfo).then(response => {
this.$message.success('注册成功')
this.userInfo['name'] = null
this.userInfo['age'] = null
this.fetchData()
})
}
}
}
</script>
<style lang="scss" scoped>
.el-table{
border: 2px solid #008B93;
}
</style>
注意事项
- 拦截器
JwtInterceptor接口修改
JwtInterceptor.java1
2
3
4
5
6
7
8
9
10
11
12
13
14
15
16
17
18
19
20
21
22
23// 拦截器,解决每个接口都需要token导致的代码冗余问题
public class JwtInterceptor extends HandlerInterceptorAdapter {
public boolean preHandle(HttpServletRequest request, HttpServletResponse response, Object handler) throws Exception {
// 这里是个坑,因为带请求带headers时,ajax会发送两次请求,
// 第一次会发送OPTIONS请求,第二次才会发生get/post请求,所以要放行OPTIONS请求
// 如果是OPTIONS请求,让其响应一个 200状态码,说明可以正常访问
if (HttpMethod.OPTIONS.toString().equals(request.getMethod())) {
response.setStatus(HttpServletResponse.SC_OK);
// 放行OPTIONS请求
return true;
}
// 获取请求头中的令牌
String token = request.getHeader("token");
// 验证令牌
JWTUtil.verify(token);
return true;
}
}