项目说明
Vue3-admin-template是一个后台前端解决方案,基于最新(2022年)的前端技术构建,可以直接基于此项目进行二次开发。
技术栈
- 前端框架:
Vue3 - UI 组件库:
Element Plus - 路由管理:
Vue Router v4 - 状态管理:
Pinia - 网络管理:
axios - 前端开发与构建工具:
Vite v2 - 编程语言:
TypeScript
初始化项目
新建项目
打开终端输入:
1 | npm create vite@latest |
依次输入项目名称、框架即可。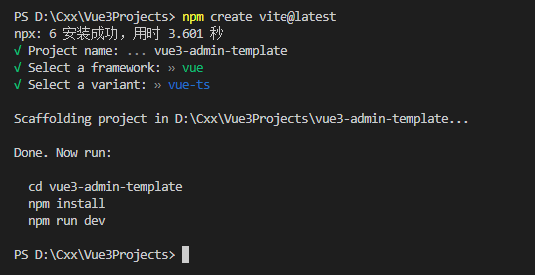
这里选择vue + ts。
启动项目
安装依赖包
1 | npm install |
运行
1 | npm run dev |
精简项目
- index.html
将<title>更改为vue3-admin-template。
- src->App.vue
删除<script>、<template>和<style>中的内容。
1 | <script setup lang="ts"> |
- src->components->HelloWorld.vue
删除该组件。
项目实现——极简版
路由配置
安装
1 | npm install vue-router@4 |
新建登录页面
src->views->login->index.vue
1 | <template> |
views文件夹通常存放的是页面级文件。
新建首页页面
src->views->dashbord->index.vue
1 | <template> |
新建全局布局系统
新建src->layout->components文件夹。
新建src->layout->index.vue:
1 | <template> |
新建路由配置文件
新建src->router->index.ts
1 | import { createRouter, createWebHashHistory, RouteRecordRaw } from 'vue-router' |
这里需要设置src文件夹别名为@:
增加tsconfig.json的compilerOptions键值对:
1 | // 设置 @ 路径 |
修改vite.config.ts
1 | import { defineConfig } from 'vite' |
如果Vscode编译器报错,需要安装依赖包:
1 | npm i @types/node --D |
注:如果使用了Vite 3版本,且在package.json中使用了"type": "module"的配置,则将导入path改为import形式:
1 | import path from 'path' |
修改App.vue
1 | <template> |
修改main.ts文件
1 | import { createApp } from 'vue' |
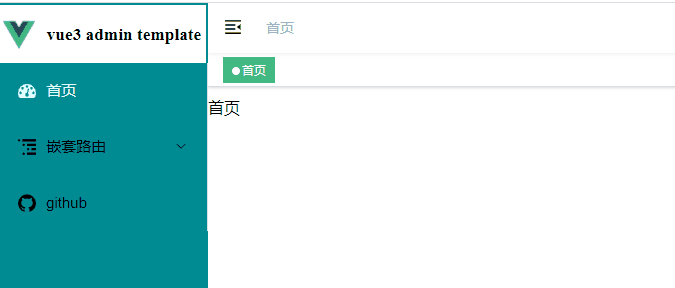
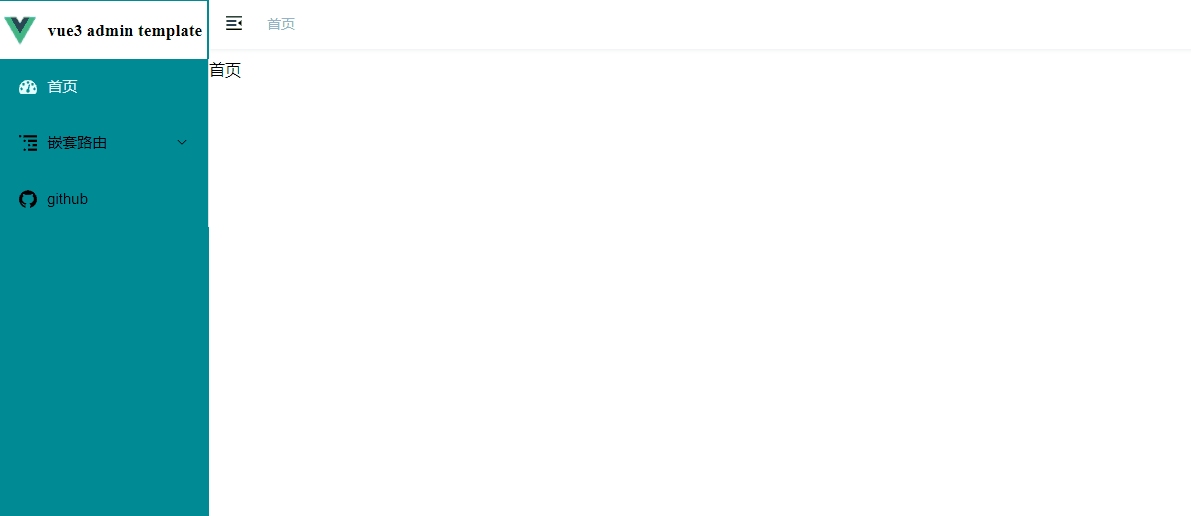
实际效果图: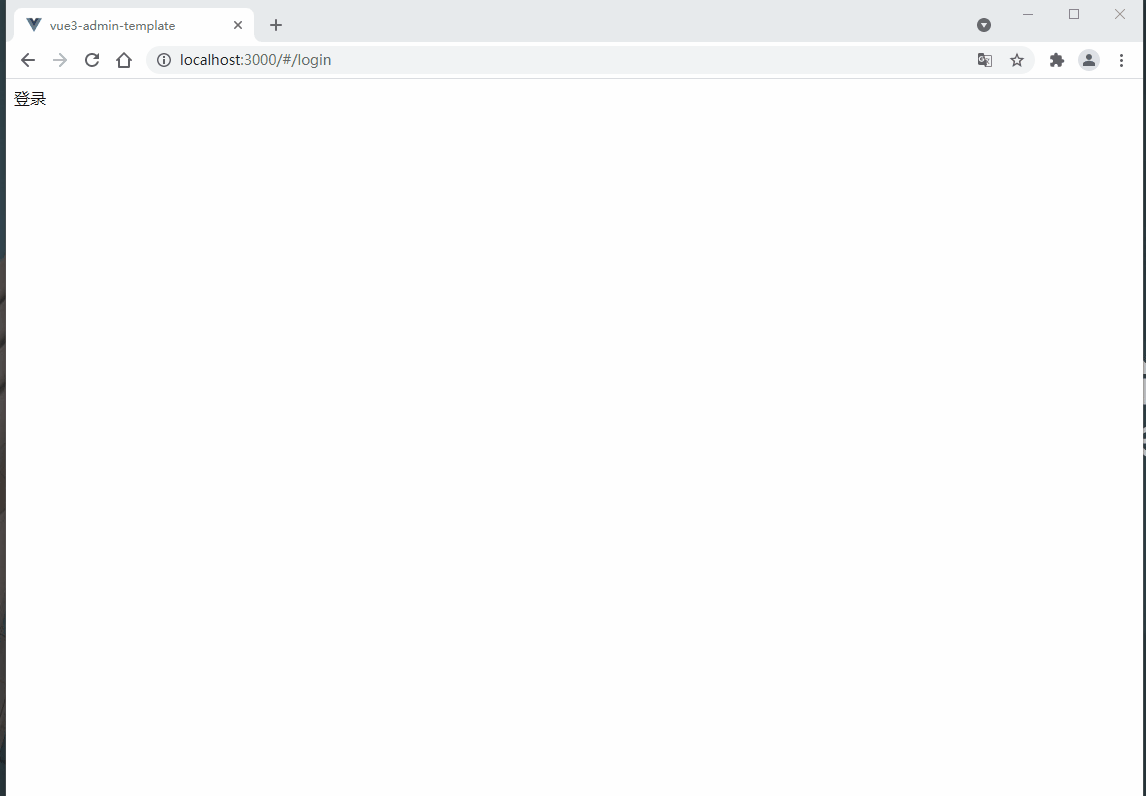
如图所示,在地址栏输入/login和/即可切换路由。
配置初始路由为登录页
添加src->permission.ts:
1 | import router from '@/router/index' |
当路由指向不是登录页且没有用户名信息时,将路由强制跳转至登录页,否则放行。
main.ts:
1 | import '@/permission' |
注:这里只是简单示例,没有添加实际的业务需求。下同。
其他配置
ELement UI Plus配置
安装
1 | npm install element-plus --save |
配置
main.ts
1 | // 引入element-ui组件 |
scss配置
安装
1 | npm i sass --save-dev |
ESLint配置
安装
1 | npm install eslint --save-dev |
这里使用的配置选项为:
注:如果使用了Vite 3版本,且在package.json中使用了"type": "module"的配置,则会在项目生成.eslintrc.cjs文件。
如果勾选了TypeScript配置,则需要在.eslintrc.cjs文件中设置TypeScript的配置文件: Linting with Type Information
1 | parserOptions: { |
更新rules
详见Github项目地址中的.eslintrc.js文件。仅供参考。
在Vscode编译器中安装ESLint插件,并打开配置文件settings(ctrl+shift+p),增加以下配置信息:
1 | // eslint配置 |
注:如果eslint没有运行,可以打开Vscode编译器右下角的ESlint终端查找错误。
注:eslint-plugin-vue v9.0.0以上移除了vue/name-property-casing规则,如果在rules中配置了需要将其删除。vue/name-property-casing
登录页面
src->views->login->index.vue
1 | <template> |
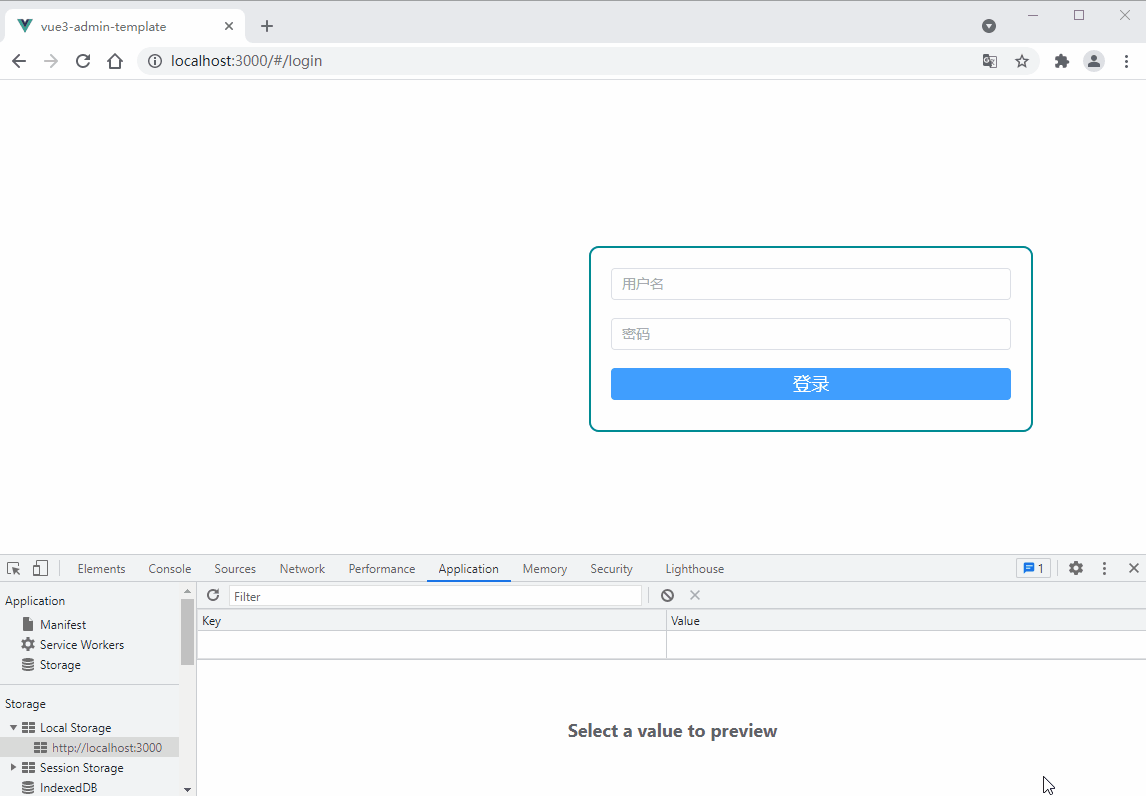
这里只做了简单的表单验证,如果成功则跳转至首页,并在浏览器中记录用户名信息。
全局布局组件系统
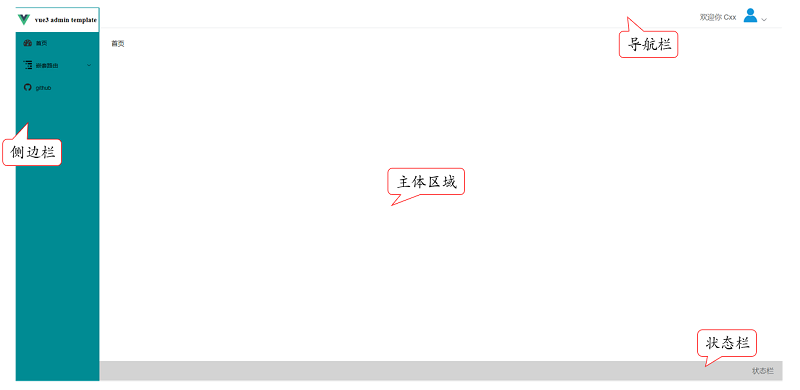
全局布局文件整体分为侧边栏、导航栏、页面主体区域和状态栏四个部分。具体位置见上图所示。
在src目录下新建layout文件夹,用于存放全局布局文件。然后在layout文件夹下,新建components文件夹和index.vue文件。其中components文件夹存放各个区域的布局文件,index.vue为出口文件。
在components文件夹下,分别新建侧边栏布局文件夹Sidebar文件夹(并在文件夹内新建出口文件index.vue),主体区域布局文件AppMain.vue、导航栏布局文件Narvar.vue和状态栏布局文件Footerbar.vue。
layout的出口文件src->layout->index.vue:
1 | <template> |
1 | import AppMain from './components/AppMain.vue' |
这里只显示布局文件和脚本文件,样式文件详见Github项目地址。下同。
主体区域布局文件
src->layout->components->AppMain.vue:
1 | <template> |
这里存放路由配置文件中的具体路由显示。
状态栏布局文件
src->layout->components->Footerbar.vue:
1 | <template> |
这里只做了简单的显示,可根据实际需求添加相应功能。
导航栏布局文件
src->layout->components->Narbar.vue:
1 | <template> |
1 | import { ArrowDown } from '@element-plus/icons-vue' |
这里只做了简单的信息显示和退出登录功能。
菜单栏组件系统
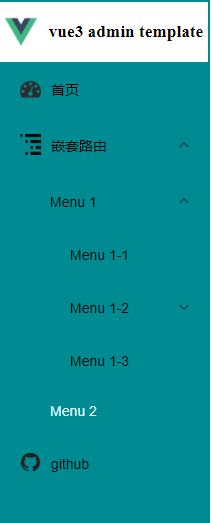
菜单栏组件主要分为两部分,上面为项目图标和项目名称,下面为各个菜单组成的滚动条。
图标组件
在Sidebar文件夹下新建Logo.vue文件:
src->layout->components->Sidebar->Logo.vue:
1 | <template> |
这里使用<router-link>进行包裹区域,可以实现点击图标/标题跳转至首页。
1 | <script setup lang="ts"> |
注意vite获取静态资源文件的方式。
菜单路由组件系统
在Sidebar文件夹下,新建菜单项组件:SidebarItem.vue,菜单内容组件Item.vue和判断菜单类型组件Link.vue。
本项目主要包含3种路由类型:单级路由,多级路由和外部链接路由。因此,首选更改之前的路由配置文件:
src->router->index.ts:
1 | import { createRouter, createWebHashHistory, RouteRecordRaw } from 'vue-router' |
src->layout->components->Sidebar->index.vue:
1 | <template> |
1 | <script setup lang="ts"> |
菜单路由部分首先使用el-scrollbar滚动条组件包裹所有的el-menu组件,然后使用v-for指令添加路由配置文件的所有路由。
src->layout->components->Sidebar->SidebarItem.vue:
1 | <template> |
1 | <script setup lang="ts"> |
在菜单项组件中,首先判断路由是否包含子路由,如果包含,则会循环遍历所有的子路由,否则会根据路由的性质判断是否是外部链接。
src->layout->components->Sidebar->Link.vue:
1 | <template> |
1 | <script setup lang="ts"> |
src->layout->components->Sidebar->Item.vue:
1 | <template> |
1 | <script setup lang="ts"> |
最后每个菜单内容由图标+标题组成。
项目实现——标准版
在标准版中,会增加以下功能:
- 由于
Element UI Plus系统本身提供的图标并不多,而且png图片会存在一定的失真,因此本项目使用svg管理所有的图标系统。 - 目前一些状态信息是存放在浏览器的
localStorage中,安全性较低,本项目使用pinia管理项目中所有的信息系统。 - 优化全局布局组件系统,扩展功能。
全局图标系统
安装
1 | npm install svg-sprite-loader -D |
Svg图标组件
在src文件夹下新建icons文件夹,用来处理全局图标系统。然后新建index.vue文件和svg文件夹,其中svg文件夹下存放所有的.svg图标文件。
src->icons->index.vue:
1 | <template> |
1 | <script setup lang="ts"> |
1 | <style lang="scss" scoped> |
vite配置
在src文件夹下新建plugins,用于存放项目中的插件系统,然后新建svgBuilder.ts:
1 | import { Plugin } from 'vite' |
并在vite.config.ts中配置:
1 | // 引入svgBuilder插件 |
这里如果提示不能找到该ts文件,需要在tsconfig.node.json中添加该文件:
1 | "include": ["vite.config.ts", "./src/plugins/svgBuilder.ts"] |
main.ts配置
最后将其配置到main.ts中,注册组件:
1 | // 引入svg |
使用
例如,在全局布局组件系统中的菜单栏组件所有的图标改成svg的形式:
src->layout->components->sidebar->item.vue:
1 | <template> |
这里主要通过路由配置文件中每个路由的icon参数来选择相应的图标。(默认已经将svg图标放在src->icons->svg中。)
注1:如果不能看到效果,需要重启项目。
注2:iconfont图标库
全局状态系统
安装
1 | npm install pinia |
main.ts配置
1 | import { createPinia } from 'pinia' |
使用
在src目录下新建store文件夹,存放所有的状态管理文件。
pinia样例文件:
src->store->example.ts:
1 | import { defineStore } from 'pinia' |
全局布局组件系统优化
增加菜单栏显示/隐藏功能
该功能主要是实现点击切换按钮时,菜单栏会只显示图标部分,隐藏所有的文字部分,再次点击时,会恢复初始状态,且菜单栏宽度保持自适应状态。
状态管理设置
首先在src->store文件夹中,新建app.ts,用于存放当前设备的状态。
src->store->app.ts:
1 | import { defineStore } from 'pinia' |
切换组件实现
然后在src文件夹中新建components文件夹,该文件夹主要存放非页面级的组件。
在该文件夹下新建控制菜单栏显示切换的图标组件:
src->components->Hamburger->index.vue:
1 | <template> |
1 | <script setup lang="ts"> |
导航栏组件调整
Hamburger组件主要是存放在导航栏组件的左侧,菜单栏组件的右侧,因此在父组件导航栏组件中,引入该图标组件:
src->layout->components->Narbar.vue:
1 | <!-- 控制菜单栏的显示 --> |
1 | import Hamburger from '@/components/Hamburger/index.vue' |
注:这里只显示和之前代码有变化的部分,下同。
菜单栏组件调整
首先将Logo.vue组件设置为根据collapse状态控制是否显示标题:
src->layout->components->Sidebar->Logo.vue:
1 | <template> |
1 | import { defineProps, reactive } from 'vue' |
使用v-if和v-else指令,结合传入的collapse状态值,实时切换是否显示标题文字。
然后修改Logo.vue的父组件index.vue,将状态管理中的sidebar值实时传递给Logo.vue组件:
1 | <!-- 左上角图标 --> |
1 | import { computed } from 'vue' |
菜单选项组件的显示和隐藏主要通过样式来控制(src->style->sidebar.module.scss)。
增加导航栏面包屑功能
该功能主要实现在导航栏上实时显示当前路由的地址,如果是嵌套路由则会根据嵌套规则显示完整的路由地址,并且点击相应的路由标题时,会切换到相应的界面。
面包屑组件实现
在src->compnents目录下新建Hamburger->index.vue组件,实现面包屑功能:
1 | <template> |
1 | <script setup lang="ts"> |
其主要原理就是实时监测当前路由的变化,并根据当前路由的参数遍历生成面包屑路由,并将首页路由添加至面包屑开始位置,通过点击面包屑中显示的路由标题,实现路由的切换。
导航栏组件调整
最后将其添加至父组件导航栏组件中:
src->components->Narbar.vue:
1 | <breadcrumb id="breadcrumb-container" class="breadcrumb-container" /> |
1 | import Breadcrumb from '@/components/Breadcrumb/index.vue' |
增加标签栏导航功能

该功能主要实现在导航栏上保存已经访问过的路由,点击相应标签即可切换至相应路由,并且可以实现关闭其他、全部关闭路由等功能。
路由标签状态管理
首先在src->store文件夹中,新建tagsViews.ts,用于存放已访问的路由和缓存的路由,并实现添加路由、删除路由等功能。
1 | import { defineStore } from 'pinia' |
标签组件实现
在src->layout->components下新建TagsView文件夹,并在该文件夹下新建index.vue和ScrollPane.vue。
src->layout->components->TagsView->ScrollPane.vue:
1 | <template> |
1 | <script setup lang="ts"> |
src->layout->components->TagsView->index.vue:
1 | <template> |
1 | <script setup lang="ts"> |
其主要原理就是首先将访问过的路由依次显示在滚动条组件中,然后通过鼠标右击事件弹出功能菜单,并通过定义在tagsViewStore里面的功能实现相应的功能。
全局布局组件调整
最后将其添加至父组件全局布局组件中:
src->layout->index.vue:
1 | <div> |
1 | import TagsView from './components/TagsView/index.vue' |
项目实现——完整版
全局网络请求管理系统
本项目使用Axios作为网络请求库。
安装
1 | npm install axios |
封装拦截器
在src/utils文件夹下新建request.ts:1
2
3
4
5
6
7
8
9
10
11
12
13
14
15
16
17
18
19
20
21
22
23
24
25
26
27
28
29
30
31
32
33
34
35
36
37
38
39
40
41
42
43
44
45
46
47
48
49
50
51
52
53
54
55import axios, { AxiosRequestConfig, AxiosResponse } from 'axios'
import { ElMessage } from 'element-plus'
const service = axios.create({
// URL地址
baseURL: process.env.VUE_APP_BASE_API,
// 连接时间
timeout: 5000
})
// 请求拦截器
service.interceptors.request.use(
(config: AxiosRequestConfig) => {
// const userStore = useUserStore()
// // 如果有token 则加上token值
// if (userStore.token) {
// config.headers['X-Token'] = getToken()
// }
return config
},
(error) => {
return Promise.reject(error)
}
)
// 响应拦截器
service.interceptors.response.use(
(response: AxiosResponse) => {
const res = response.data
// 如果状态码不是20000
// 根据实际的后端接口确定状态码
if (res.code !== 20000) {
ElMessage({
message: res.message || 'Error',
type: 'error',
duration: 5 * 1000
})
return Promise.reject(new Error(res.message || 'Error'))
} else {
// 正确则返回数据
return res
}
},
(error) => {
ElMessage({
message: error.message,
type: 'error',
duration: 5 * 1000
})
return Promise.reject(error)
}
)
export default service
首先配置Axios的根URL地址,由于项目在开发的过程中,开发环境和生产环境的服务器地址不同,因此需要在在项目中创建.env.development和.env.production文件,配置不同的根URL地址:
.env.development1
2
3
4
5# just a flag
ENV = 'development'
# base api
VUE_APP_BASE_API = 'http://127.0.0.1:8080'
.env.production1
2
3
4
5# just a flag
ENV = 'production'
# base api
VUE_APP_BASE_API = 'http://10.0.0.0:8080'
其中development为开发环境,production为生产环境。
请求拦截器主要处理用户登录时Token的保存业务。
响应拦截器主要处理获取服务器数据的业务。
注:响应拦截器的的状态码需要根据实际后端业务设计来编写。如果没有,可以去掉该判断。
封装后端接口
在项目文件夹下创建API文件夹src->api,并根据业务需求创建example.ts文件:
src->api->example.ts
1 | import request from '@/utils/request' |
使用api
在具体的业务文件中,调用该接口即可。注意由于Axios返回的是Promise对象,因此最好使用async和await来调用。
1 | import { functionName1 } from '@/api/example' |