平台
仙工AMB系列无人搬运底盘
Windows 10
IntelliJ IDEA
Android Studio
整体框架
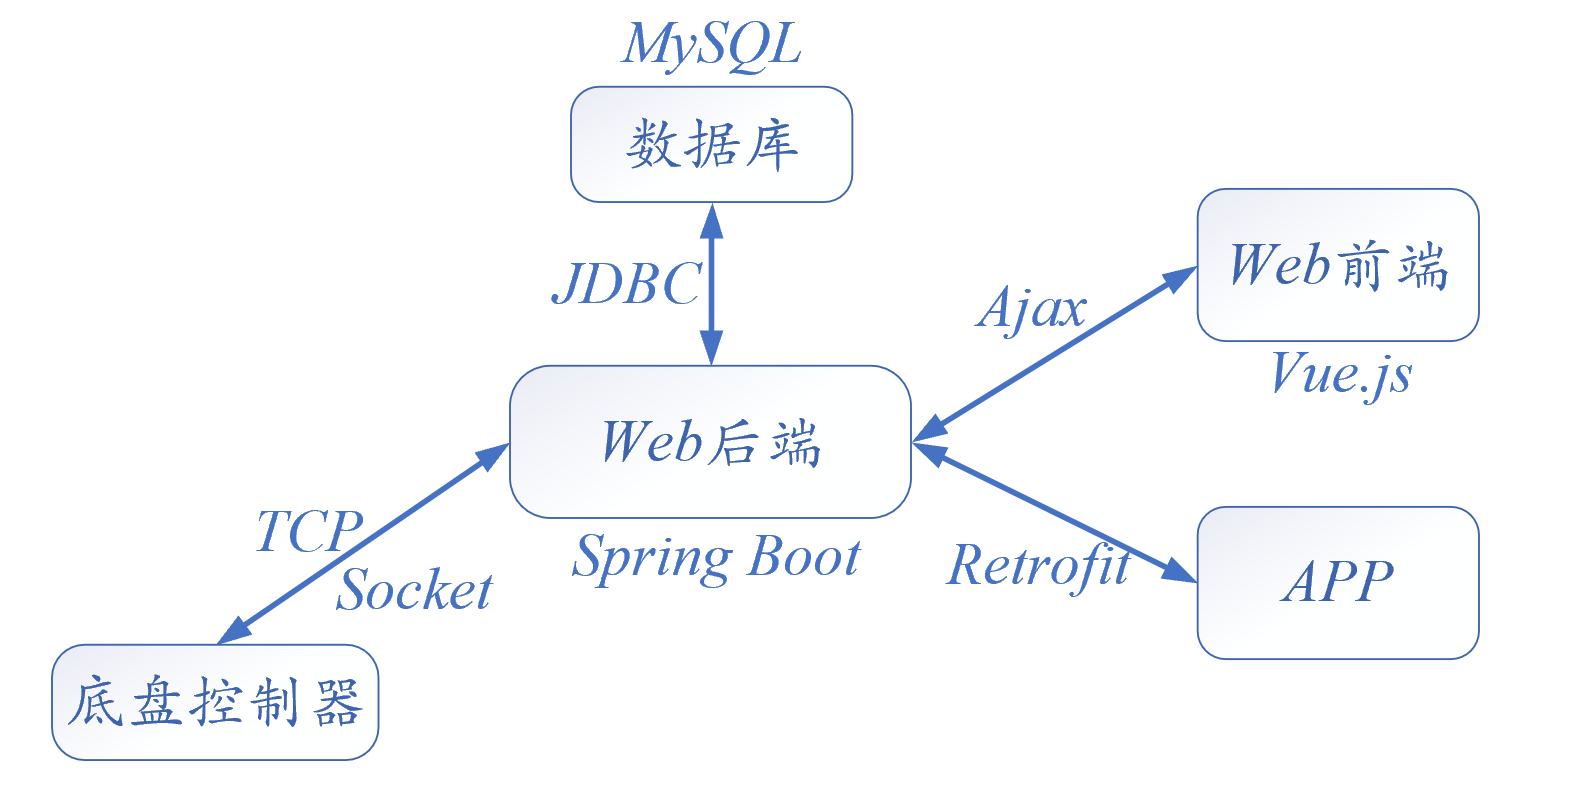
首先底盘控制器和Web后端通过TCP协议进行数据交互,所有的逻辑处理均在Web后端中实现,所有产生的交互数据均通过JDBC驱动连接存储在数据库中。
通过S Web后端和Web前端采用Ajax技术实现
仙工AMR底盘
TCP通讯数据协议简介
仙工官方文档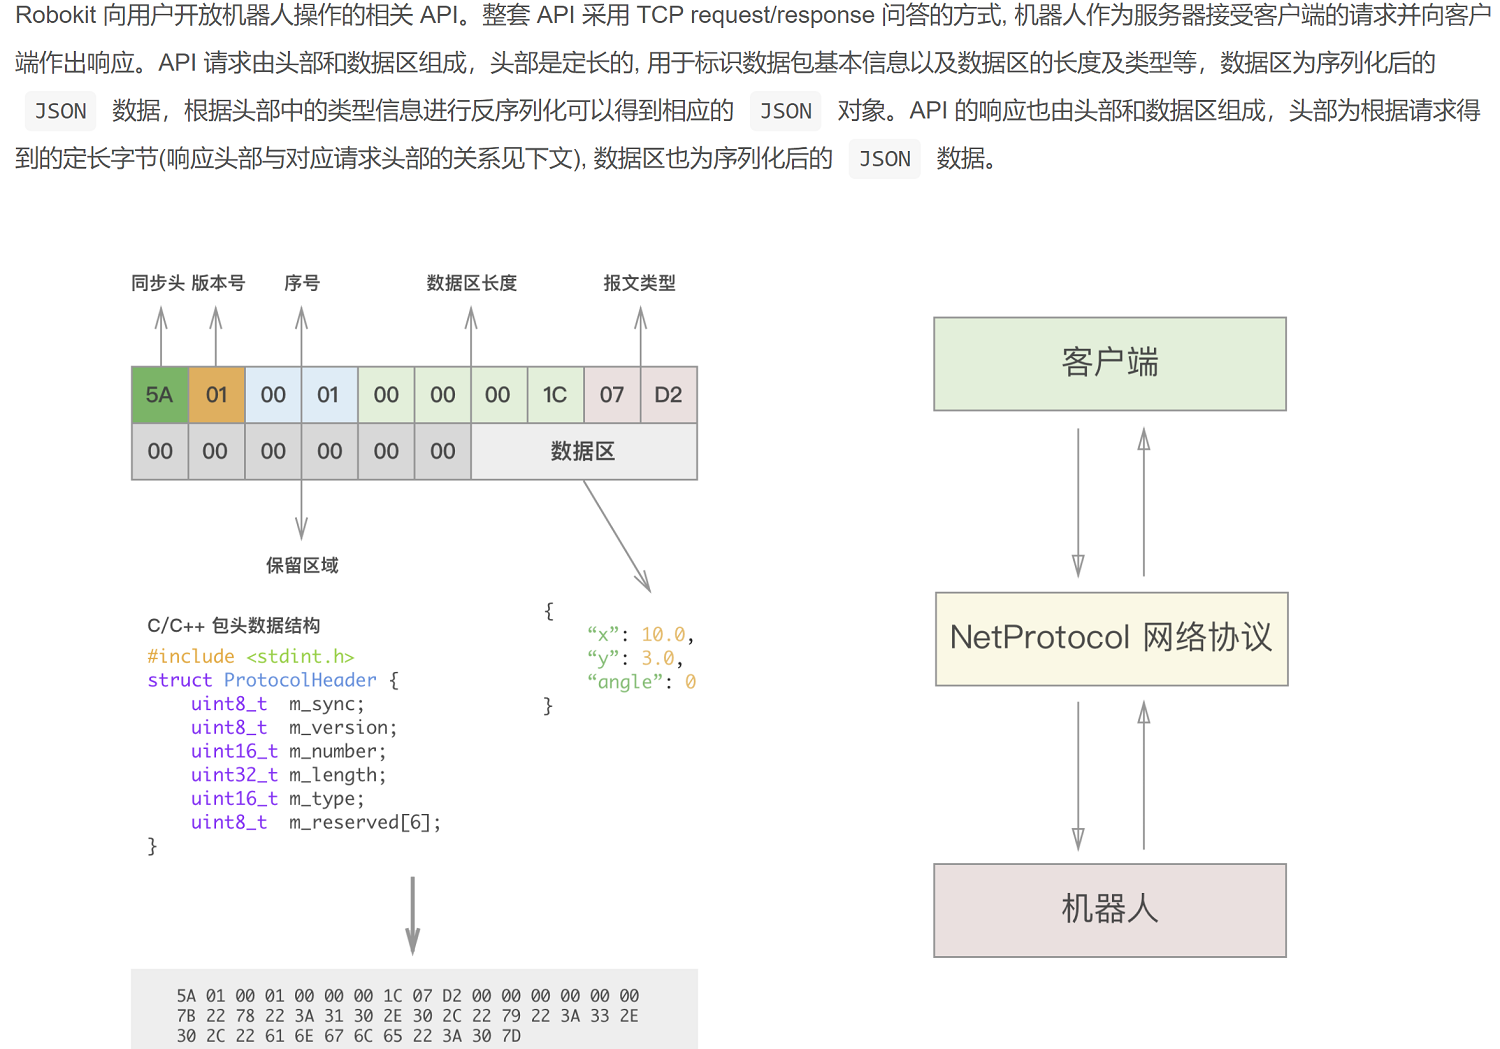
该TCP协议的API请求由头部和数据区组成,因此该请求方式可以分为两种,一种是有请求数据的,一种是没有请求数据的。
- 没有请求数据
此时数据区为0,请求数据的区别只在于报文类型的不同(这里的数据区长度字段为0),因此只需在官网查询相应API的报文类型即可。例如,第三章的机器人状态API中的查询机器人信息: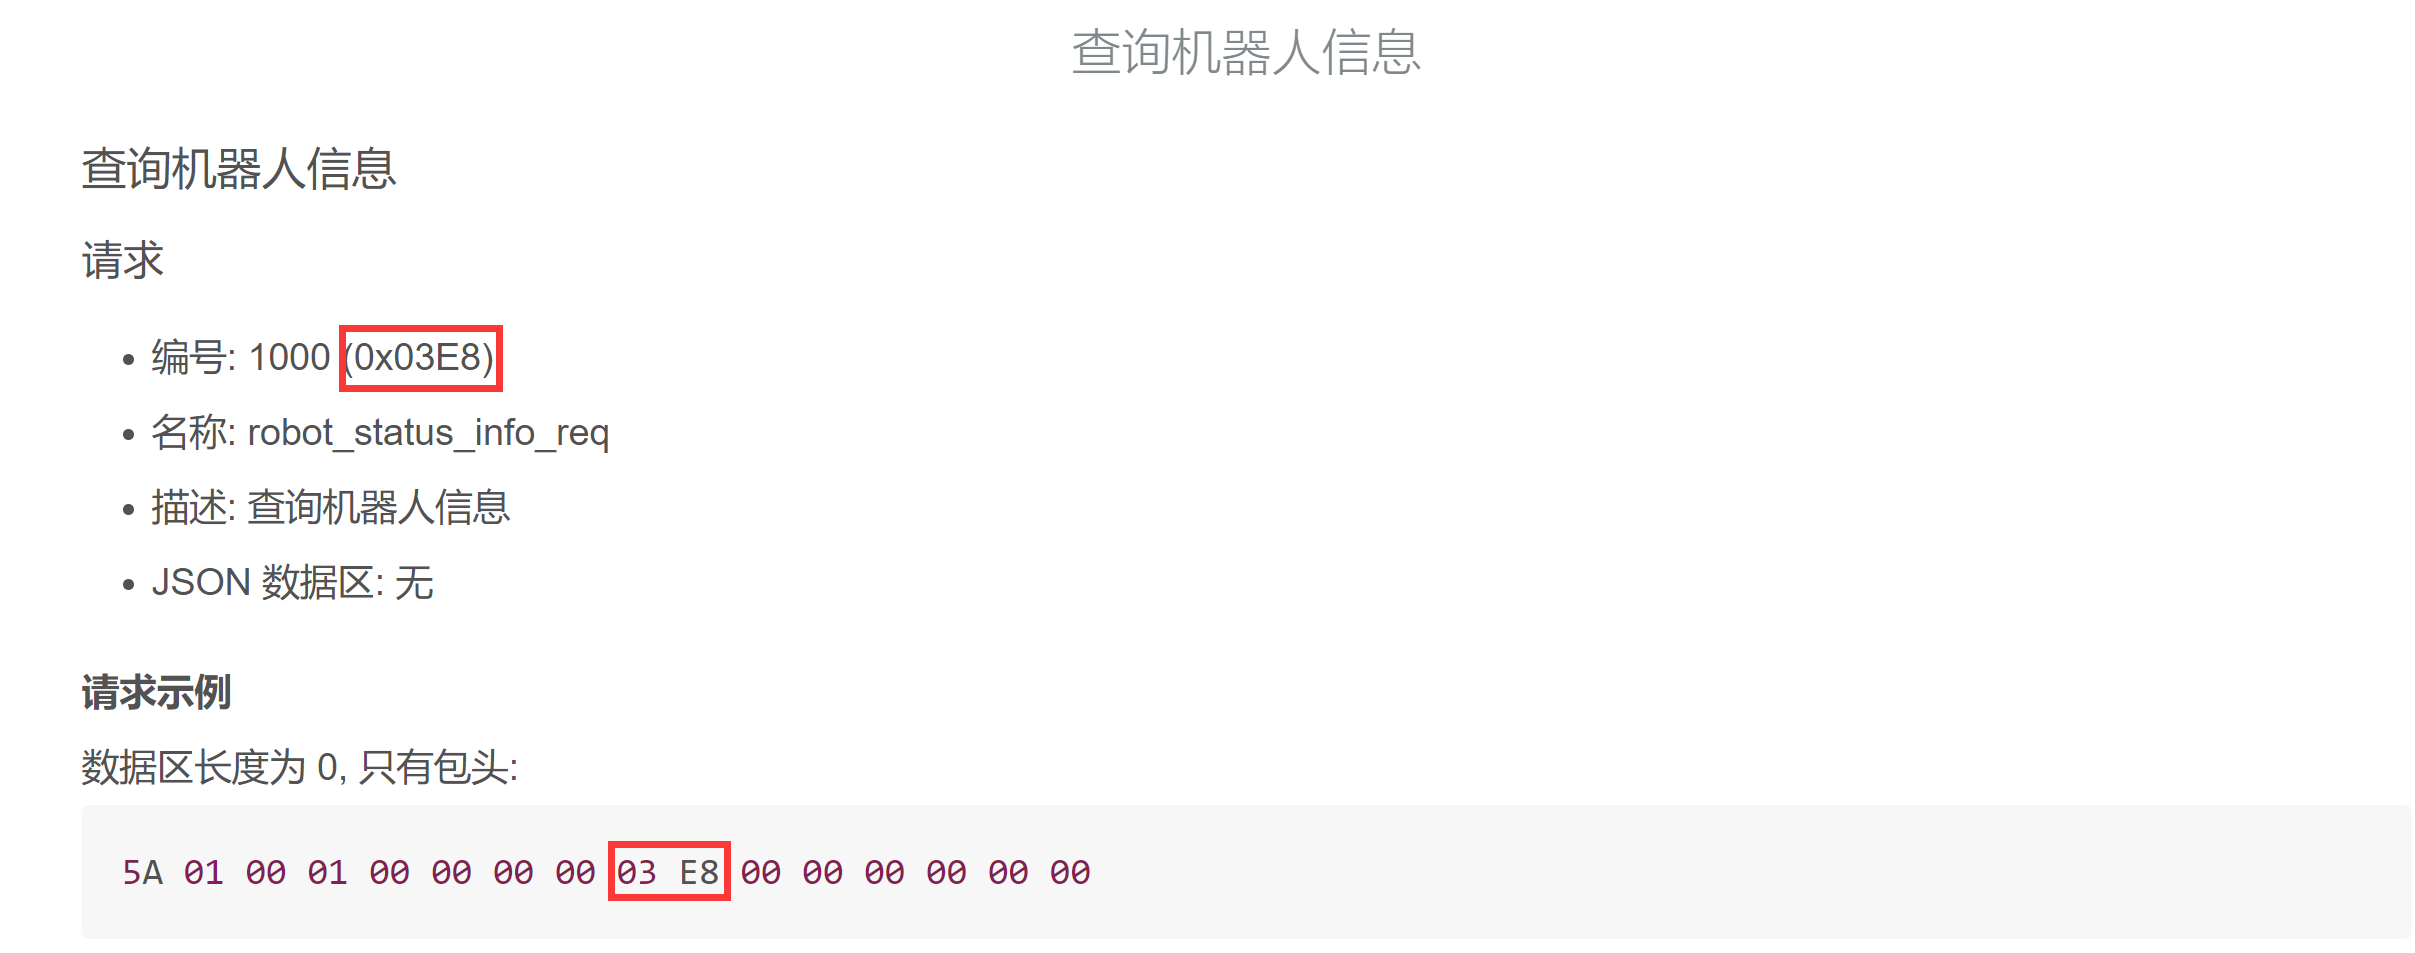
这里只需将报文类型字段更改为请求编号03E8即可,其余按默认值处理。 - 有请求数据
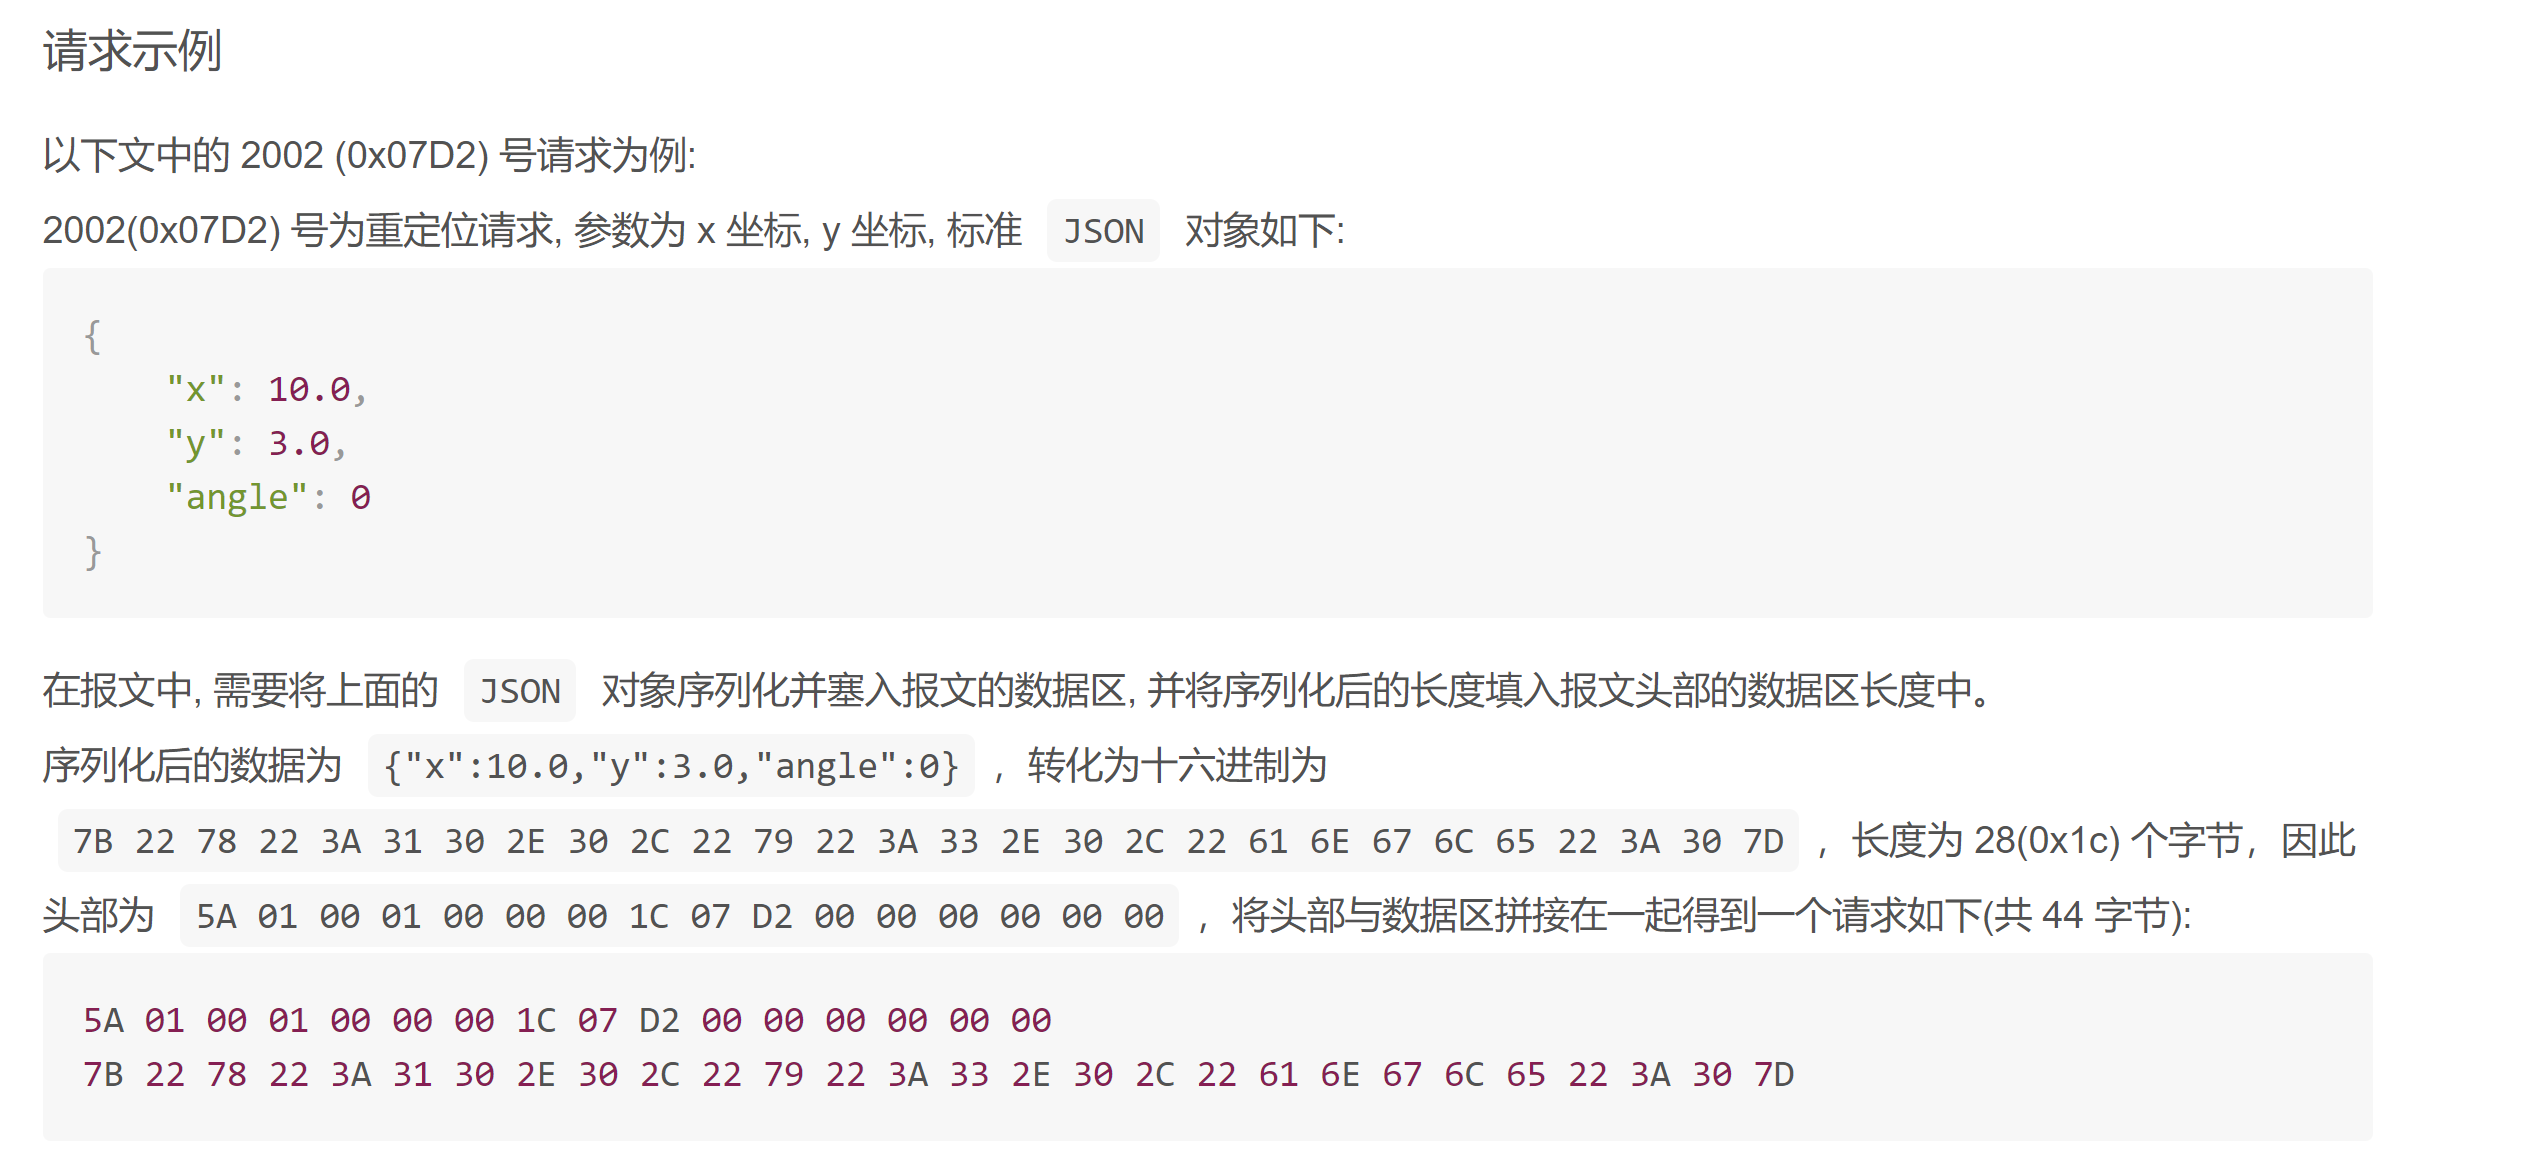
由该例可见,首先需要将JSON对象序列字符串转换为十六进制,然后计算其长度作为数据区长度字段的数值。注意这里的长度是按字节计算,需要除以2(请求示例中,转换为十六进制后数据的字符个数为56,但长度为28)。
TCP通讯端口协议简介
这部分原理比较简单,按照官网提示即可。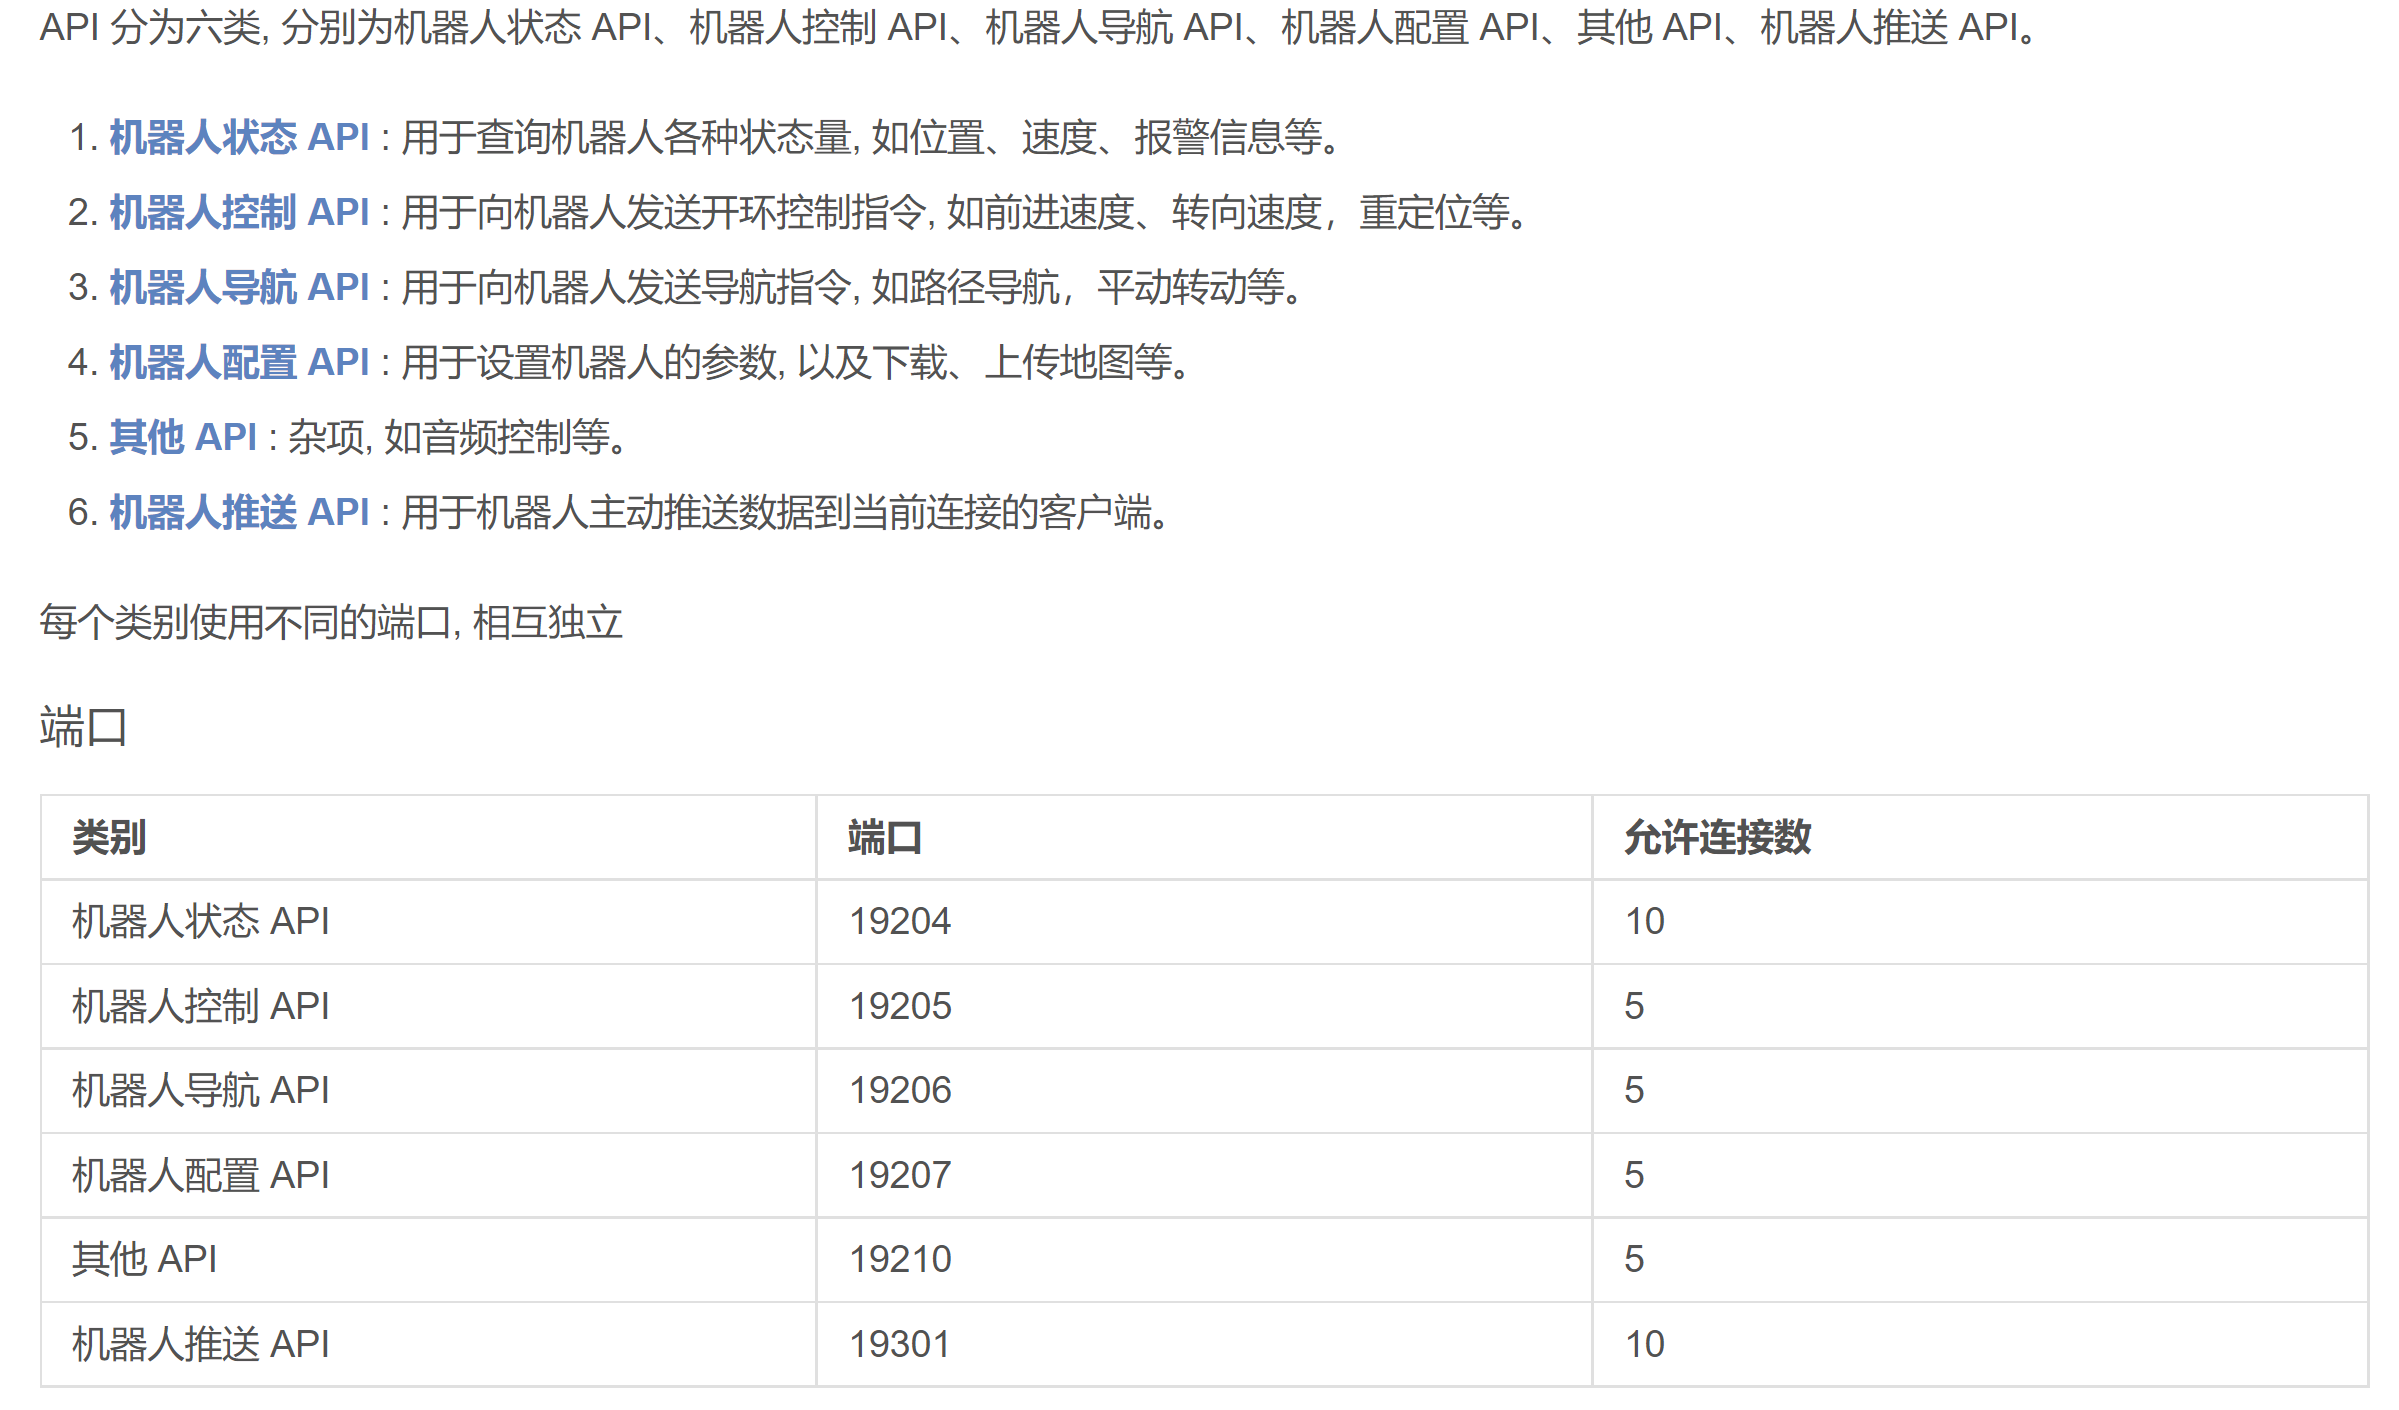
基于Socket协议的TCP通讯实现
Socket原理
基于仙工底盘TCP API接口的Java编程实现
新建工程文件
首先打开IntelliJ IDEA创建Web后端工程,选择Spring Initializr: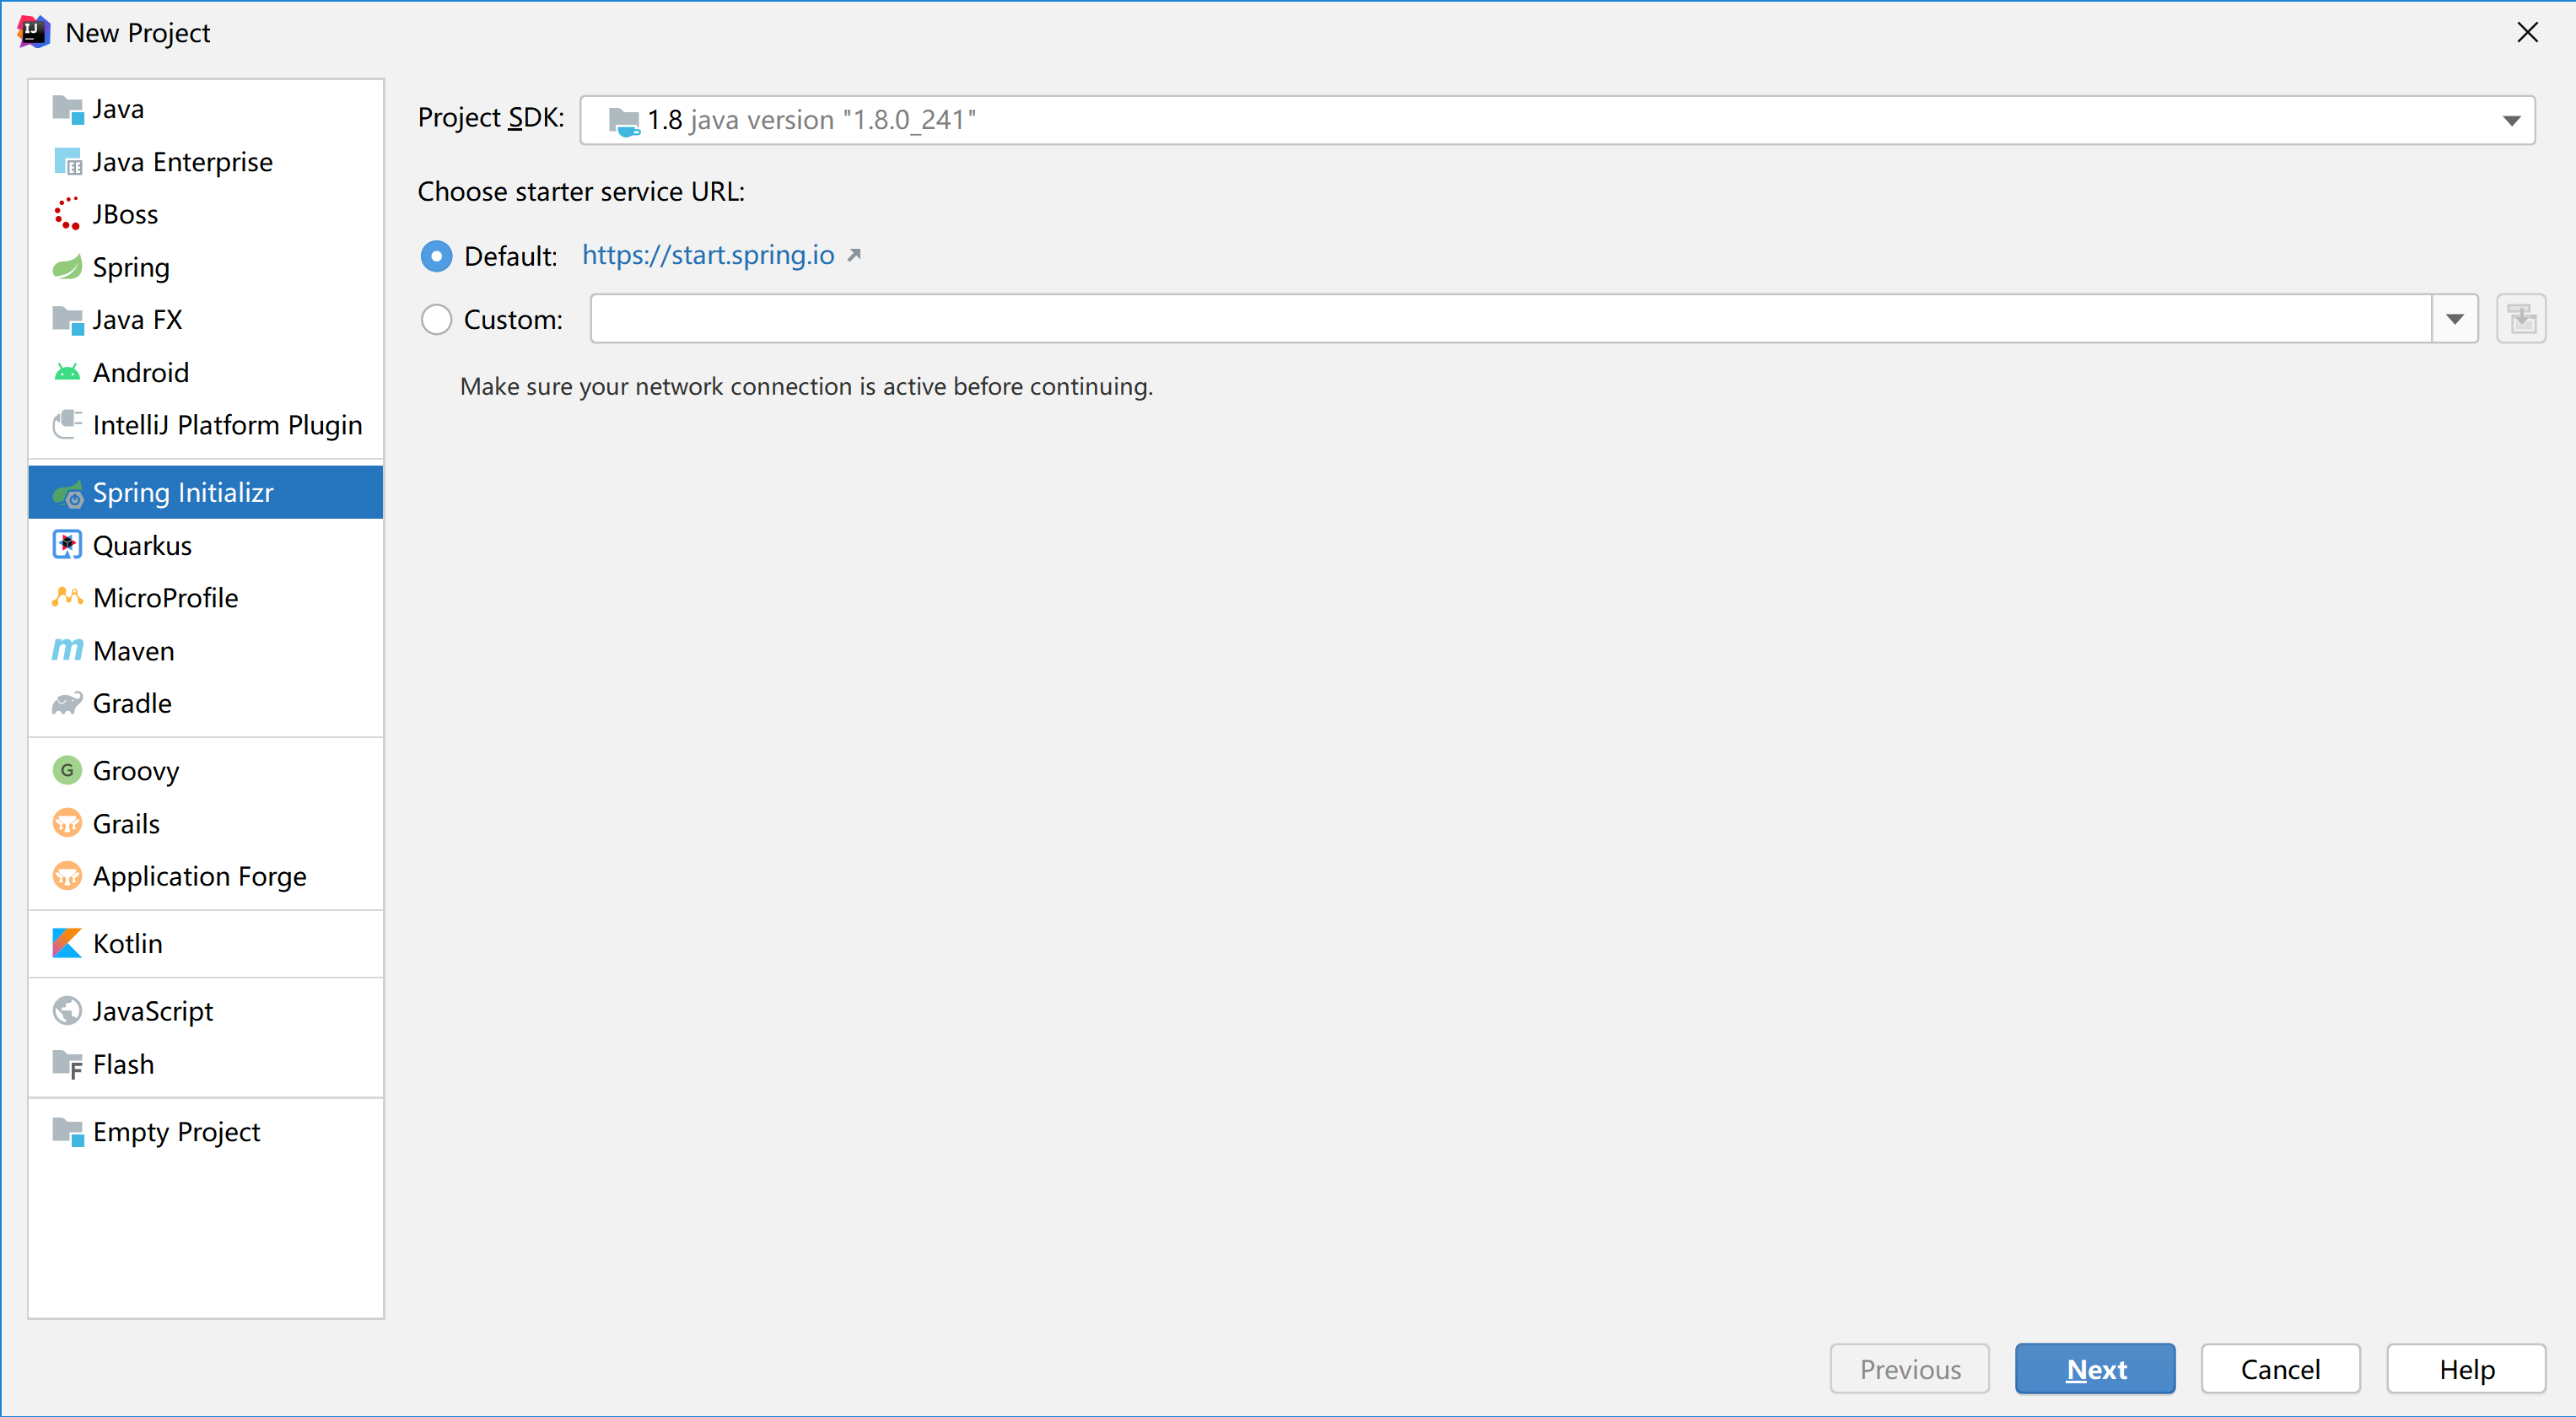
然后更改相应的Group和Artifact,Java Version选择8。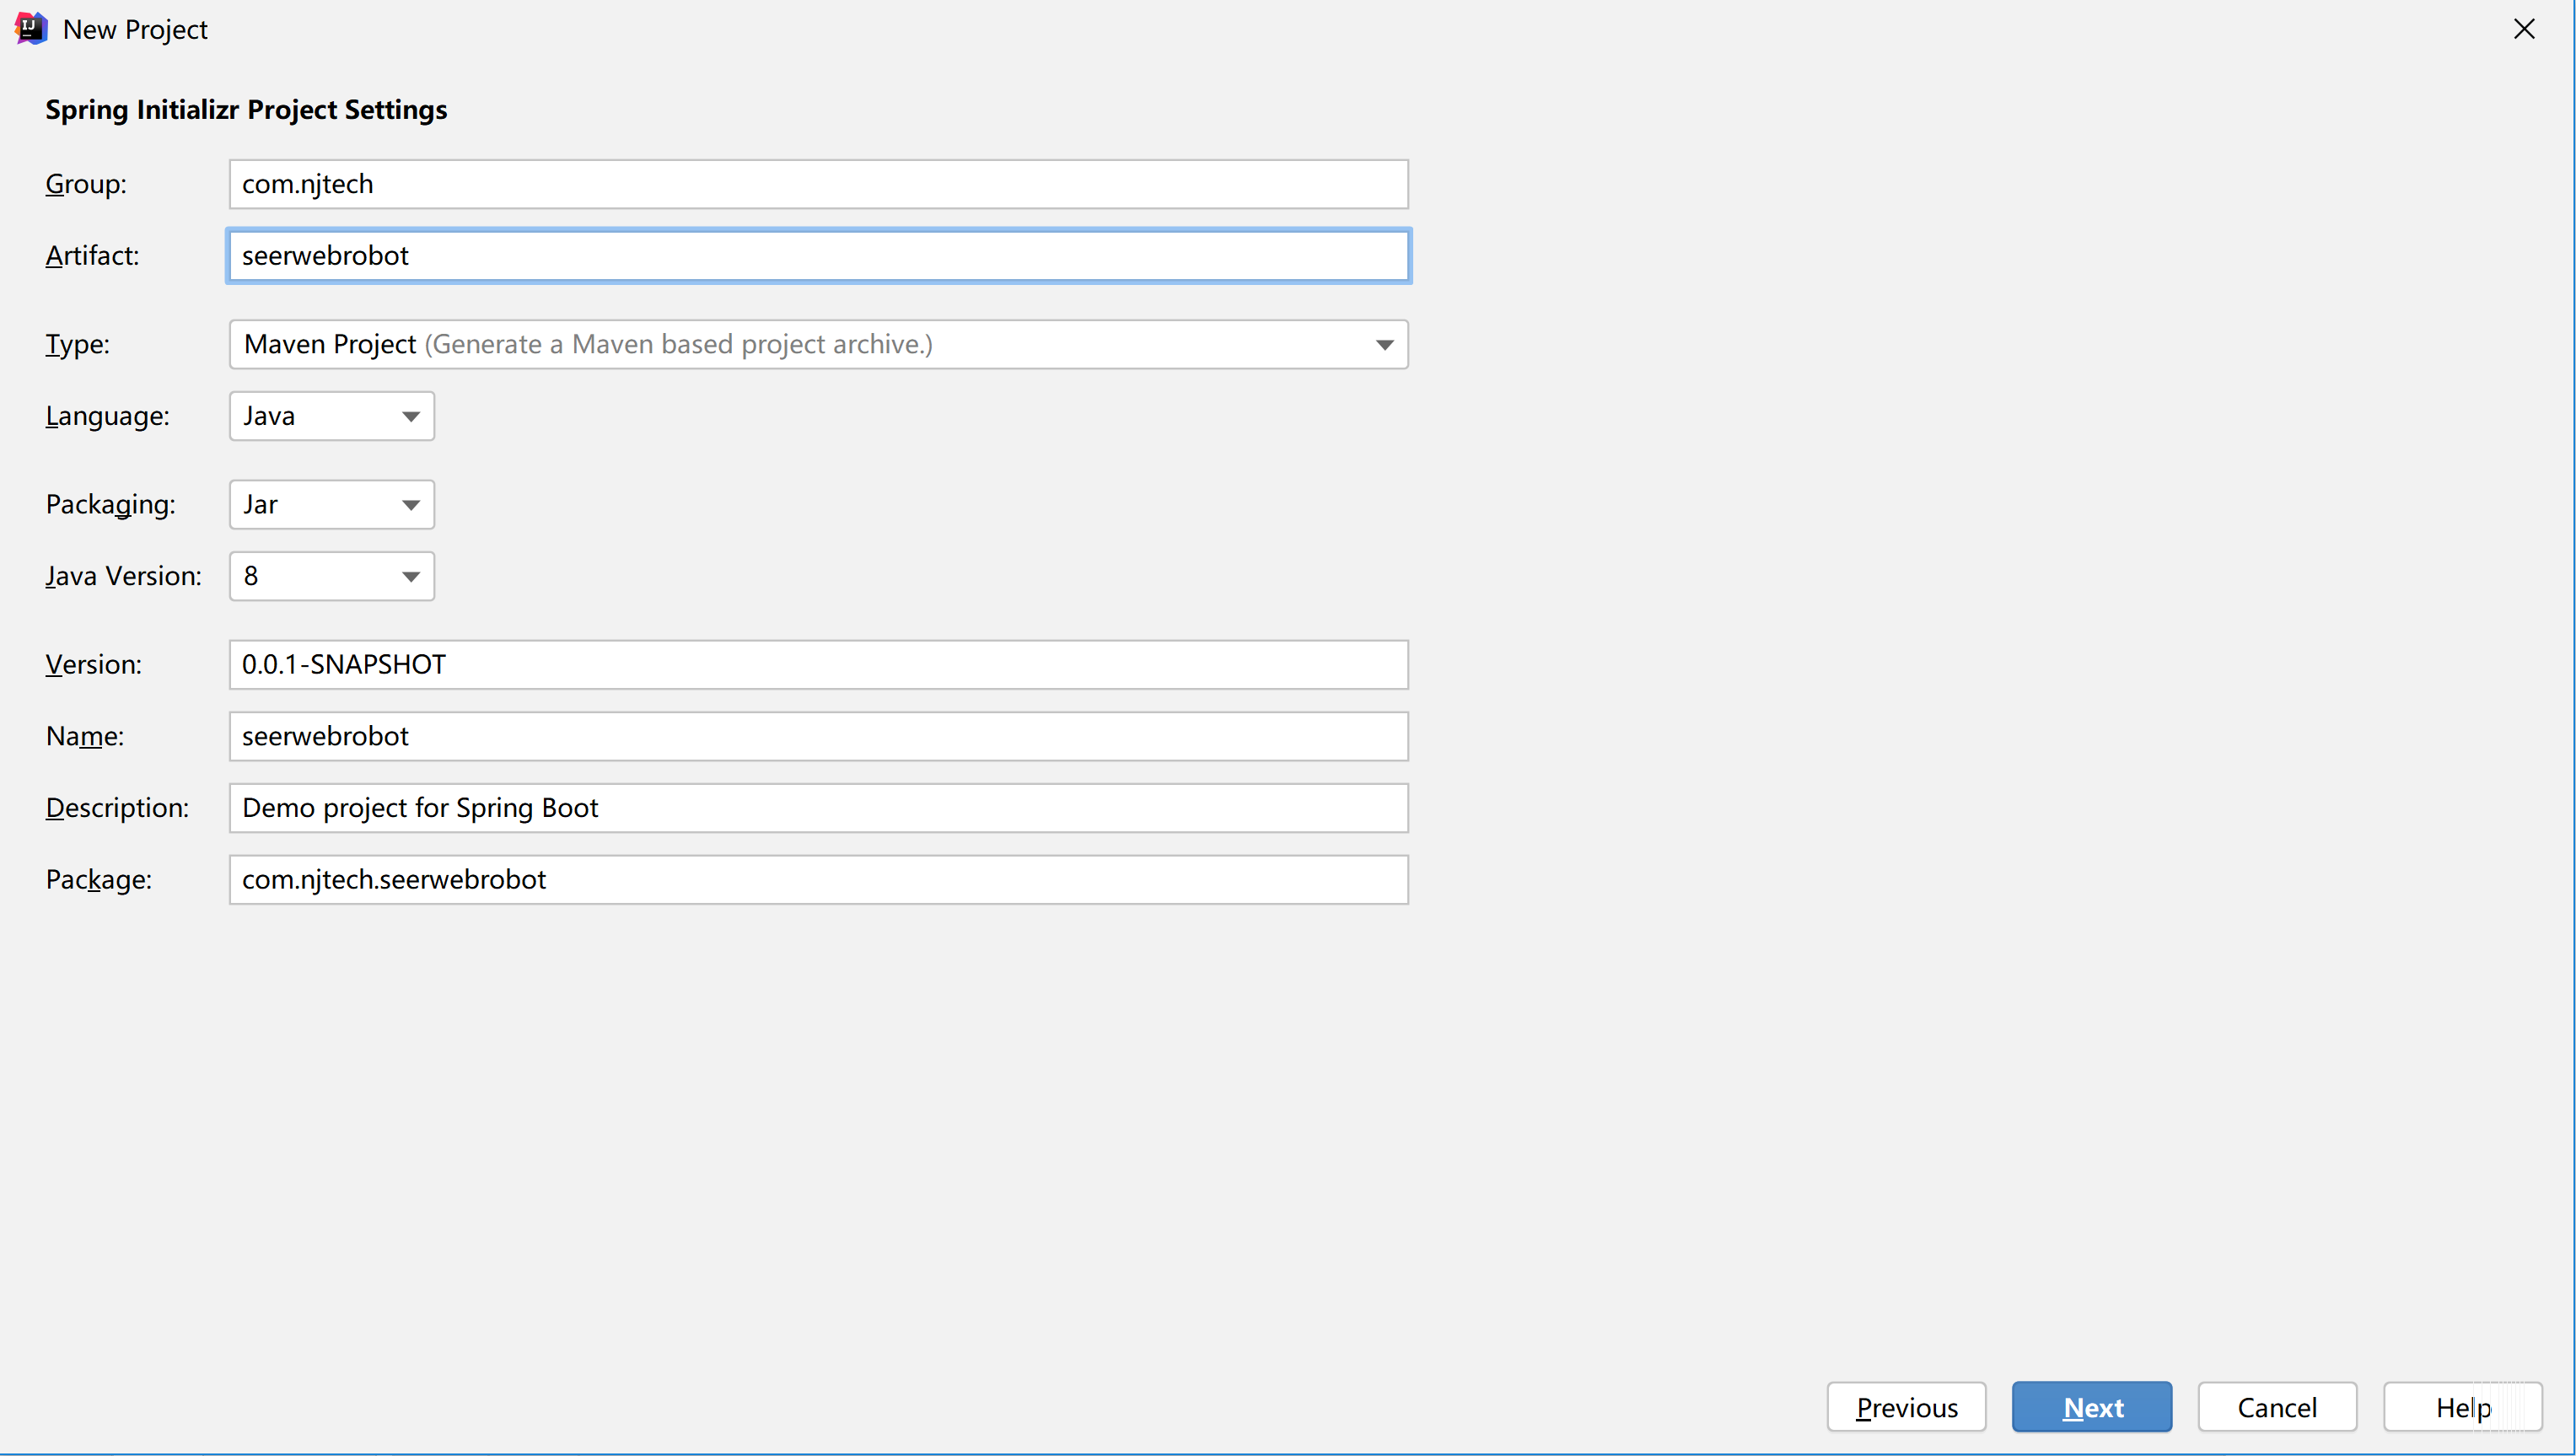
这里的依赖库可以先选择不安装,后续在pom.xml配置文件中统一安装。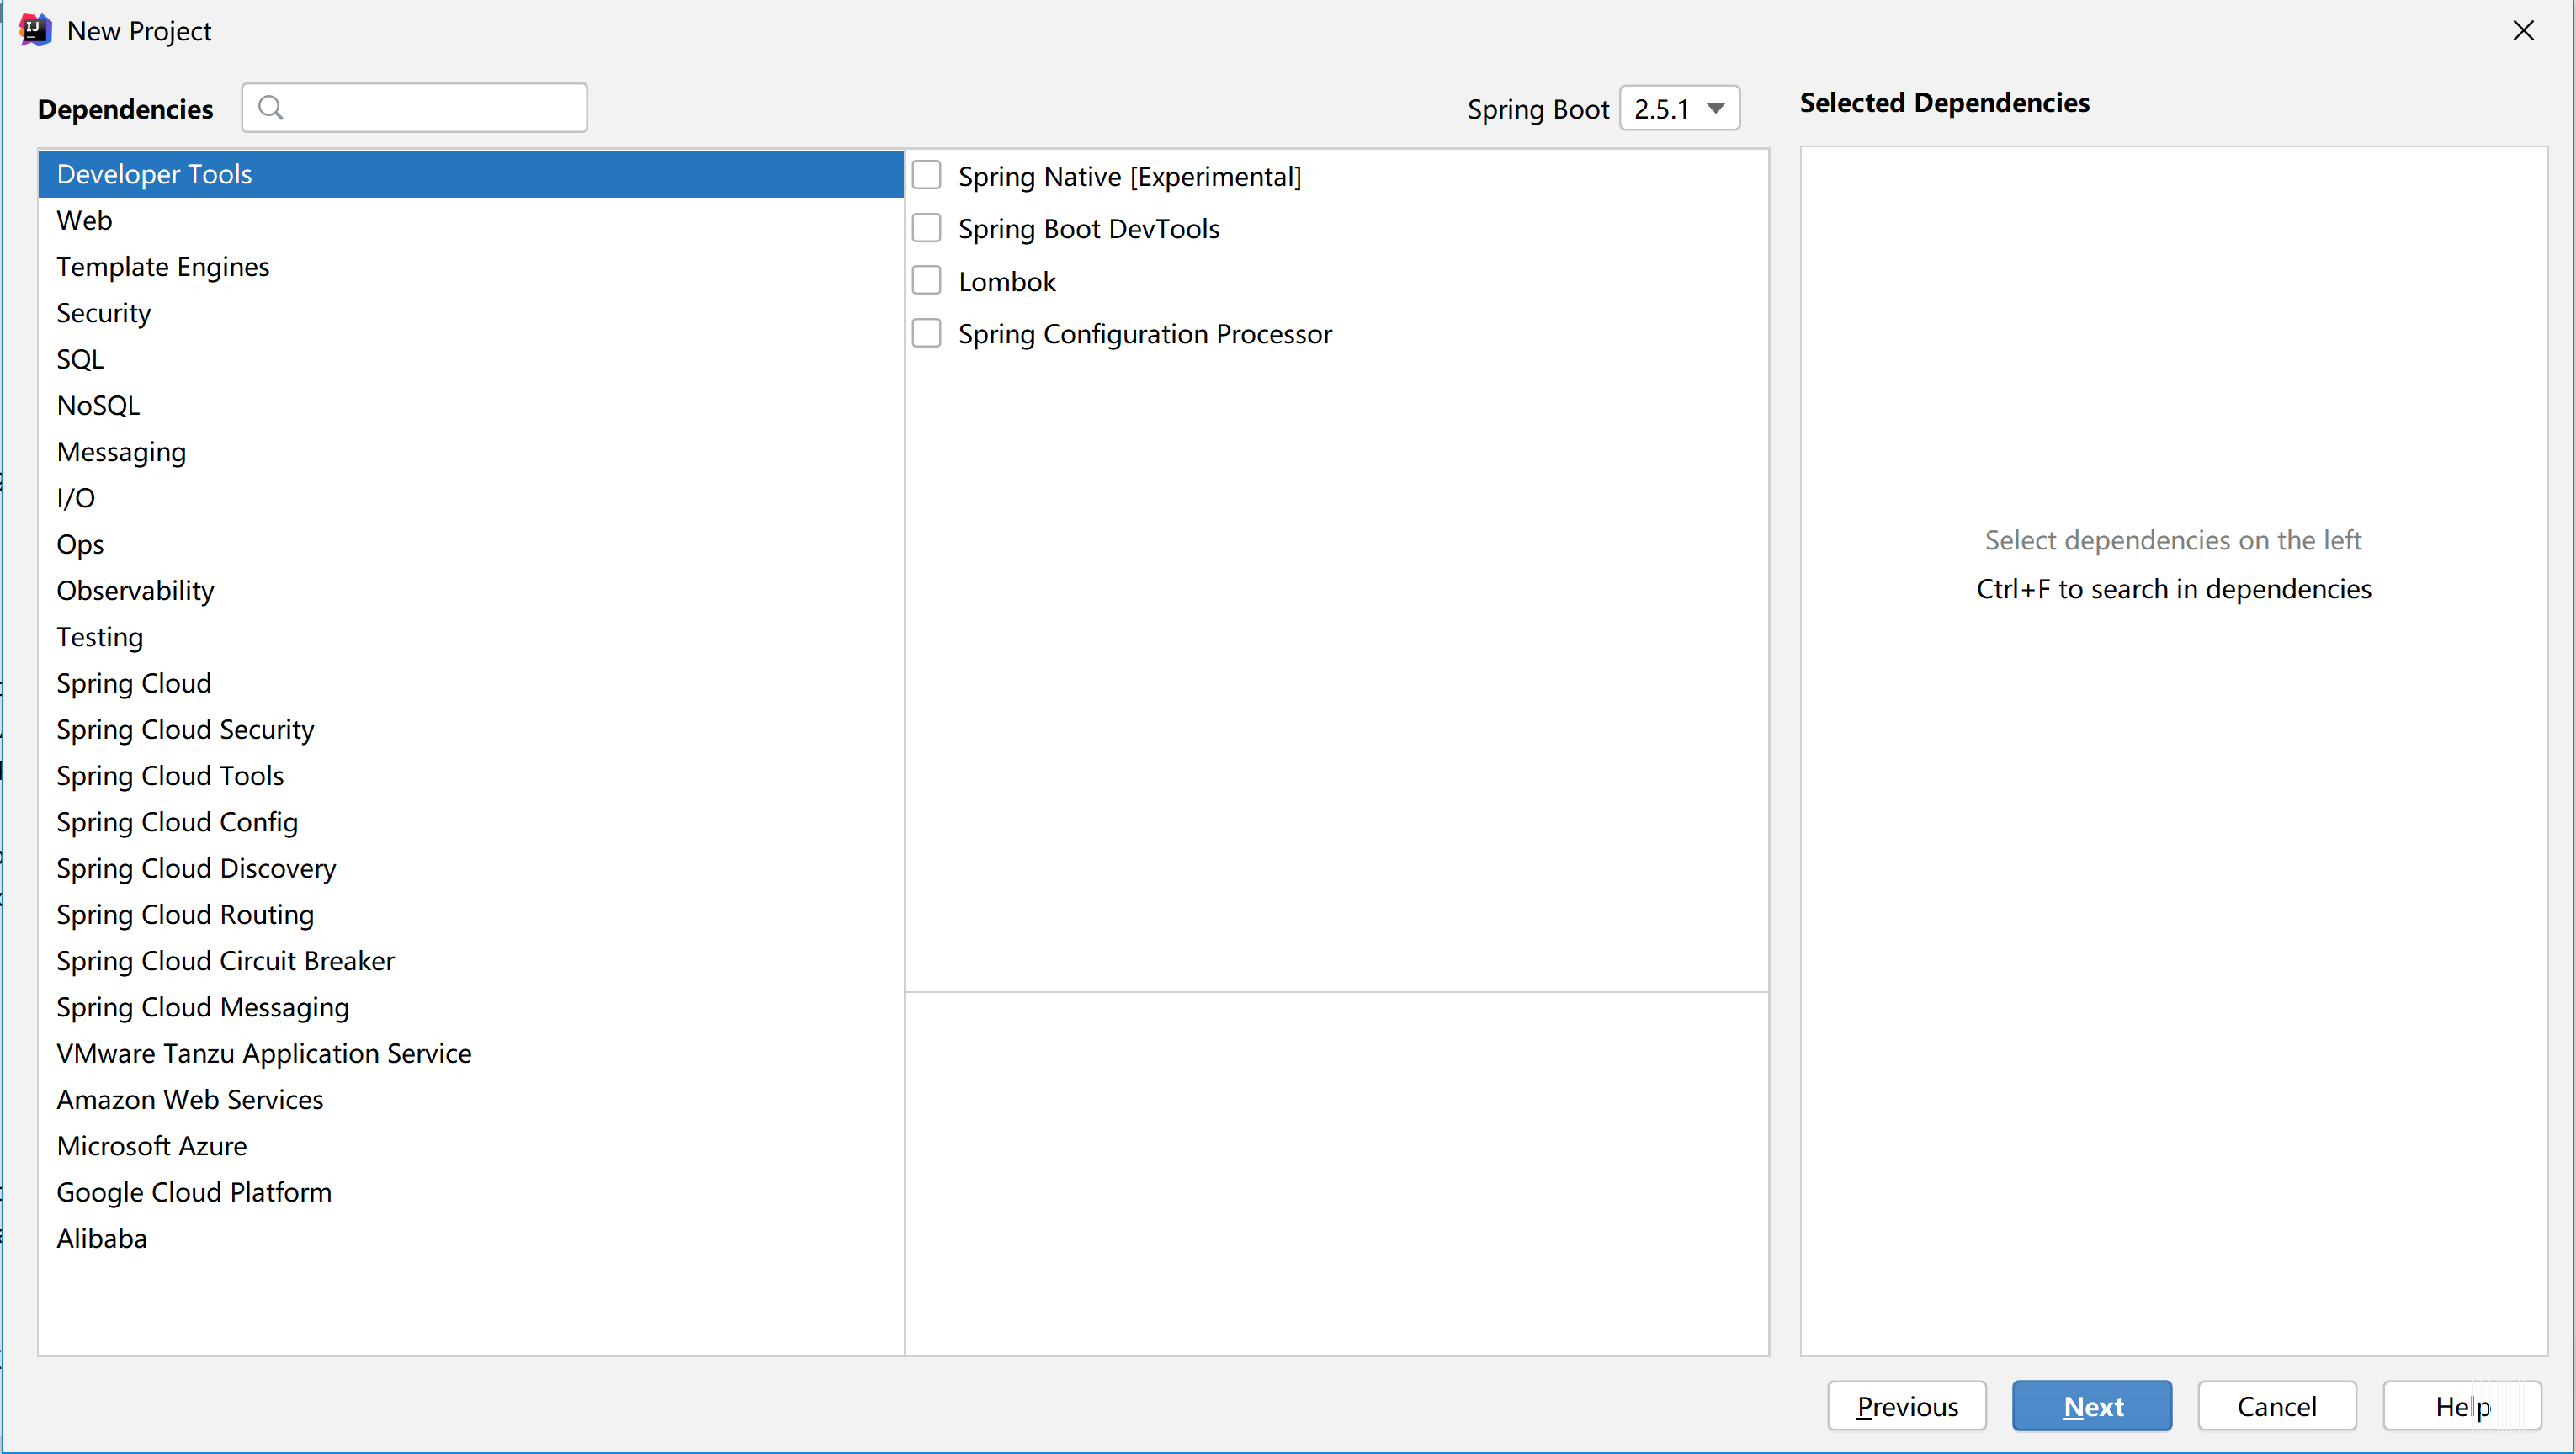
注:如果出现pom.xml配置文件错误:系统找不到文件路径,打开设置文件中的Maven选项检查相应的文件是否正确。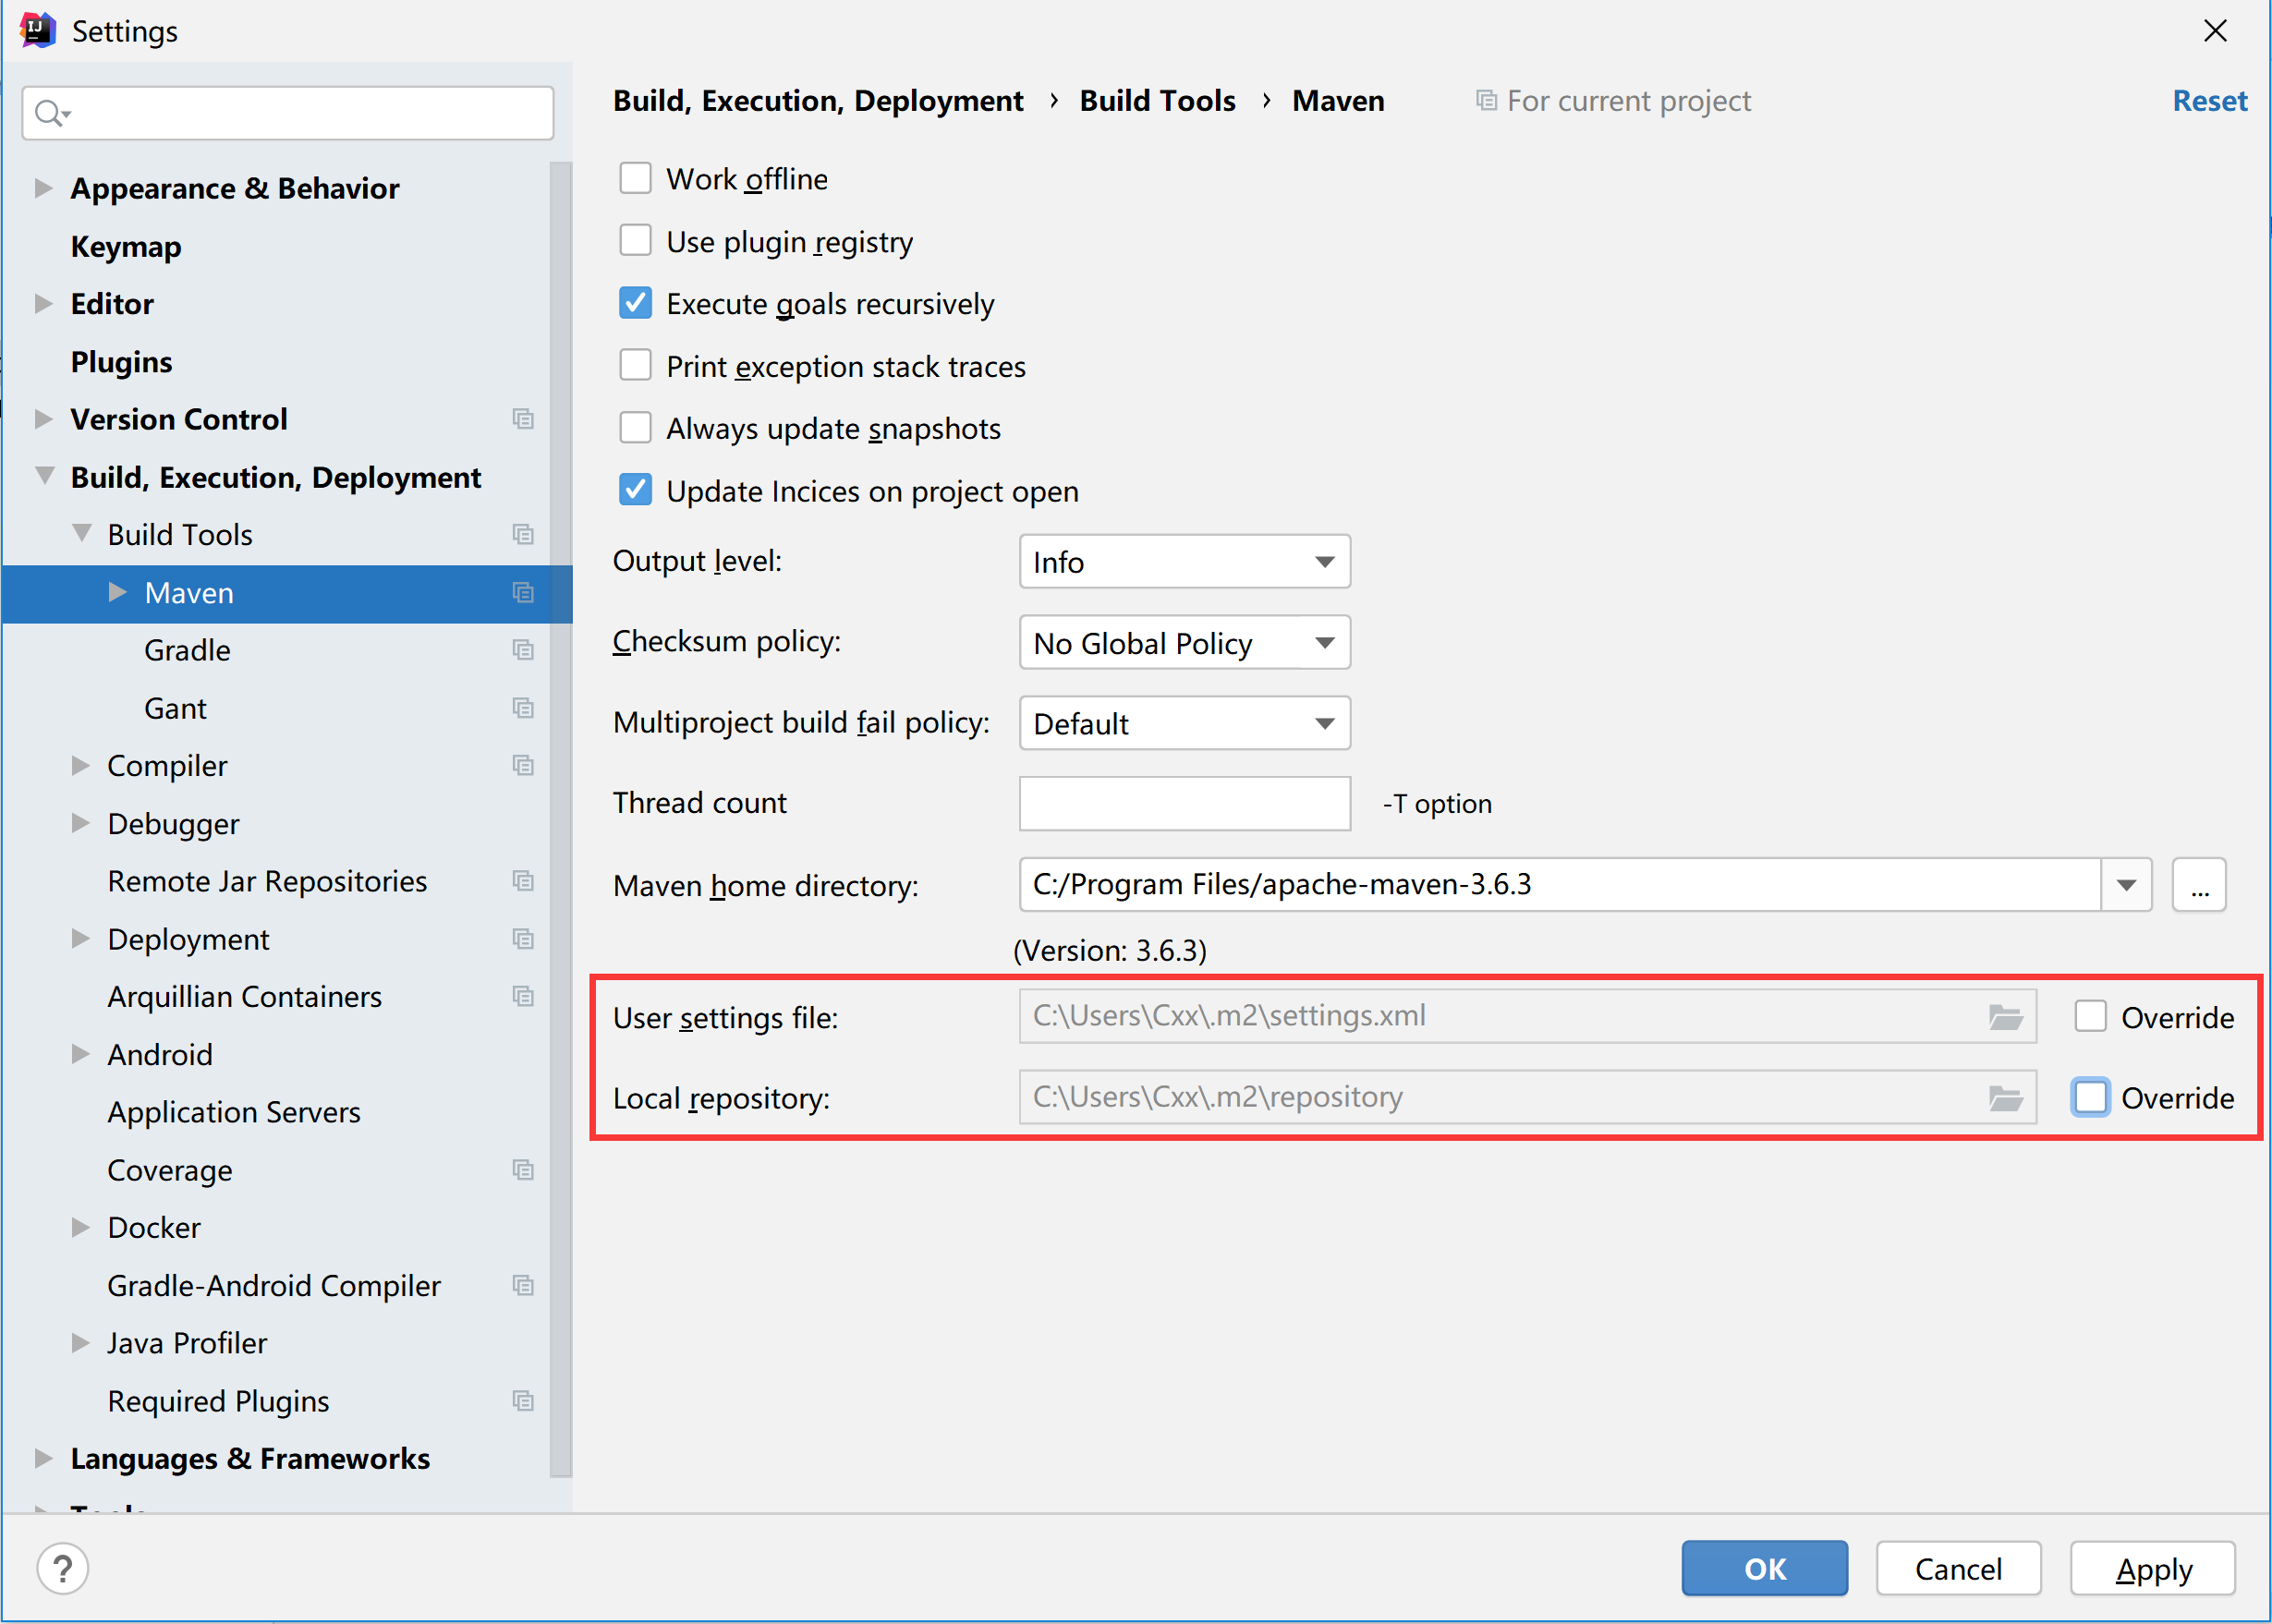
添加依赖文件
在pom.xml依赖管理文件中添加json依赖,并添加依赖版本管理:1
2
3
4
5
6
7
8
9
10
11
12
13
14
15
16<!--json-->
<dependency>
<groupId>com.alibaba</groupId>
<artifactId>fastjson</artifactId>
<version>${fastjson.version}</version>
</dependency>
<dependency>
<groupId>org.json</groupId>
<artifactId>json</artifactId>
<version>${json.version}</version>
</dependency>
<dependency>
<groupId>com.google.code.gson</groupId>
<artifactId>gson</artifactId>
<version>${gson.version}</version>
</dependency>
依赖版本管理,这里部分依赖版本后续会依次添加。1
2
3
4
5
6
7
8
9
10
11
12
13
14
15
16
17
18
19
20
21
22
23
24
25<!-- 依赖版本管理 -->
<properties>
<java.version>1.8</java.version>
<mybatis-plus.version>3.3.1</mybatis-plus.version>
<velocity.version>2.0</velocity.version>
<swagger.version>2.9.2</swagger.version>
<aliyun.oss.version>3.1.0</aliyun.oss.version>
<jodatime.version>2.10.1</jodatime.version>
<commons-fileupload.version>1.3.1</commons-fileupload.version>
<commons-io.version>2.6</commons-io.version>
<commons-lang.version>3.9</commons-lang.version>
<httpclient.version>4.5.1</httpclient.version>
<jwt.version>0.7.0</jwt.version>
<aliyun-java-sdk-core.version>4.3.3</aliyun-java-sdk-core.version>
<aliyun-java-sdk-vod.version>2.15.2</aliyun-java-sdk-vod.version>
<aliyun-sdk-vod-upload.version>1.4.11</aliyun-sdk-vod-upload.version>
<fastjson.version>1.2.28</fastjson.version>
<gson.version>2.8.2</gson.version>
<json.version>20170516</json.version>
<commons-dbutils.version>1.7</commons-dbutils.version>
<canal.client.version>1.1.0</canal.client.version>
<docker.image.prefix>zx</docker.image.prefix>
<alibaba.easyexcel.version>2.1.1</alibaba.easyexcel.version>
<apache.xmlbeans.version>3.1.0</apache.xmlbeans.version>
</properties>
实现Socket工具类
在main->java->com.njtech.seerwebrobot文件夹下新建包service->utils,并在包下面新建SocketUtils.java和StringUtils.java文件。
在main->java->com.njtech.seerwebrobot文件夹下新建包service->constant,并在包下面新建Constant.java、RobotControlAPIConst、RobotStatusAPIConst和RobotTaskAPIConst.java文件。用来存储仙工底盘TCP API接口中的常量。
Constant.java1
2
3
4
5
6
7
8
9
10
11
12
13
14
15
16
17
18
19public interface Constant {
// 机器人有线IP
// String robotIP = "192.168.192.5";
// 机器人AMR无线IP
String robotIP = "192.168.3.99";
// 机器人状态API端口号
Integer robotStatusPort = 19204;
// 机器人控制API端口号
Integer robotControlPort = 19205;
// 机器人导航API端口号
Integer robotTaskPort = 19206;
// 机器人配置API端口号
Integer robotConfigPort = 19207;
// 头部数据区
String apiHeader = "5A 01 00 01";
// 保留区
String apiRetain = "00 00 00 00 00 00";
}
RobotControlAPIConst.java1
2
3
4public interface RobotControlAPIConst {
// 确定定位正确
String robotControlConfirmLoc = "5A 01 00 01 00 00 00 00 07 D3 00 00 00 00 00 00";
}
RobotStatusAPIConst.java1
2
3
4
5
6
7
8
9
10
11
12
13
14public interface RobotStatusAPIConst {
// 查询机器人信息
String robotStatusAllInfo = "5A 01 00 01 00 00 00 00 03 E8 00 00 00 00 00 00";
// 查询机器人运行信息
String robotStatusRunInfo = "5A 01 00 01 00 00 00 00 03 EA 00 00 00 00 00 00";
// 查询机器人电池状态
String robotStatusBatteryInfo = "5A 01 00 01 00 00 00 00 03 EF 00 00 00 00 00 00";
// 查询机器人位置信息
String robotStatusLocationInfo = "5A 01 00 01 00 00 00 00 03 EC 00 00 00 00 00 00";
// 查询机器人I/O数据
String robotStatusIoInfo = "5A 01 00 01 00 00 00 00 03 F5 00 00 00 00 00 00";
// 查询机器人急停状态
String robotStatusEmergencyInfo = "5A 01 00 01 00 00 00 00 03 F4 00 00 00 00 00 00 ";
}
RobotTaskAPIConst.java1
2
3
4
5
6
7
8
9
10
11
12
13public interface RobotTaskAPIConst {
// 路径导航
String robotTaskGotarget = "0BEB";
// 暂停当前导航
String robotTaskPause = "5A 01 00 01 00 00 00 00 0B B9 00 00 00 00 00 00";
// 继续当前导航
String robotTaskResume = "5A 01 00 01 00 00 00 00 0B BA 00 00 00 00 00 00";
// 取消当前导航
String robotTaskCancel = "5A 01 00 01 00 00 00 00 0B BB 00 00 00 00 00 00";
}
注:这里只列举了部分TCP接口中的数据。
StringUtils.java1
2
3
4
5
6
7
8
9
10
11
12
13
14
15
16
17
18
19
20
21
22
23
24
25
26
27
28
29
30
31
32
33
34
35
36
37
38
39
40
41
42
43
44
45
46
47
48
49
50
51
52
53
54
55
56
57
58
59
60
61
62
63
64
65
66
67
68
69
70
71
72
73public class StringUtils {
/**
* 将十六进制的字符串转换成字节数组
*
* @param hexString
* @return
*/
public static byte[] hexStringToByteArray(String hexString) {
hexString = hexString.replaceAll(" ", "");
int len = hexString.length();
byte[] bytes = new byte[len / 2];
for (int i = 0; i < len; i += 2) {
// 两位一组,表示一个字节,把这样表示的16进制字符串,还原成一个字节
bytes[i / 2] = (byte) ((Character.digit(hexString.charAt(i), 16) << 4) + Character
.digit(hexString.charAt(i + 1), 16));
}
return bytes;
}
/**
* 字符串转化成为16进制字符串
* @param s
* @return
*/
public static String strTo16(String s) {
String str = "";
for (int i = 0; i < s.length(); i++) {
int ch = (int) s.charAt(i);
String s4 = Integer.toHexString(ch);
str = str + s4;
}
return str;
}
/**
* 将两个byte数组合并为一个
* @param data1 要合并的数组1
* @param data2 要合并的数组2
* @return 合并后的新数组
*/
public static byte[] mergeBytes(byte[] data1, byte[] data2) {
byte[] data3 = new byte[data1.length + data2.length];
System.arraycopy(data1, 0, data3, 0, data1.length);
System.arraycopy(data2, 0, data3, data1.length, data2.length);
return data3;
}
/**
* 截取字符串str中指定字符 strStart、strEnd之间的字符串
*
* @param str 原始字符串
* @param strStart 开始
* @param strEnd 结束
* @return 截取后的
*/
public static String subString(String str, String strStart, String strEnd) {
/* 找出指定的2个字符在 该字符串里面的 位置 */
int strStartIndex = str.indexOf(strStart);
int strEndIndex = str.indexOf(strEnd);
/* index 为负数 即表示该字符串中 没有该字符 */
if (strStartIndex < 0) {
return "字符串 :---->" + str + "<---- 中不存在 " + strStart + ", 无法截取目标字符串";
}
if (strEndIndex < 0) {
return "字符串 :---->" + str + "<---- 中不存在 " + strEnd + ", 无法截取目标字符串";
}
/* 开始截取 */
String result = str.substring(strStartIndex, strEndIndex).substring(strStart.length());
return result;
}
}
SocketUtils.java1
2
3
4
5
6
7
8
9
10
11
12
13
14
15
16
17
18
19
20
21
22
23
24
25
26
27
28
29
30
31
32
33
34
35
36
37
38
39
40
41
42
43
44
45
46
47
48
49
50
51
52
53
54
55
56
57
58
59
60
61
62
63
64
65
66
67
68
69
70
71
72
73
74
75
76
77
78
79
80
81
82
83
84
85
86
87
88
89
90
91
92
93
94
95
96
97
98
99
100
101
102
103
104
105
106
107
108
109
110
111
112
113
114
115
116
117
118
119
120
121
122
123
124
125
126
127
128
129
130
131
132
133
134
135
136
137
138
139
140
141
142
143
144
145
146
147public class SocketUtils {
// 发送TCP报文数据,无数据区域
public static JSONObject sendTCPInfo(String robotIP, Integer robotAPIPort, String sendTCPData){
JSONObject jsonInfo = new JSONObject();
try {
// 创建socket,指定服务区地址和端口号
// Socket socket = new Socket(Constant.robotIP, apiPort);
Socket socket = new Socket();
SocketAddress socketAddress = new InetSocketAddress(robotIP, robotAPIPort);
// 设置连接时间
socket.connect(socketAddress, 100);
// 获取输出流,向服务器发送信息
OutputStream os = socket.getOutputStream();
byte[] bytes = StringUtils.hexStringToByteArray(sendTCPData);
os.write(bytes);
os.flush();
socket.shutdownOutput();//关闭输出流
//获取输入流,读取服务器的响应信息
InputStream is = socket.getInputStream();
BufferedReader br = new BufferedReader(new InputStreamReader(is));
// 原始数据
String rawInfo = br.readLine();
// System.out.println("原始数据: " + rawInfo);
// 截取 引号 之前字符串 需要截取的字符中间不要加空格!
String subInfo = rawInfo.substring(0, rawInfo.indexOf("\""));
// System.out.println("截取 { 之前的数据: " + subInfo);
// 重新构造的数据
String newInfo = null;
// 去掉 引号 之前的数据 重新构造数据
newInfo = rawInfo.substring(subInfo.length());
// System.out.println("新的数据: " + newInfo);
jsonInfo = JSONObject.parseObject("{" + newInfo);
jsonInfo.put("msg", "noError");
// 关闭资源
br.close();
is.close();
os.close();
socket.close();
} catch (SocketTimeoutException | SocketException s){
jsonInfo.put("msg", "networkError");
} catch (Exception e) {
jsonInfo.put("msg", "otherError");
e.printStackTrace();
}
return jsonInfo;
}
// 发送TCP报文数据,有数据区域
public static JSONObject sendTCPInfo(String robotIP, Integer robotAPIPort, String sendTCPData, String apiType){
JSONObject jsonInfo = new JSONObject();
try {
// 创建socket,指定服务区地址和端口号
// Socket socket = new Socket(Constant.robotIP, robotAPIPort);
Socket socket = new Socket();
SocketAddress socketAddress = new InetSocketAddress(robotIP, robotAPIPort);
// 设置连接时间
socket.connect(socketAddress, 100);
// 获取输出流,向服务器发送信息
OutputStream os = socket.getOutputStream();
byte[] totalBytes = sendInfo(Constant.apiHeader, sendTCPData, apiType, Constant.apiRetain);
os.write(totalBytes);
os.flush();
socket.shutdownOutput();//关闭输出流
// 获取输入流,读取服务器的响应信息
InputStream is = socket.getInputStream();
BufferedReader br = new BufferedReader(new InputStreamReader(is));
String rawInfo = br.readLine();
// System.out.println("原始字符串: " + rawInfo);
// 截取 引号 之前字符串 需要截取的字符中间不要加空格!
String subInfo = rawInfo.substring(0, rawInfo.indexOf("\""));
// System.out.println("截取 { 之前的数据: " + subInfo);
// 重新构造的数据
String newInfo = null;
// 去掉 引号 之前的数据 重新构造数据
newInfo = rawInfo.substring(subInfo.length());
// System.out.println("新的数据: " + newInfo);
jsonInfo = JSONObject.parseObject("{" + newInfo);
jsonInfo.put("msg", "noError");
//关闭资源
br.close();
is.close();
os.close();
socket.close();
} catch (SocketTimeoutException | SocketException s){
jsonInfo.put("msg", "networkError");
} catch (Exception e) {
jsonInfo.put("msg", "otherError");
e.printStackTrace();
}
return jsonInfo;
}
// 发送数据
public static byte[] sendInfo(String header, String data, String type, String retain){
// 头部数据区
byte[] headerBytes = StringUtils.hexStringToByteArray(header);
// 数据区
String data16 = StringUtils.strTo16(data);
byte[] dataBytes = StringUtils.hexStringToByteArray(data16);
// 数据区长度 需要除以2且数据长度为8位
String dataLength = String.format("%08x", data16.length() / 2);
byte[] dataLengthBytes = StringUtils.hexStringToByteArray(dataLength);
// 报文类型
byte[] typeBytes = StringUtils.hexStringToByteArray(type);
// 保留区
byte[] retainBytes = StringUtils.hexStringToByteArray(retain);
byte[] totalBytes = StringUtils.mergeBytes(headerBytes, dataLengthBytes);
totalBytes = StringUtils.mergeBytes(totalBytes, typeBytes);
totalBytes = StringUtils.mergeBytes(totalBytes, retainBytes);
totalBytes = StringUtils.mergeBytes(totalBytes, dataBytes);
return totalBytes;
}
}
由上述分析可知,一共分为两种情况,因此定义2个函数分别处理没有请求数据的和有请求数据的,两者只在发送数据处不同,其他均相似。
首先创建一个JSONObject类型的变量用来处理接收到的json类型的数据。
然后使用SocketAddress socketAddress = new InetSocketAddress(robotIP, robotAPIPort)创建TCP连接。这里可以通过设置连接时间防止TCP网络未正确连接时,服务器长时间等待的情况(如果在连接时间内未正常连接,则会抛出SocketTimeoutException异常)。
这里最重要的一行代码就是byte[] bytes = StringUtils.hexStringToByteArray(sendTCPData),即将字符串转为字节数组。如果使用字符串作为发送数据,仙工底盘的控制器是无法正确解析的!
然后通过String rawInfo = br.readLine();接收控制器返回的数据。
最后通过字符串操作和JSONObject对象操作将原始数据处理为所需的json对象。
注:这里使用了msg字段来处理各种TCP通讯情况。
针对有请求数据的情况,根据上文的原理分析,首先需要利用StringUtils.strTo16()将发送区数据转为十六进制数据,然后计算数据区长度并除以2,即data16.length() / 2,最后因为数据区长度的字段规定长度为8位,利用String.format()统一长度。
测试Socke连接
查询信息
在test文件目录中的SeerwebrobotApplicationTests文件夹下新建测试类:1
2
3
4
5
6
7
8
9
10
11
12
13
14
15
16
void testGetInfo(){
JSONObject robotRawInfo;
// String robotIP = "192.168.192.5";
String robotIP = "192.168.3.99";
robotRawInfo = SocketUtils.sendTCPInfo(robotIP, Constant.robotStatusPort,
RobotStatusAPIConst.robotStatusAllInfo);
String robotRawInfoStr = JSON.toJSONString(robotRawInfo,
SerializerFeature.PrettyFormat, SerializerFeature.WriteMapNullValue,
SerializerFeature.WriteDateUseDateFormat);
System.out.println(robotRawInfoStr);
// System.out.println(robotRawInfo);
}
这里直接调用SocketUtils工具类中的sendTCPInfo()函数,其中robotIP为实际的底盘IP地址,其余2个参数为常量中的相应数据,最后将其格式化JSON输出。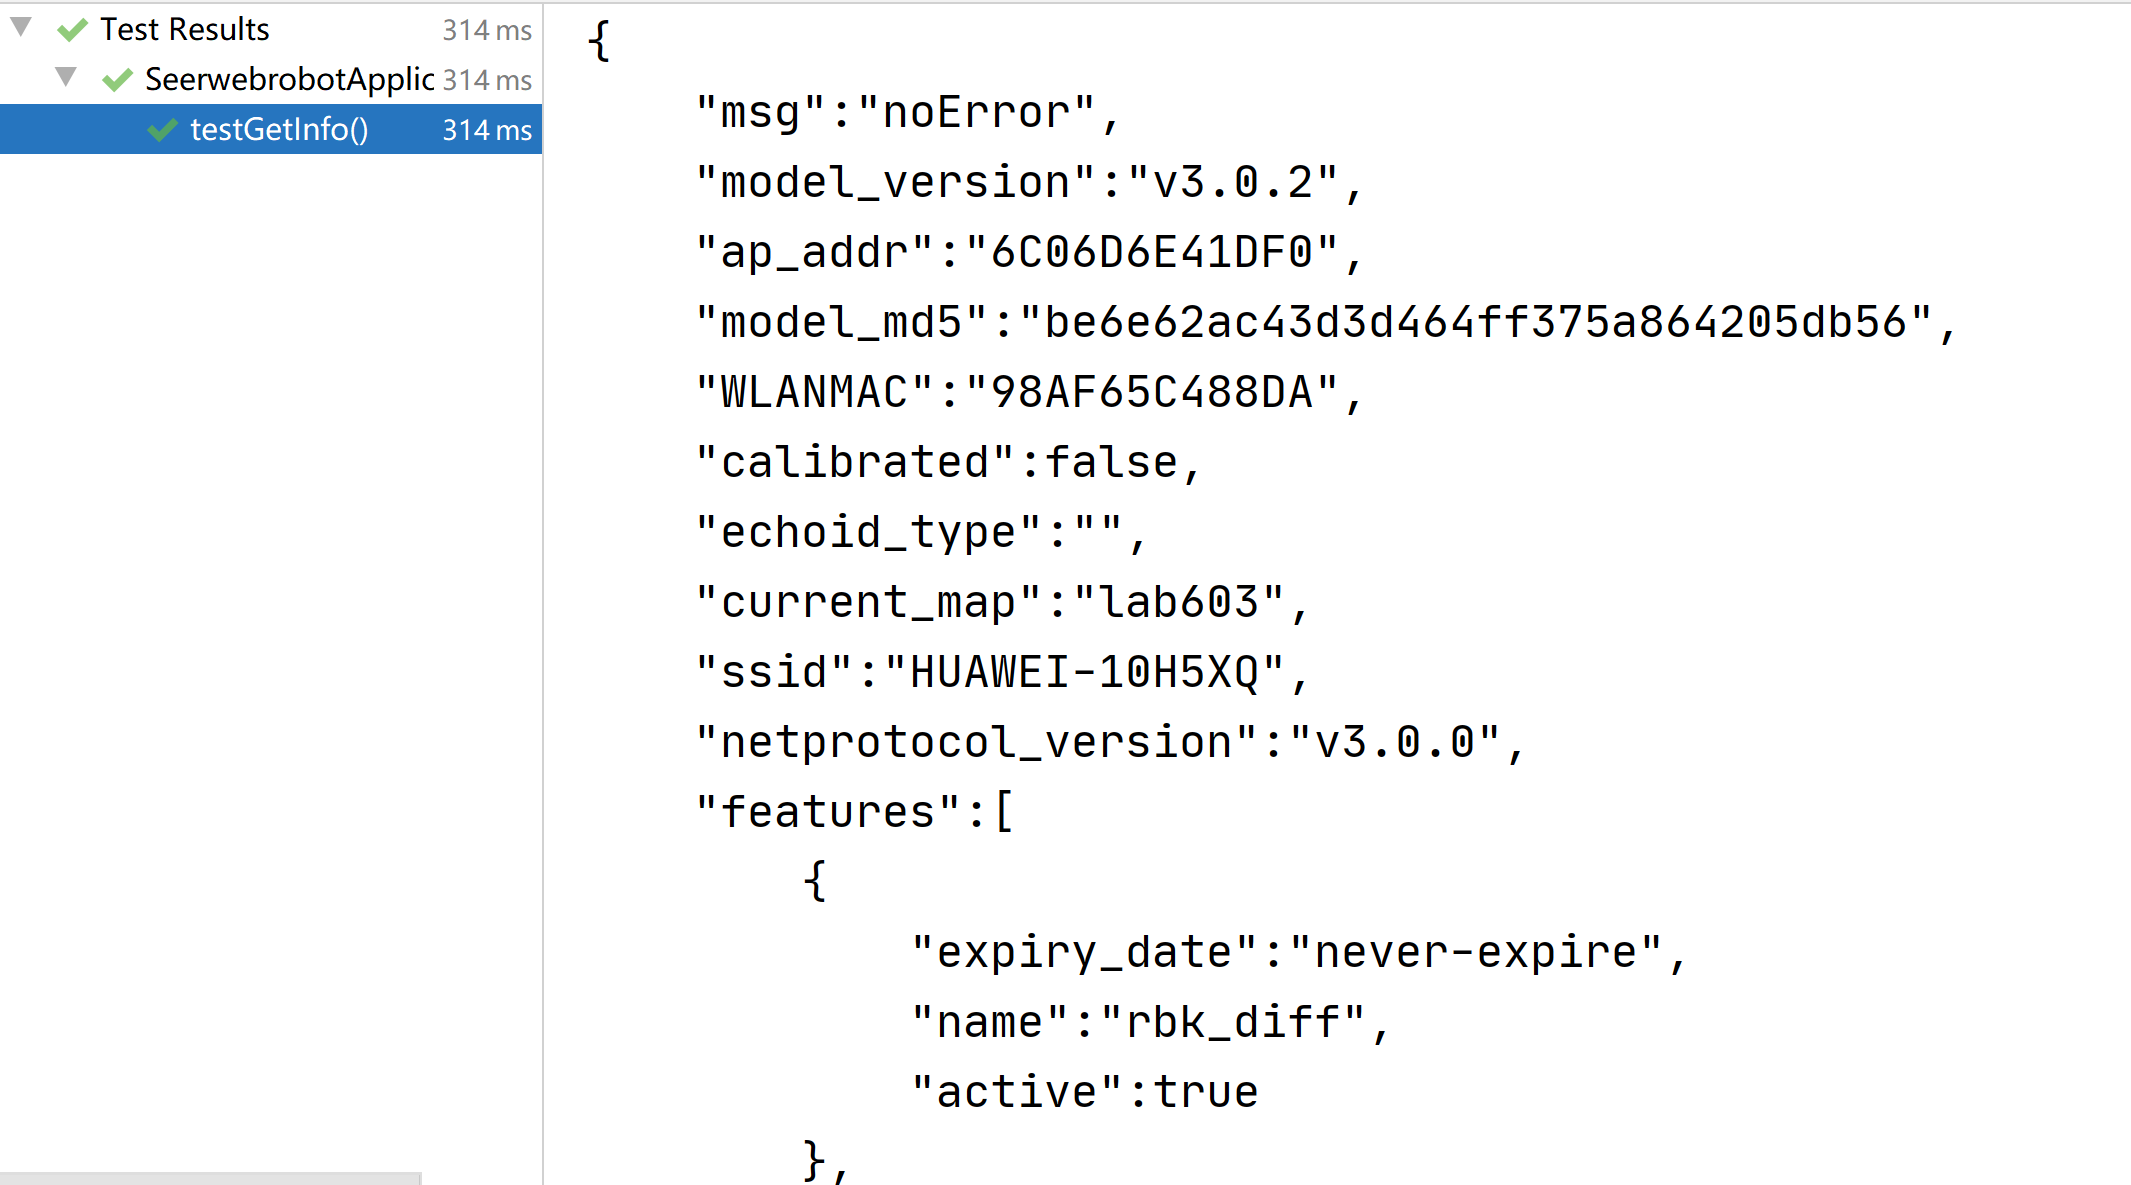
发送信息
这里测试其导航功能,从A点到B点。1
2
3
4
5
6
7
8
9
10
11
12
13
14
15
16
17
18
void testSendInfo(){
JSONObject jsonSendTCPData = new JSONObject();
jsonSendTCPData.put("source_id", "LM1");
jsonSendTCPData.put("id", "LM6");
jsonSendTCPData.put("task_id", "87654321");
String sendTCPData = JSONObject.toJSONString(jsonSendTCPData);
JSONObject robotRawInfo = SocketUtils.sendTCPInfo(Constant.robotIP, Constant.robotTaskPort,
sendTCPData, RobotTaskAPIConst.robotTaskGotarget);
String robotRawInfoStr = JSON.toJSONString(robotRawInfo,
SerializerFeature.PrettyFormat, SerializerFeature.WriteMapNullValue,
SerializerFeature.WriteDateUseDateFormat);
System.out.println(robotRawInfoStr);
}
相比较有数据的发送信息,即查询信息,只需要新建一个JSONObject对象的数据,并按照官网的说明文档将数据依次添加进去即可。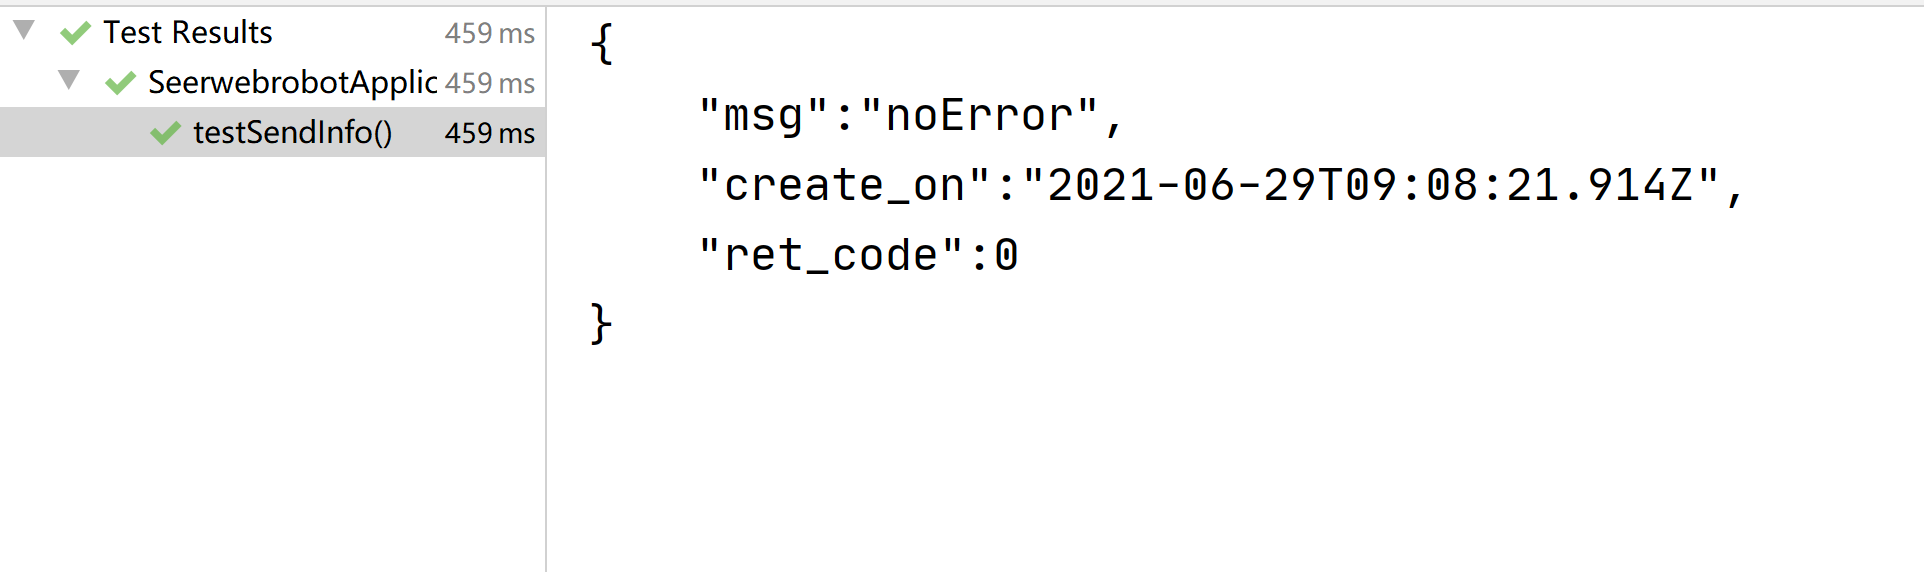
Web后端框架搭建
平台
Spring Boot
MySql
数据库配置
首先配置好本地数据库系统MySql 8,按照数据库软件Navicat(也可以是其他任意一个)建立数据表。
这里以机器人信息和机器人任务表作为案例展示,需要其他表格可以按相同操作添加。
根据仙工官网提供的API返回值信息建立数据表: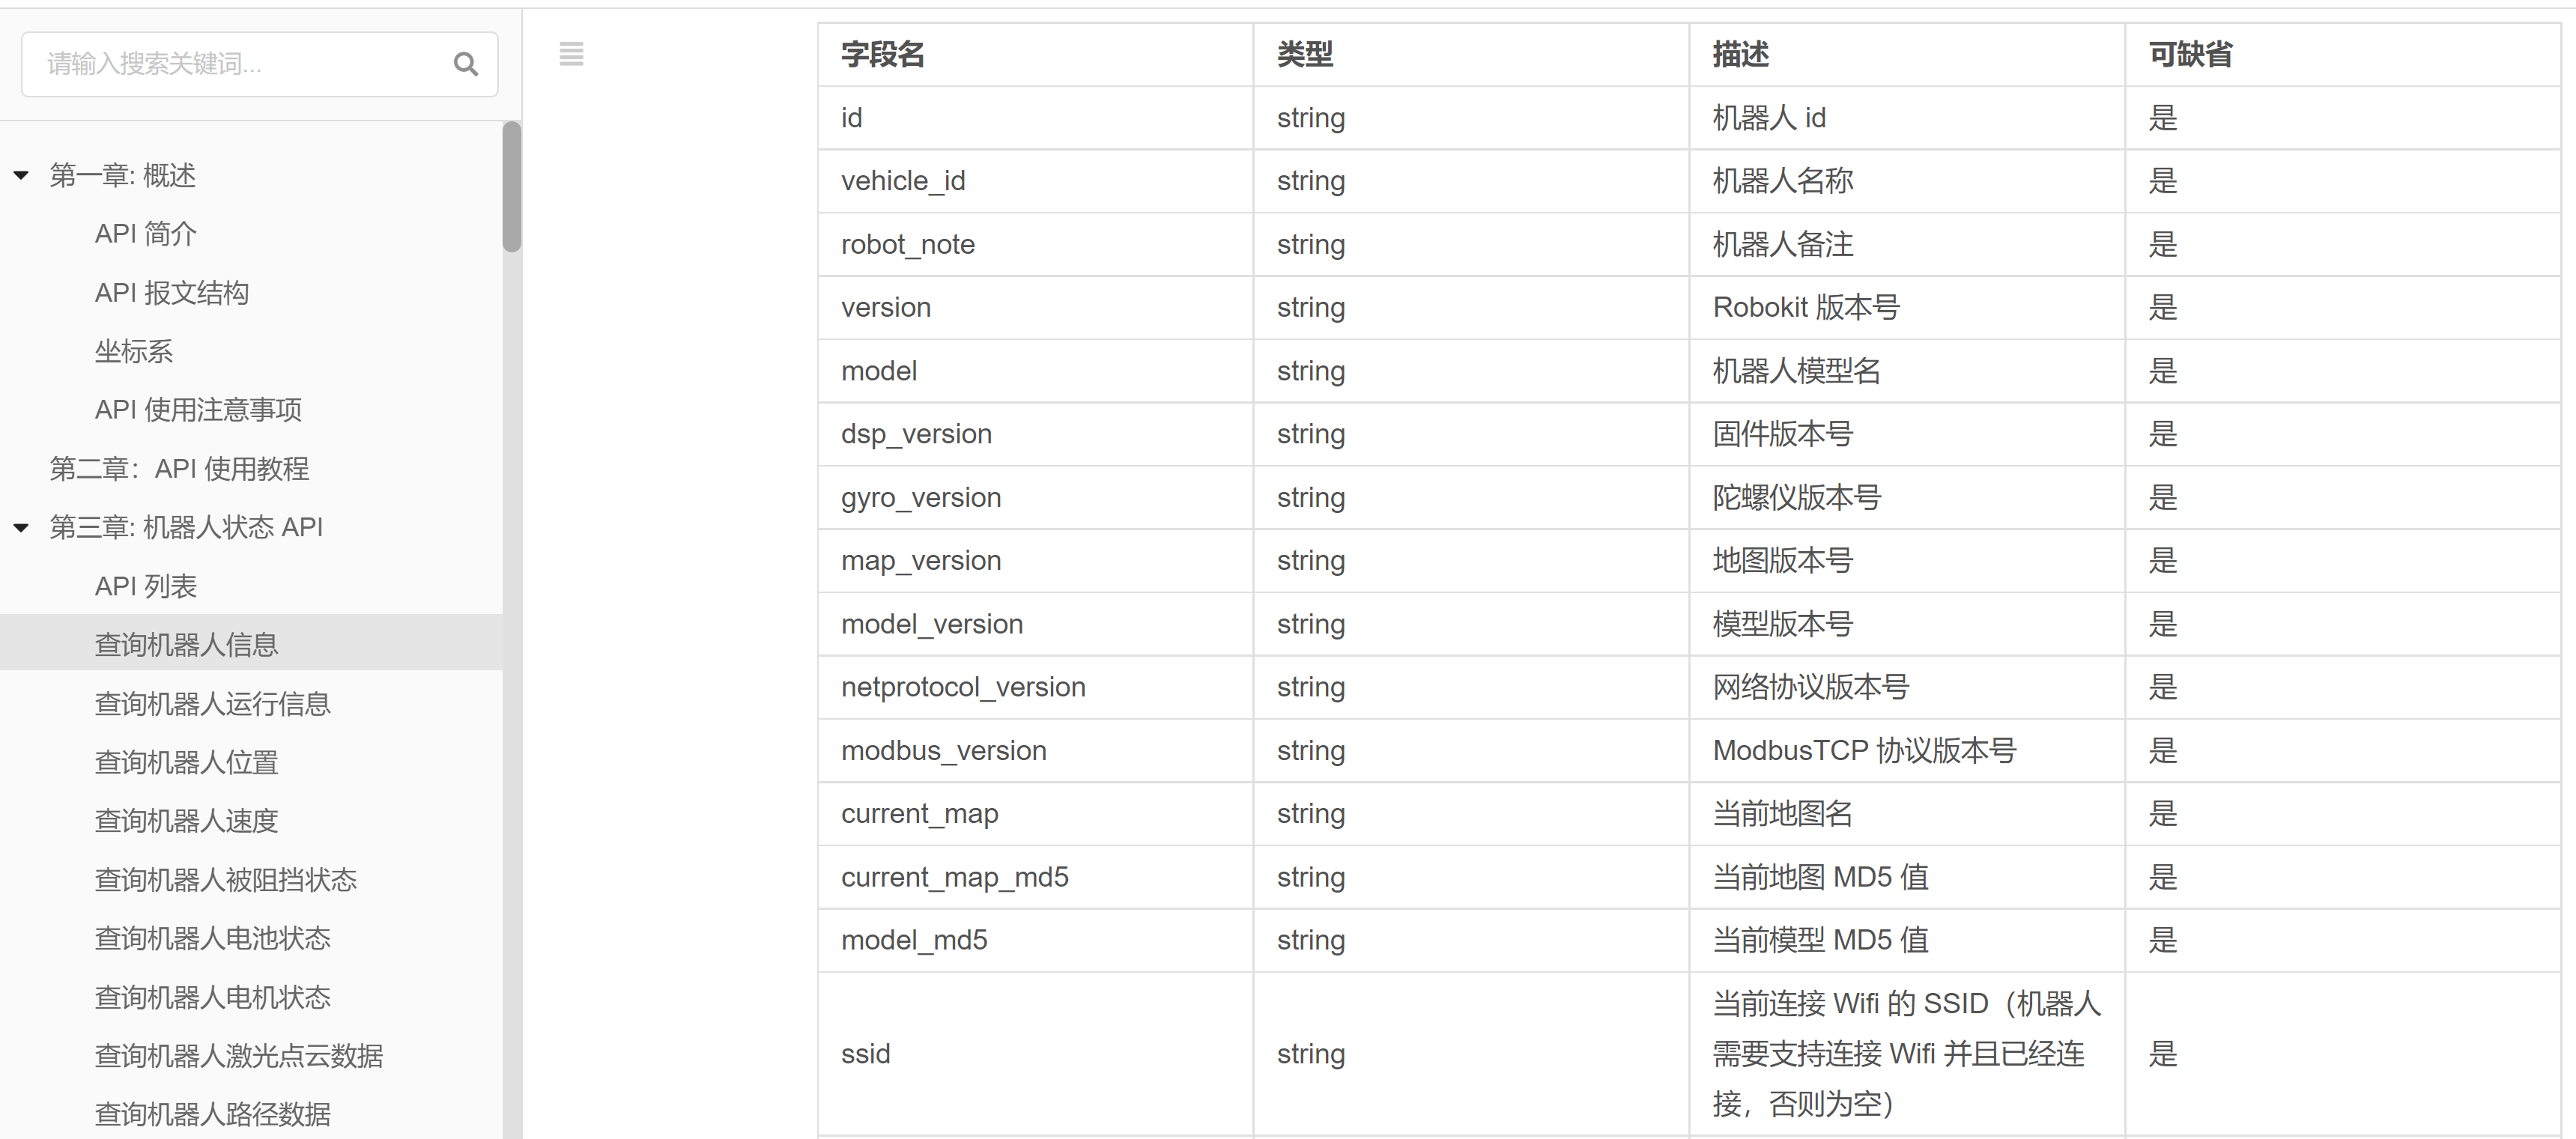
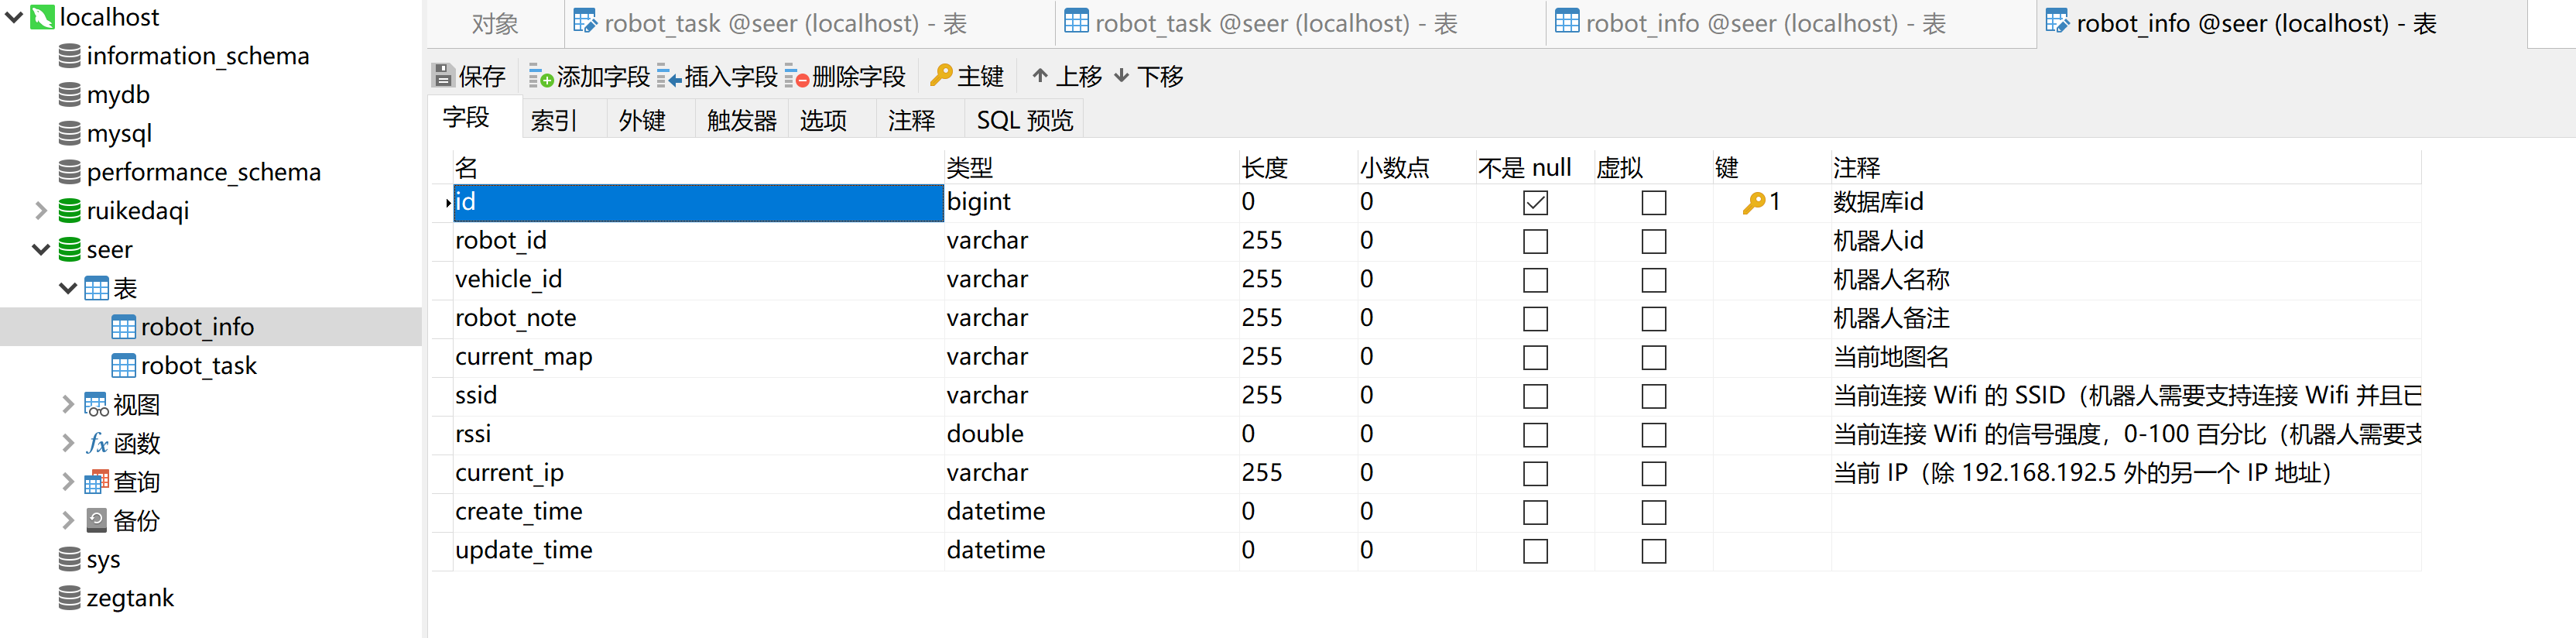
这里只采用了部分字段建立数据表,其中id、create_time和update_time为数据表必需字段。
Spring Boot后端框架搭建
基本配置文件
添加依赖
首先在pom.xml添加依赖:1
2
3
4
5
6
7
8
9
10
11
12
13
14
15
16
17
18
19
20
21
22
23
24
25
26
27
28
29
30
31
32
33
34
35
36
37
38
39
40
41
42
43
44
45
46
47
48
49
50
51
52
53
54
55
56
57
58
59
60
61
62
63
64
65
66
67
68
69
70
71
72
73
74
75
76
77
78
79
80
81
82
83
84
85
86
87
88
89
90<dependencies>
<dependency>
<groupId>org.springframework.boot</groupId>
<artifactId>spring-boot-starter</artifactId>
</dependency>
<dependency>
<groupId>org.springframework.boot</groupId>
<artifactId>spring-boot-starter-test</artifactId>
<scope>test</scope>
</dependency>
<!-- Spring Boot Web 依赖 -->
<dependency>
<groupId>org.springframework.boot</groupId>
<artifactId>spring-boot-starter-thymeleaf</artifactId>
</dependency>
<dependency>
<groupId>org.springframework.boot</groupId>
<artifactId>spring-boot-starter-web</artifactId>
</dependency>
<!--mysql JDBC驱动 -->
<dependency>
<groupId>mysql</groupId>
<artifactId>mysql-connector-java</artifactId>
</dependency>
<!--mybatis-plus 持久层-->
<dependency>
<groupId>com.baomidou</groupId>
<artifactId>mybatis-plus-boot-starter</artifactId>
<version>${mybatis-plus.version}</version>
</dependency>
<dependency>
<groupId>com.baomidou</groupId>
<artifactId>mybatis-plus-generator</artifactId>
<version>${mybatis-plus.version}</version>
</dependency>
<!-- velocity 模板引擎, Mybatis Plus 代码生成器需要 -->
<dependency>
<groupId>org.apache.velocity</groupId>
<artifactId>velocity-engine-core</artifactId>
<version>${velocity.version}</version>
</dependency>
<!--swagger-->
<dependency>
<groupId>io.springfox</groupId>
<artifactId>springfox-swagger2</artifactId>
<version>${swagger.version}</version>
</dependency>
<!--swagger ui-->
<dependency>
<groupId>io.springfox</groupId>
<artifactId>springfox-swagger-ui</artifactId>
<version>${swagger.version}</version>
</dependency>
<!-- lombok -->
<dependency>
<groupId>org.projectlombok</groupId>
<artifactId>lombok</artifactId>
<version>1.18.12</version>
</dependency>
<dependency>
<groupId>com.github.jsqlparser</groupId>
<artifactId>jsqlparser</artifactId>
<version>3.1</version>
<scope>test</scope>
</dependency>
<!--json-->
<dependency>
	<groupId>com.alibaba</groupId>
	<artifactId>fastjson</artifactId>
	<version>${fastjson.version}</version>
</dependency>
<dependency>
	<groupId>org.json</groupId>
	<artifactId>json</artifactId>
	<version>${json.version}</version>
</dependency>
<dependency>
	<groupId>com.google.code.gson</groupId>
	<artifactId>gson</artifactId>
	<version>${gson.version}</version>
</dependency>
</dependencies>
后端框架配置
然后需要对整个后端框架进行一个基本的配置设置。
在main->java->com.njtech.seerwebrobot->service包下面新建base包,并在base包下面新建config包和handler包,分别处理基本配置和数据库自动填充功能。然后在config包下面新建MyConfig.java和MybaticPlusConfig.java,在handler包下面新建CommonMetaObjectHandler.java文件,最终base包的文件目录如下(后面2个java文件后续会介绍):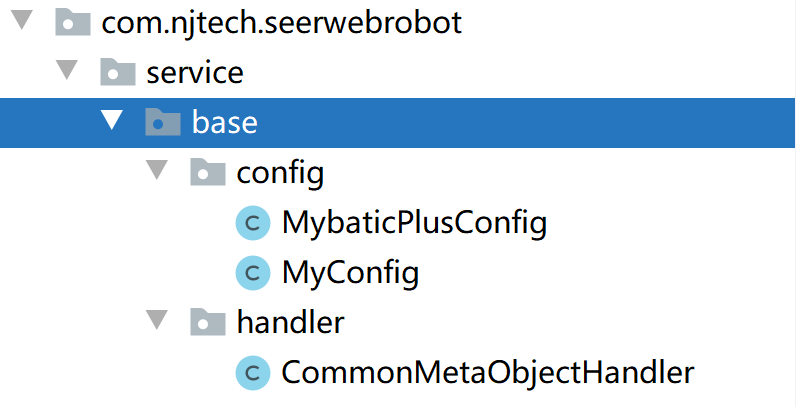
MyConfig.java1
2
3
4
5
6
7
8
9
10
11
12
13
14
15
16
17
18
19
20
21
22
23
24
25
26
27
28
29
2
public class MyConfig {
//配置swagger2核心配置docket
//修改默认配置bean
public Docket myDocket(){
return new Docket(DocumentationType.SWAGGER_2) //指定API类型为swagger2
.apiInfo(apiInfo()) //用于定于api文档汇总信息
.select()
.apis(RequestHandlerSelectors
.basePackage("com.njtech.seerwebrobot.service.controller")) //指定controller包
.paths(PathSelectors.any()) // 所有controller
.build();
}
private ApiInfo apiInfo(){
return new ApiInfoBuilder()
.title("医疗服务机器人") // 文档页标题
.contact(new Contact("Cxx", // 联系人信息
"www.baidu.com",
"@email"))
.description("南京工业大学") // 详细信息
.version("1.0.1") // 文档版本号
.termsOfServiceUrl("www.baidu.com") //网站地址
.build();
}
}
这里主要是一个swagger UI的ApiInfo的信息配置和basePackage的包扫描功能。这里需要扫描的包主要为controller包下面的文件。
application.yml文件配置
1 | #server: |
统一返回值信息
返回值信息主要包括4个方面:是否成功、返回码、返回消息和返回数据,具体定义为:1
2
3
4private Boolean success
private Integer code
private String message
private Map<String, Object> data = new HashMap<String, Object>()
在service包下面新建result包,并新建R.java和ResultCodeEnum.java分别定义返回结果和返回码、返回消息。
R.java1
2
3
4
5
6
7
8
9
10
11
12
13
14
15
16
17
18
19
20
21
22
23
24
25
26
27
28
29
30
31
32
33
34
35
36
37
38
39
40
41
42
43
44
45
46
47
48
49
50
51
52
53
54
55
56
57
58
59
60
61
62
63
64
65
66
67
68
69
70
71
72
73
74
75
76
77
78
79
80
81
82
83
84
85
86
87
88
89
90
91
92
93
94
95
96
97
98
99
(value = "全局统一返回结果")
public class R {
(value = "是否成功")
private Boolean success;
(value = "返回码")
private Integer code;
(value = "返回消息")
private String message;
(value = "返回数据")
private Map<String, Object> data = new HashMap<String, Object>();
public R(){}
public static R ok(){
R r = new R();
r.setSuccess(ResultCodeEnum.SUCCESS.getSuccess());
r.setCode(ResultCodeEnum.SUCCESS.getCode());
r.setMessage(ResultCodeEnum.SUCCESS.getMessage());
return r;
}
public static R error(){
R r = new R();
r.setSuccess(ResultCodeEnum.UNKNOWN_REASON.getSuccess());
r.setCode(ResultCodeEnum.UNKNOWN_REASON.getCode());
r.setMessage(ResultCodeEnum.UNKNOWN_REASON.getMessage());
return r;
}
public static R setResult(ResultCodeEnum resultCodeEnum){
R r = new R();
r.setSuccess(resultCodeEnum.getSuccess());
r.setCode(resultCodeEnum.getCode());
r.setMessage(resultCodeEnum.getMessage());
return r;
}
public R success(Boolean success){
this.setSuccess(success);
return this;
}
public R message(String message){
this.setMessage(message);
return this;
}
public Boolean getSuccess() {
return success;
}
public void setSuccess(Boolean success) {
this.success = success;
}
public Integer getCode() {
return code;
}
public void setCode(Integer code) {
this.code = code;
}
public String getMessage() {
return message;
}
public void setMessage(String message) {
this.message = message;
}
public Map<String, Object> getData() {
return data;
}
public void setData(Map<String, Object> data) {
this.data = data;
}
public R code(Integer code){
this.setCode(code);
return this;
}
public R data(String key, Object value){
this.data.put(key, value);
return this;
}
public R data(Map<String, Object> map){
this.setData(map);
return this;
}
}
ResultCodeEnum.java1
2
3
4
5
6
7
8
9
10
11
12
13
14
15
16
17
18
19
20
21
22
23
24
25
26
27
28
29
30
31
32
33
34
35
36
37
38
39
40
41
42
43
public enum ResultCodeEnum {
SUCCESS(true, 20000,"成功"),
UNKNOWN_REASON(false, 20001, "未知错误"),
private Boolean success;
private Integer code;
private String message;
public Boolean getSuccess() {
return success;
}
public void setSuccess(Boolean success) {
this.success = success;
}
public Integer getCode() {
return code;
}
public void setCode(Integer code) {
this.code = code;
}
public String getMessage() {
return message;
}
public void setMessage(String message) {
this.message = message;
}
ResultCodeEnum(Boolean success, Integer code, String message) {
this.success = success;
this.code = code;
this.message = message;
}
}
这里主要调用ok()和error()方法,当然也可以定义其他的静态方法,在函数体内设置好setSuccess()、setCode()和setMessage()即可。ResultCodeEnum为枚举类,在里面可以定义各种信息提示,这里只简单列举了成功和未知错误的信息定义。
使用方法如下:1
2
3R.ok().message("注册成功");
R.error().message("注册失败");
R.ok().data("robotInfoList", robotInfoList);
其他插件配置
MybaticPlusConfig.java1
2
3
4
5
6
7
8
9
10
11
12
13
("com.njtech.seerwebrobot.service.mapper")
public class MybatisPlusConfig {
/**
* 分页插件
*/
public PaginationInterceptor paginationInterceptor() {
return new PaginationInterceptor();
}
}
这里也主要是一个包扫描和分页插件的配置。
CommonMetaObjectHandler.java1
2
3
4
5
6
7
8
9
10
11
12
13
14
15
16
174j
public class CommonMetaObjectHandler implements MetaObjectHandler {
public void insertFill(MetaObject metaObject) {
//log.info("start insert fill ....");
this.setFieldValByName("createTime", new Date(), metaObject);
this.setFieldValByName("updateTime", new Date(), metaObject);
}
public void updateFill(MetaObject metaObject) {
//log.info("start update fill ....");
this.setFieldValByName("updateTime", new Date(), metaObject);
}
}
这里主要是配置数据库自动填充功能。
自动生成代码框架
这里使用MyBatis-Plus的代码生成器,通过 AutoGenerator可以快速生成Entity、Mapper、Mapper XML、Service、Controller等各个模块的代码。
Entity为实体类,存放基本的数据定义,Mapper为数据库操作,Service为后端主要逻辑实现,Controller主要提供前端界面的接口。
在test目录下面新建CodeGenerator.java文件:1
2
3
4
5
6
7
8
9
10
11
12
13
14
15
16
17
18
19
20
21
22
23
24
25
26
27
28
29
30
31
32
33
34
35
36
37
38
39
40
41
42
43
44
45
46
47
48
49
50
51
52
53
54
55
56
57
58
59
60
61
62
63
64
65
66
67
68
69
70
71
72public class CodeGenerator {
public void genCode() {
// 执行时 需要删除之前生成的 com包
String prefix = "seer"; // 数据表的名字
//String moduleName = "edu";
// 1、创建代码生成器
AutoGenerator mpg = new AutoGenerator();
// 2、全局配置
// 生成文件的路径
GlobalConfig gc = new GlobalConfig();
String projectPath = System.getProperty("user.dir");
gc.setOutputDir(projectPath + "/src/main/java");
gc.setAuthor("Cxx");
gc.setOpen(false); //生成后是否打开资源管理器
gc.setFileOverride(true); //重新生成时文件是否覆盖
gc.setServiceName("%sService"); //去掉Service接口的首字母I
gc.setIdType(IdType.ASSIGN_ID); //主键策略
gc.setDateType(DateType.ONLY_DATE);//定义生成的实体类中日期类型
gc.setSwagger2(true);//开启Swagger2模式
mpg.setGlobalConfig(gc);
// 3、数据源配置
DataSourceConfig dsc = new DataSourceConfig();
//dsc.setUrl("jdbc:mysql://localhost:3306/" + prefix + "guli_" + moduleName + "?serverTimezone=GMT%2B8");
dsc.setUrl("jdbc:mysql://localhost:3306/" + prefix + "?serverTimezone=GMT%2B8");
dsc.setDriverName("com.mysql.cj.jdbc.Driver");
dsc.setUsername("root");
dsc.setPassword("root");
dsc.setDbType(DbType.MYSQL);
mpg.setDataSource(dsc);
// 4、包配置
PackageConfig pc = new PackageConfig();
//pc.setModuleName(moduleName); //模块名
pc.setParent("com.njtech.seerwebrobot.service");
pc.setController("controller");
pc.setEntity("entity");
pc.setService("service");
pc.setMapper("mapper");
mpg.setPackageInfo(pc);
// 5、策略配置
StrategyConfig strategy = new StrategyConfig();
strategy.setNaming(NamingStrategy.underline_to_camel);//数据库表映射到实体的命名策略
//strategy.setTablePrefix(moduleName + "_");//设置表前缀不生成
strategy.setColumnNaming(NamingStrategy.underline_to_camel);//数据库表字段映射到实体的命名策略
strategy.setEntityLombokModel(true); // lombok 模型 @Accessors(chain = true) setter链式操作
//strategy.setLogicDeleteFieldName("is_deleted");//逻辑删除字段名
//strategy.setEntityBooleanColumnRemoveIsPrefix(true);//去掉布尔值的is_前缀
//自动填充
TableFill createTime = new TableFill("create_time", FieldFill.INSERT);
TableFill updateTime = new TableFill("update_time", FieldFill.INSERT_UPDATE);
ArrayList<TableFill> tableFills = new ArrayList<>();
tableFills.add(createTime);
tableFills.add(updateTime);
strategy.setTableFillList(tableFills);
// controller控制层 换成restcontroller 即返回值都是Json格式的
strategy.setRestControllerStyle(true); //restful api风格控制器
strategy.setControllerMappingHyphenStyle(true); //url中驼峰转连字符
mpg.setStrategy(strategy);
// 6、执行
mpg.execute();
}
}
首先更改第一行代码中的数据表的名字,然后在数据源配置中,更改数据库的用户名和密码,其次在包配置中,更改setParent()中的包名,最后运行该文件即可自动生成相应的模块代码。
最终完整的Web工程文件夹目录结构如下: 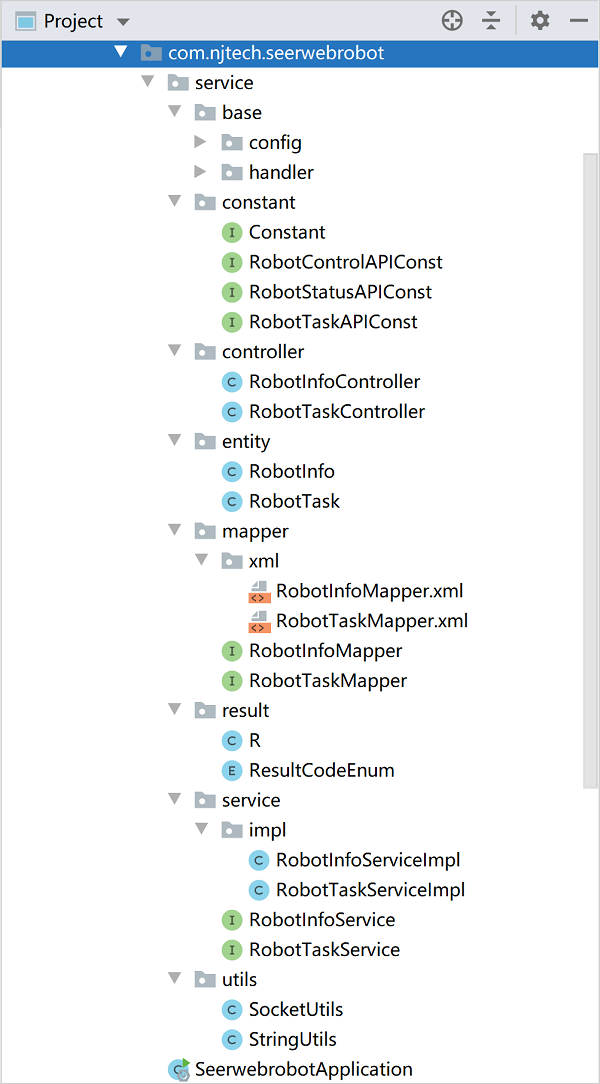
Spring Boot后端框架实现
Web后端框架的逻辑均在service包中实现,与前端交互的数据均在controller包中实现。
注:这里只展示了2个基本的底盘控制器操作,后续如需添加其他功能,只需按照新建数据表(部分功能可省略此步骤)->重新自动生成代码(这里可以将自动生成代码的setFileOverride()函数的参数改为false,即不替换之前的内容)->在service中编写具体的后端逻辑->在controller编写具体的前端交互逻辑。
Service包实现
这里以实现机器人控制器的查询信息和导航任务为例,一个是接收TCP数据,一个是发送TCP数据。
RobotInfoService
在RobotInfoService.java新建2个函数:1
2
3
4
5public interface RobotInfoService extends IService<RobotInfo> {
RobotInfo getRobotInfo(String robotIp);
int updateRobotInfo(RobotInfo robotInfo);
}
然后在RobotInfoServiceImpl.java编写具体的逻辑实现:1
2
3
4
5
6
7
8
9
10
11
12
13
14
15
16
17
18
19
20
21
22
23
24
25
26
27
28
29
30
31
32
33
34
35
36
37
38
39
40
41
42
43
44
45
46
47
48
public class RobotInfoServiceImpl extends ServiceImpl<RobotInfoMapper, RobotInfo> implements RobotInfoService {
private RobotInfoMapper robotInfoMapper;
public RobotInfo getRobotInfo(String robotIP){
JSONObject robotRawInfo;
RobotInfo robotInfo = new RobotInfo();
robotRawInfo = SocketUtils.sendTCPInfo(robotIP, Constant.robotStatusPort,
RobotStatusAPIConst.robotStatusAllInfo);
if(robotRawInfo.get("msg").equals("noError")){
robotInfo.setRobotId(robotRawInfo.get("id").toString());
robotInfo.setVehicleId(robotRawInfo.get("vehicle_id").toString());
robotInfo.setRobotNote(robotRawInfo.get("robot_note").toString());
robotInfo.setCurrentMap(robotRawInfo.get("current_map").toString());
robotInfo.setSsid(robotRawInfo.get("ssid").toString());
robotInfo.setRssi(Double.valueOf(robotRawInfo.get("rssi").toString()));
robotInfo.setCurrentIp(robotRawInfo.get("current_ip").toString());
}
else {
robotInfo.setSsid("None");
}
return robotInfo;
}
public int updateRobotInfo(RobotInfo robotInfo) {
RobotInfo newRobotInfo = new RobotInfo();
newRobotInfo.setRobotId(robotInfo.getRobotId());
newRobotInfo.setVehicleId(robotInfo.getVehicleId());
newRobotInfo.setRobotNote(robotInfo.getRobotNote());
newRobotInfo.setCurrentMap(robotInfo.getCurrentMap());
newRobotInfo.setSsid(robotInfo.getSsid());
newRobotInfo.setRssi(robotInfo.getRssi());
newRobotInfo.setCurrentIp(robotInfo.getCurrentIp());
//修改条件
UpdateWrapper<RobotInfo> robotInfoUpdateWrapper = new UpdateWrapper<>();
robotInfoUpdateWrapper
.eq("current_ip", robotInfo.getCurrentIp());
return robotInfoMapper.update(newRobotInfo, robotInfoUpdateWrapper);
}
}
这里需要先定义一个RobotInfoMapper,在RobotInfoMapper.java文件名中添加注解@Repository。
RobotTaskService
同理,实现RobotTaskService的功能模块:
RobotTaskService.java1
2
3public interface RobotTaskService extends IService<RobotTask> {
JSONObject addRobotTask(String robotIp, String sourceId, String desId, String taskId);
}
RobotTaskServiceImpl.java1
2
3
4
5
6
7
8
9
10
11
12
13
14
15
16
17
18
19
public class RobotTaskServiceImpl extends ServiceImpl<RobotTaskMapper, RobotTask> implements RobotTaskService {
private RobotTaskMapper robotTaskMapper;
public JSONObject addRobotTask(String robotIp, String sourceId, String desId, String taskId){
JSONObject jsonSendTCPData = new JSONObject();
jsonSendTCPData.put("source_id", sourceId);
jsonSendTCPData.put("id", desId);
jsonSendTCPData.put("task_id", taskId);
String sendTCPData = JSONObject.toJSONString(jsonSendTCPData);
JSONObject robotInfo = SocketUtils.sendTCPInfo(robotIp, Constant.robotTaskPort,
sendTCPData, RobotTaskAPIConst.robotTaskGotarget);
return robotInfo;
}
}
Controller包实现
然后分别实现机器人信息查询和下达任务的后端接口:
RobotInfoController.java1
2
3
4
5
6
7
8
9
10
11
12
13
14
15
16
17
18
19
20
21
22
23
24
25
26
27
28
29
30
31
32
33
34
35
36
37
38
39
40
41
42
43
44
45
46
47
48
49
50
51
52
53
54
("/robot-info")
public class RobotInfoController {
private RobotInfoService robotInfoService;
private RobotInfoMapper robotInfoMapper;
("所有机器人列表")
("listAll")
public R listAll(){
List<RobotInfo> robotInfoList = robotInfoService.list();
return R.ok().data("robotInfoList", robotInfoList);
}
("注册机器人信息")
("register")
public R register(@ApiParam(value = "机器人id和Ip", required = true) @RequestBody RobotInfo robotInfo){
String robotId = robotInfo.getRobotId();
String currentIp = robotInfo.getCurrentIp();
if(robotId == null || robotId.length() == 0 || currentIp == null || currentIp.length() == 0){
return R.error().message("请输入机器人Id和Ip");
}
HashMap<String, Object> map = new HashMap<>();
map.put("robot_id", robotId);
List<RobotInfo> robotInfoList = robotInfoMapper.selectByMap(map);
if(robotInfoList.size() != 0){
return R.error().message("机器人已存在");
}else{
boolean result = robotInfoService.save(robotInfo);
if (result) {
return R.ok().message("注册成功");
} else {
return R.error().message("注册失败");
}
}
}
("更新机器人信息")
("update/byRobotIp")
public R updateByRobotIp(@ApiParam(value = "机器人信息", required = true) @RequestBody RobotInfo robotInfo){
int result = robotInfoService.updateRobotInfo(robotInfo);
if(result != 0){
return R.ok().message("修改成功");
}else{
return R.error().message("数据不存在");
}
}
}
这里主要是一些Mybatic Plus与数据库之间的联系。
RobotTaskController.java1
2
3
4
5
6
7
8
9
10
11
12
13
14
15
16
17
18
19
20
21
22
23
24
25
26
27
28
29
30
31
32
33
34
35
36
37
38
39
40
41
42
43
44
45
46
47
48
49
50
51
52
53
54
55
56
57
58
59
60
61
62
63
64
65
66
67
68
69
70
71
72
73
74
75
("/robot-task")
public class RobotTaskController {
private RobotTaskService robotTaskService;
private RobotTaskMapper robotTaskMapper;
("下达任务")
("addTask")
public R addTask(@ApiParam(value = "任务指令", required = true) @RequestBody RobotTask robotTask){
String robotIp = robotTask.getRobotIp();
String sourceId = robotTask.getSourceId();
String desId = robotTask.getDesId();
String taskId = robotTask.getTaskId();
if(robotIp == null || robotIp.length() == 0
|| sourceId == null || sourceId.length() == 0
|| desId == null || desId.length() == 0
|| taskId == null || taskId.length() == 0){
return R.error().message("请输入正确的任务指令!");
}
JSONObject robotInfo = robotTaskService.addRobotTask(robotIp, sourceId, desId, taskId);
if(robotInfo.get("msg") == "networkError") {
return R.error().message("下达任务失败,请检查网络连接!");
}else {
if (robotInfo.get("msg") == "noError") {
boolean result = robotTaskService.save(robotTask);
if (result) {
return R.ok().message("下达任务成功,添加数据库成功!");
} else {
return R.error().message("下达任务成功,添加数据库失败!");
}
}else {
return R.error().message("任务下达失败,TCP通讯失败!");
}
}
}
("暂停当前导航")
("pause/{robot_ip}")
public R pause(@ApiParam(value = "机器人Ip", required = true) @PathVariable String robot_ip) {
JSONObject robotInfo = SocketUtils.sendTCPInfo(robot_ip, Constant.robotTaskPort, RobotTaskAPIConst.robotTaskPause);
if (robotInfo.get("msg") == "networkError") {
return R.error().message("下达任务失败,请检查网络连接!");
} else {
return R.ok().message("下达任务成功!");
}
}
("继续当前导航")
("resume/{robot_ip}")
public R resume(@ApiParam(value = "机器人Ip", required = true) @PathVariable String robot_ip) {
JSONObject robotInfo = SocketUtils.sendTCPInfo(robot_ip, Constant.robotTaskPort, RobotTaskAPIConst.robotTaskResume);
if (robotInfo.get("msg") == "networkError") {
return R.error().message("下达任务失败,请检查网络连接!");
} else {
return R.ok().message("下达任务成功!");
}
}
("取消当前导航")
("cancel/{robot_ip}")
public R cancel(@ApiParam(value = "机器人Ip", required = true) @PathVariable String robot_ip) {
JSONObject robotInfo = SocketUtils.sendTCPInfo(robot_ip, Constant.robotTaskPort, RobotTaskAPIConst.robotTaskCancel);
if (robotInfo.get("msg") == "networkError") {
return R.error().message("下达任务失败,请检查网络连接!");
} else {
return R.ok().message("下达任务成功!");
}
}
}
Swagger UI本地测试
运行启动类SeerwebrobotApplication.java,并打开浏览器输入Swagger UI本地测试网址:http://127.0.0.1:8080/swagger-ui.html#/: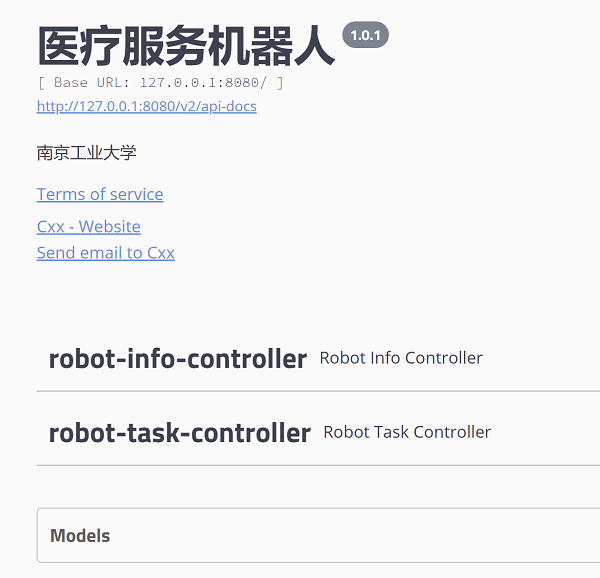
这里只对robot-task-controller->addTask接口进行简单的测试: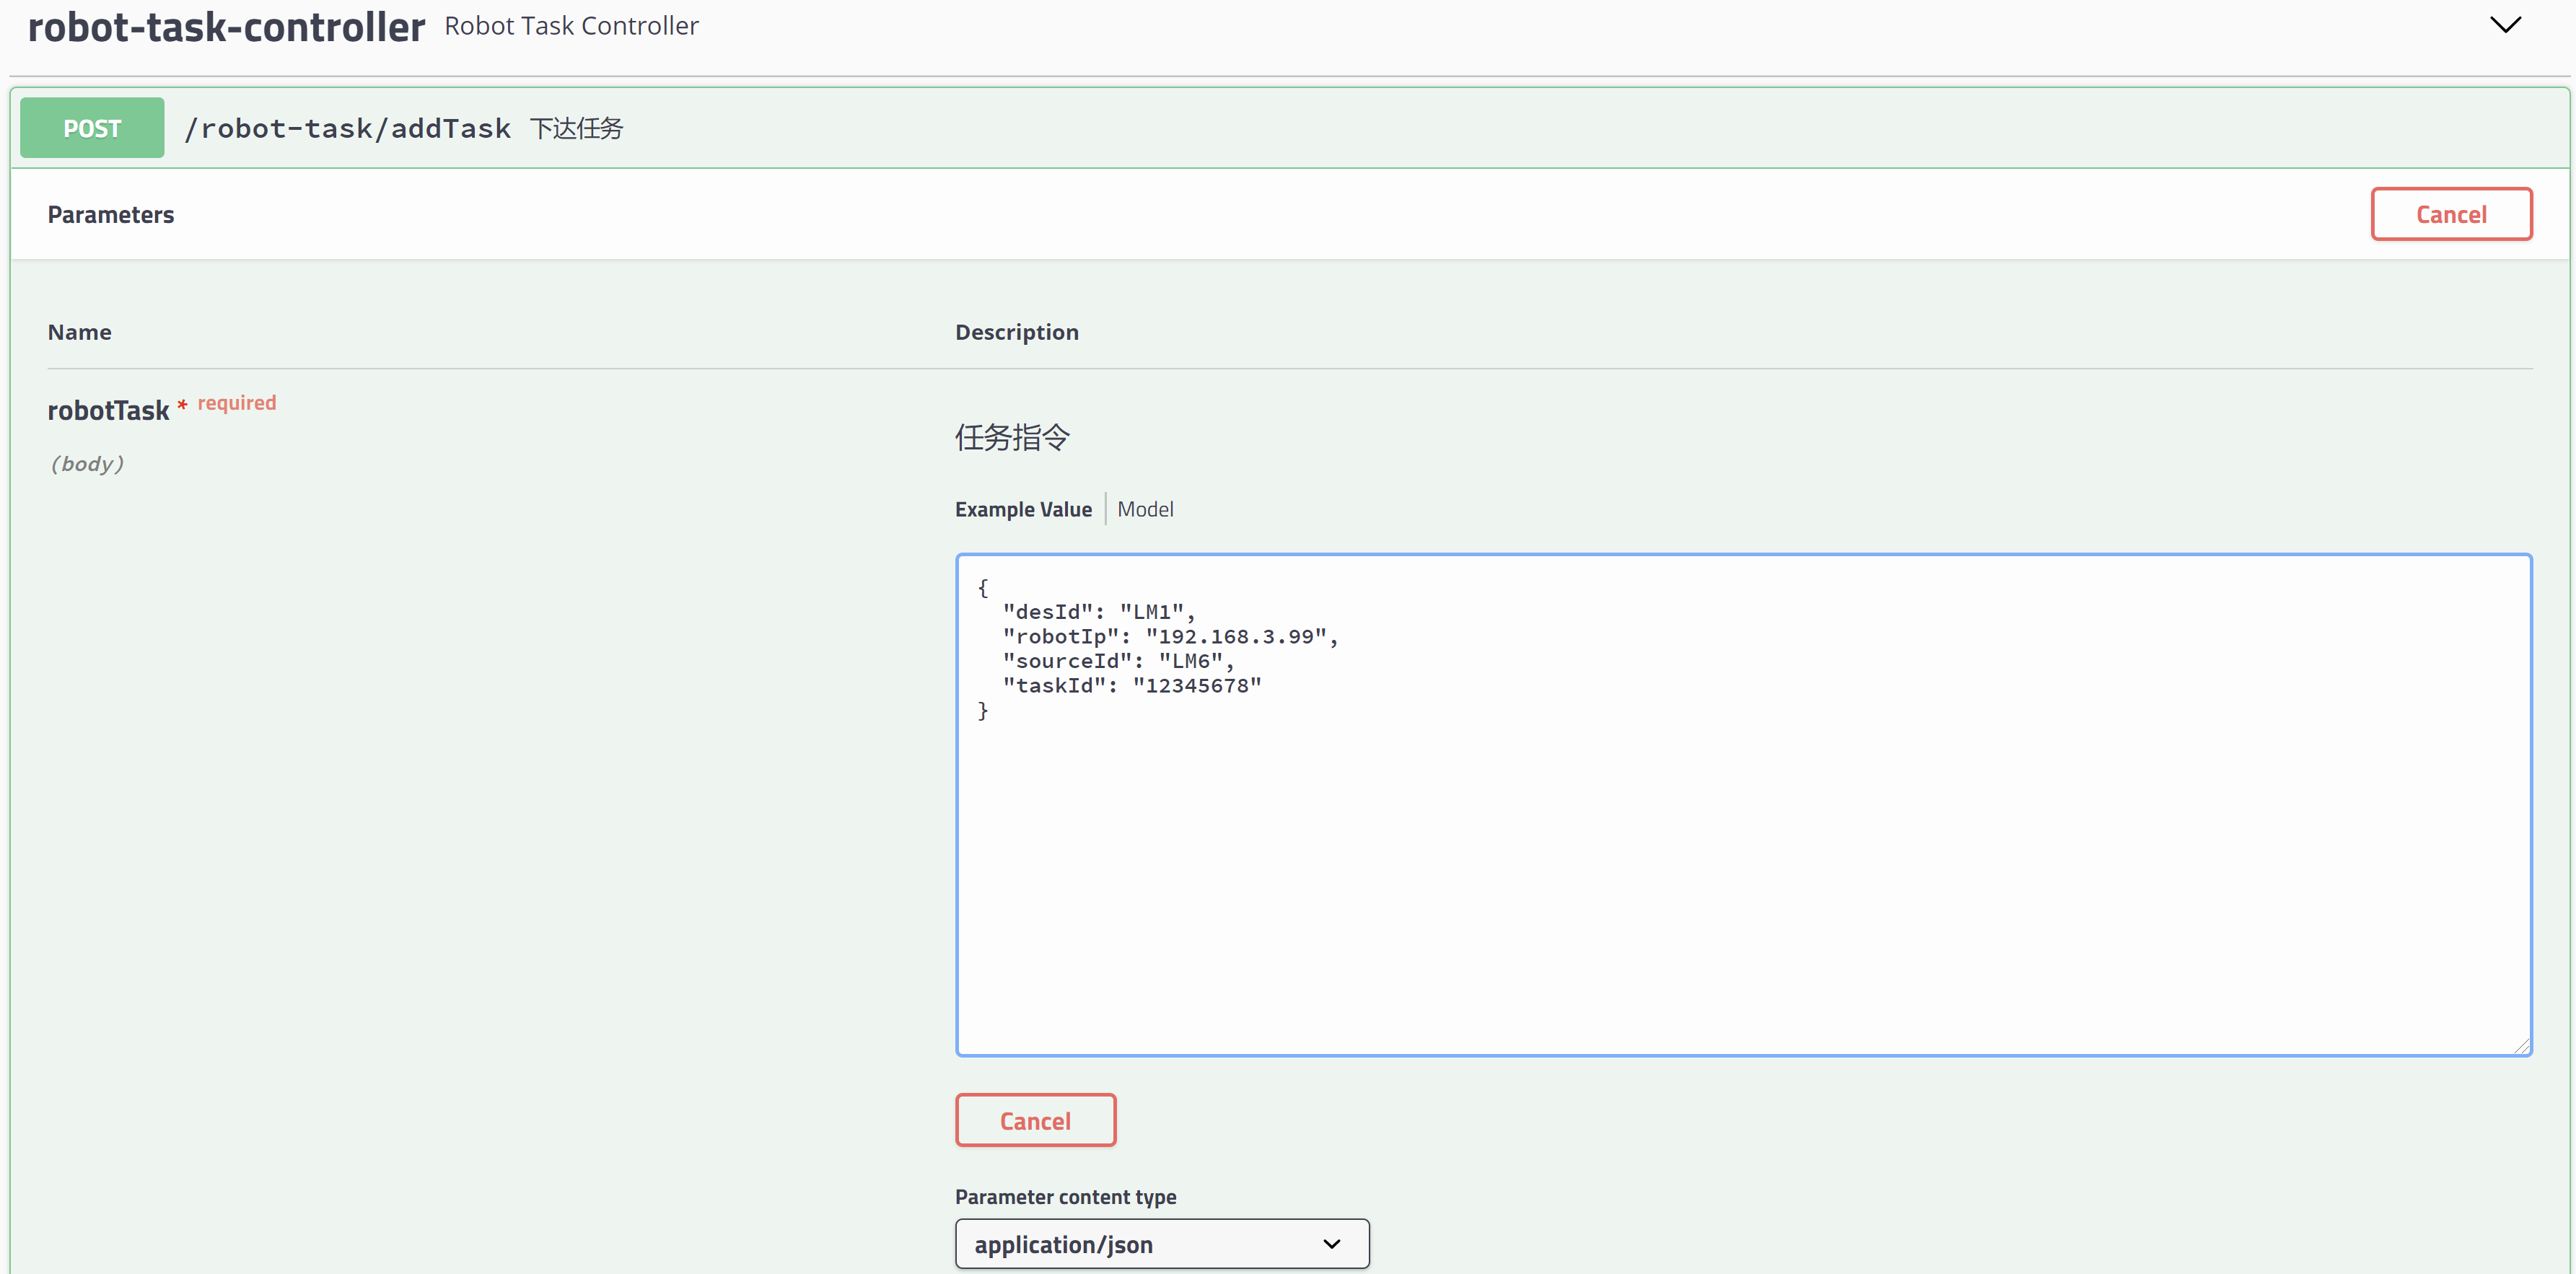
输入以上内容,并执行,可以看到机器人可以正确导航,并返回正确的信息。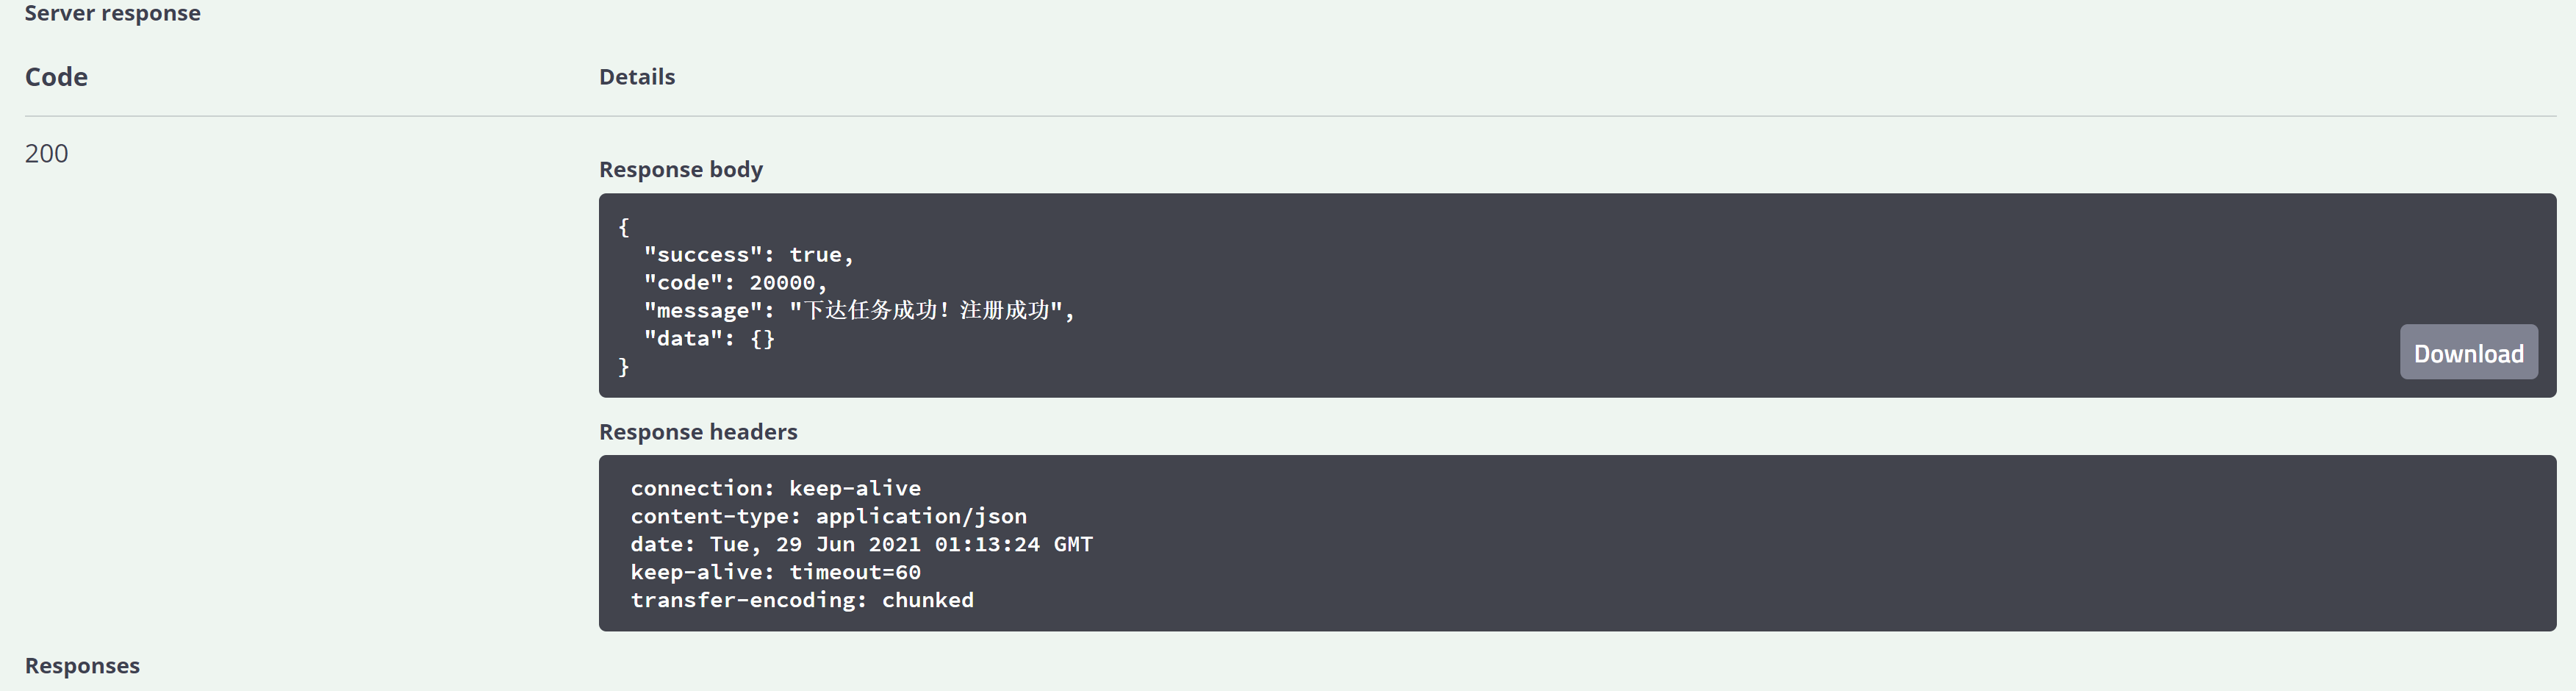
简易实时调度功能实现
主要实现自动更新机器人状态信息和自动充电功能。
医疗运输机器人客户端APP实现(基于retrofit协议)
基于Web后端提供的TCP接口,根据retrofit协议进行数据交互。
基本配置
新建工程
打开Android Studio,新建工程: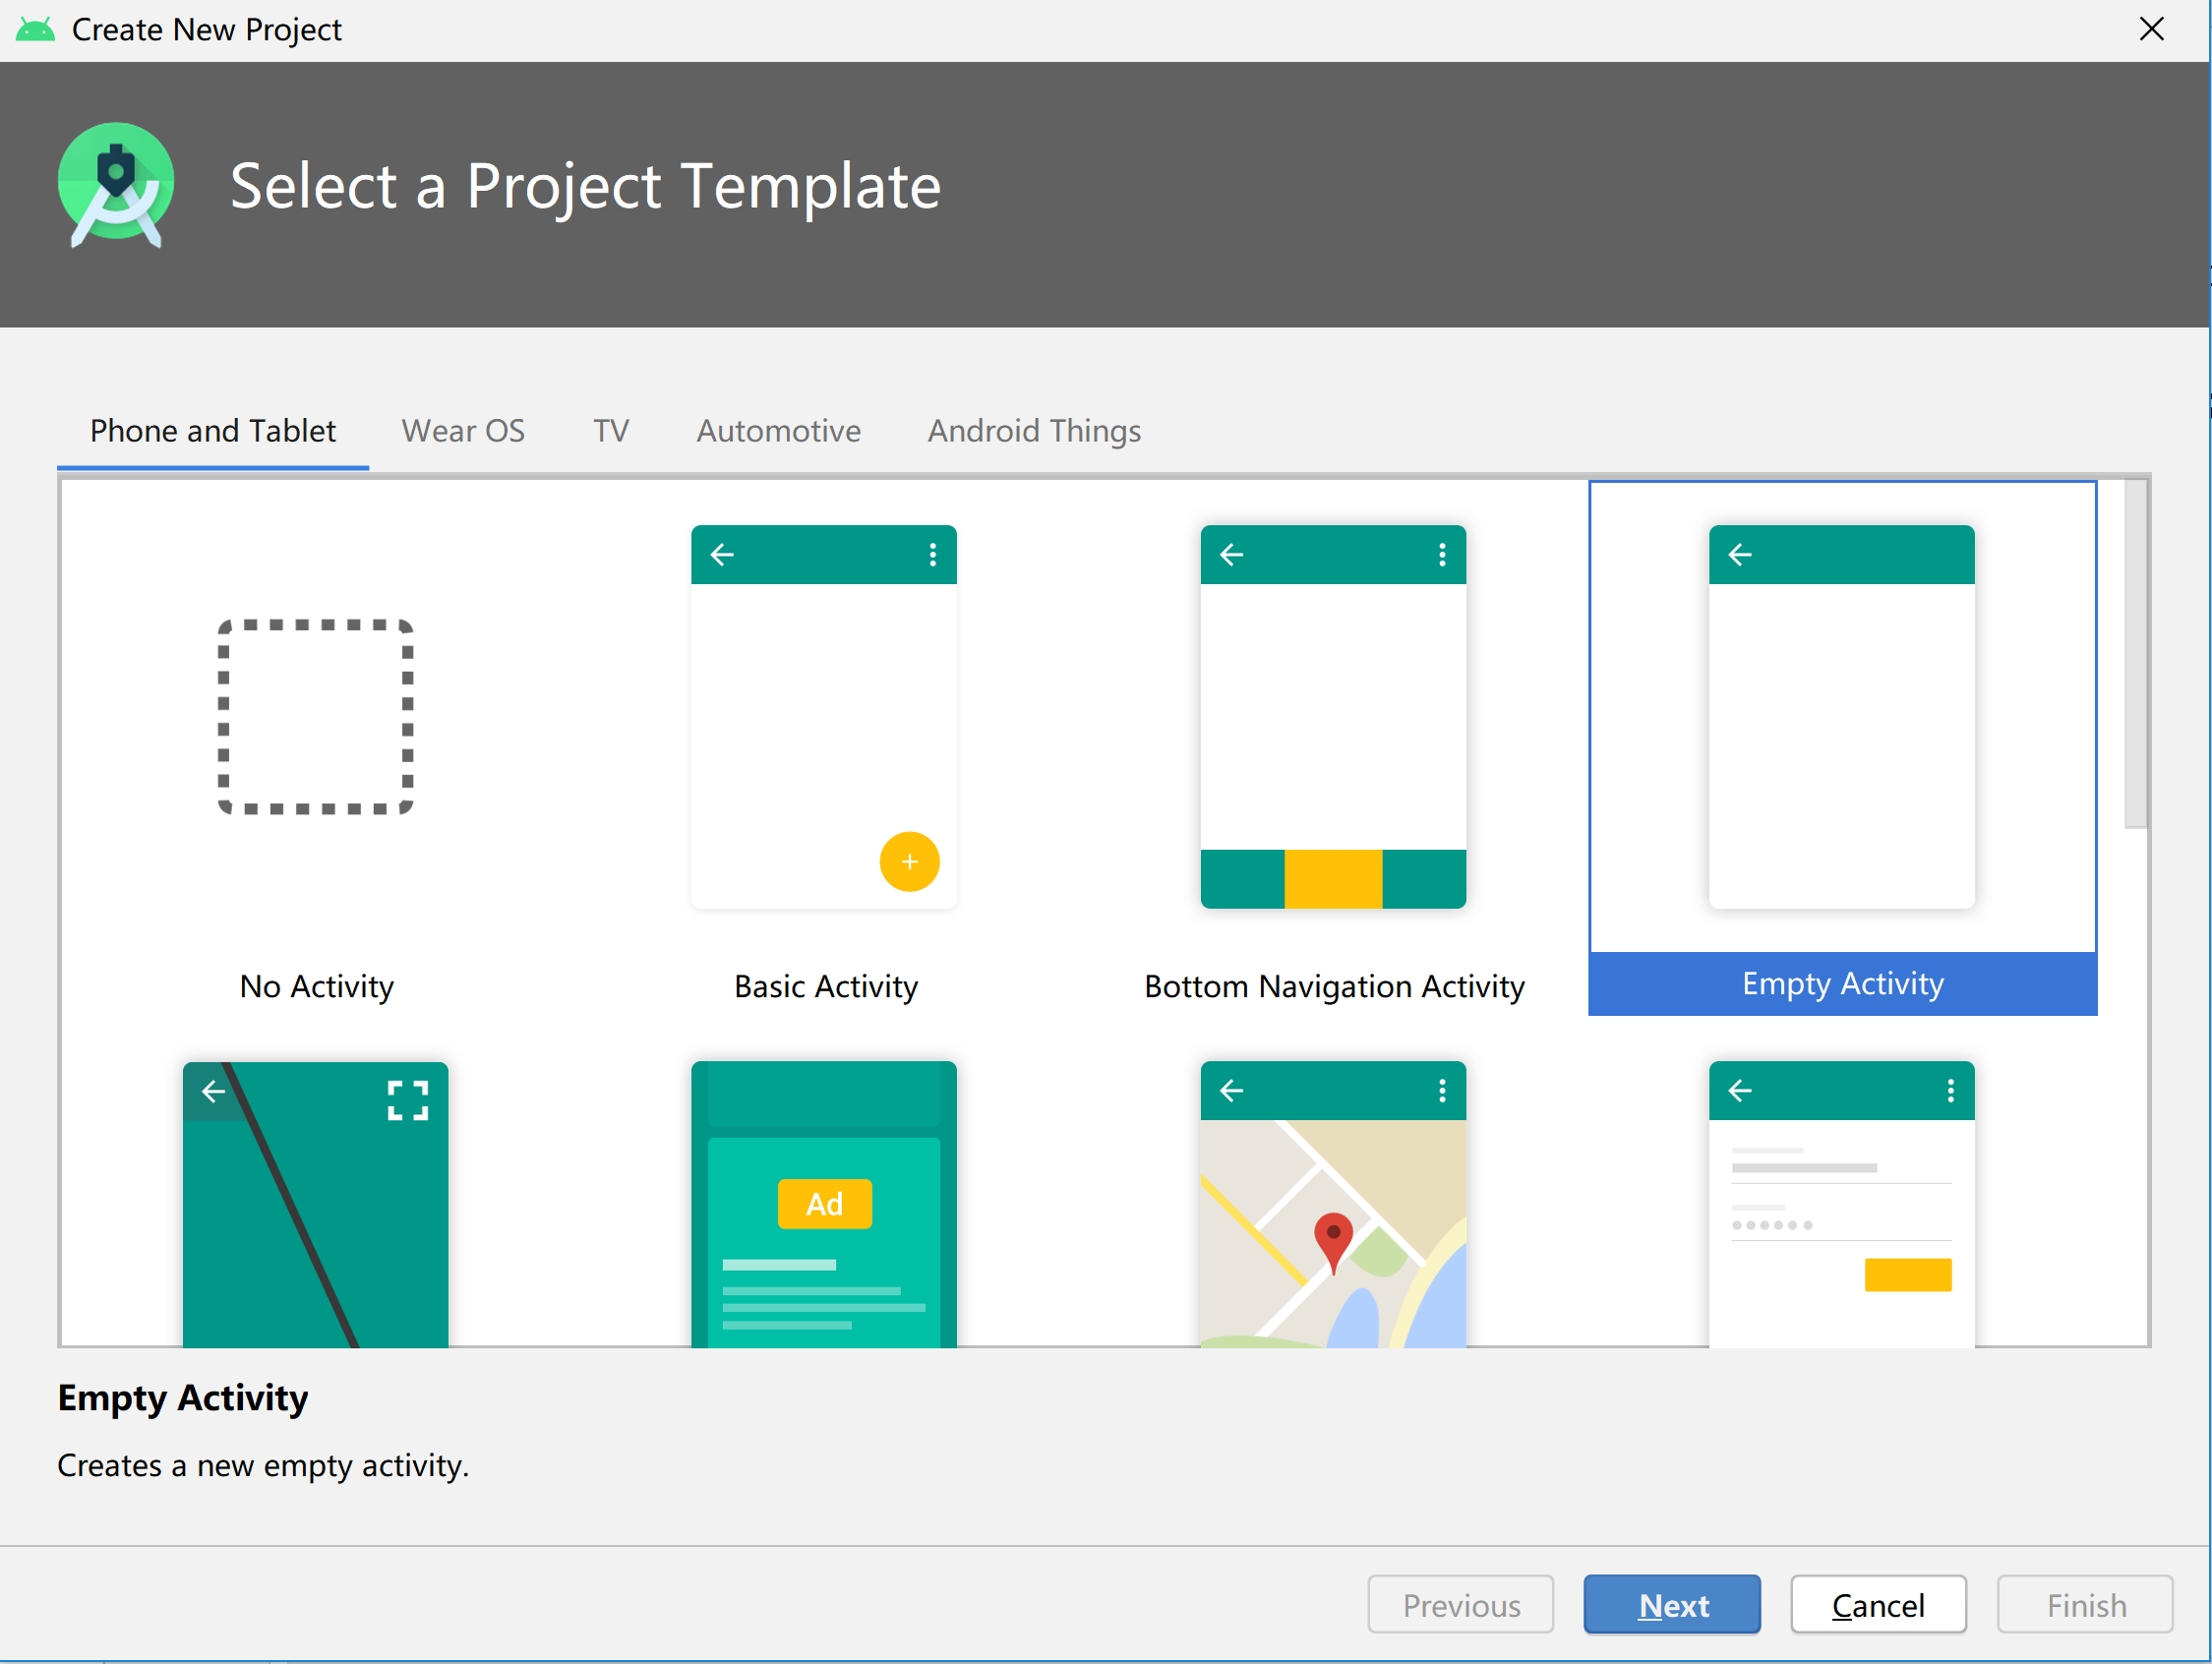
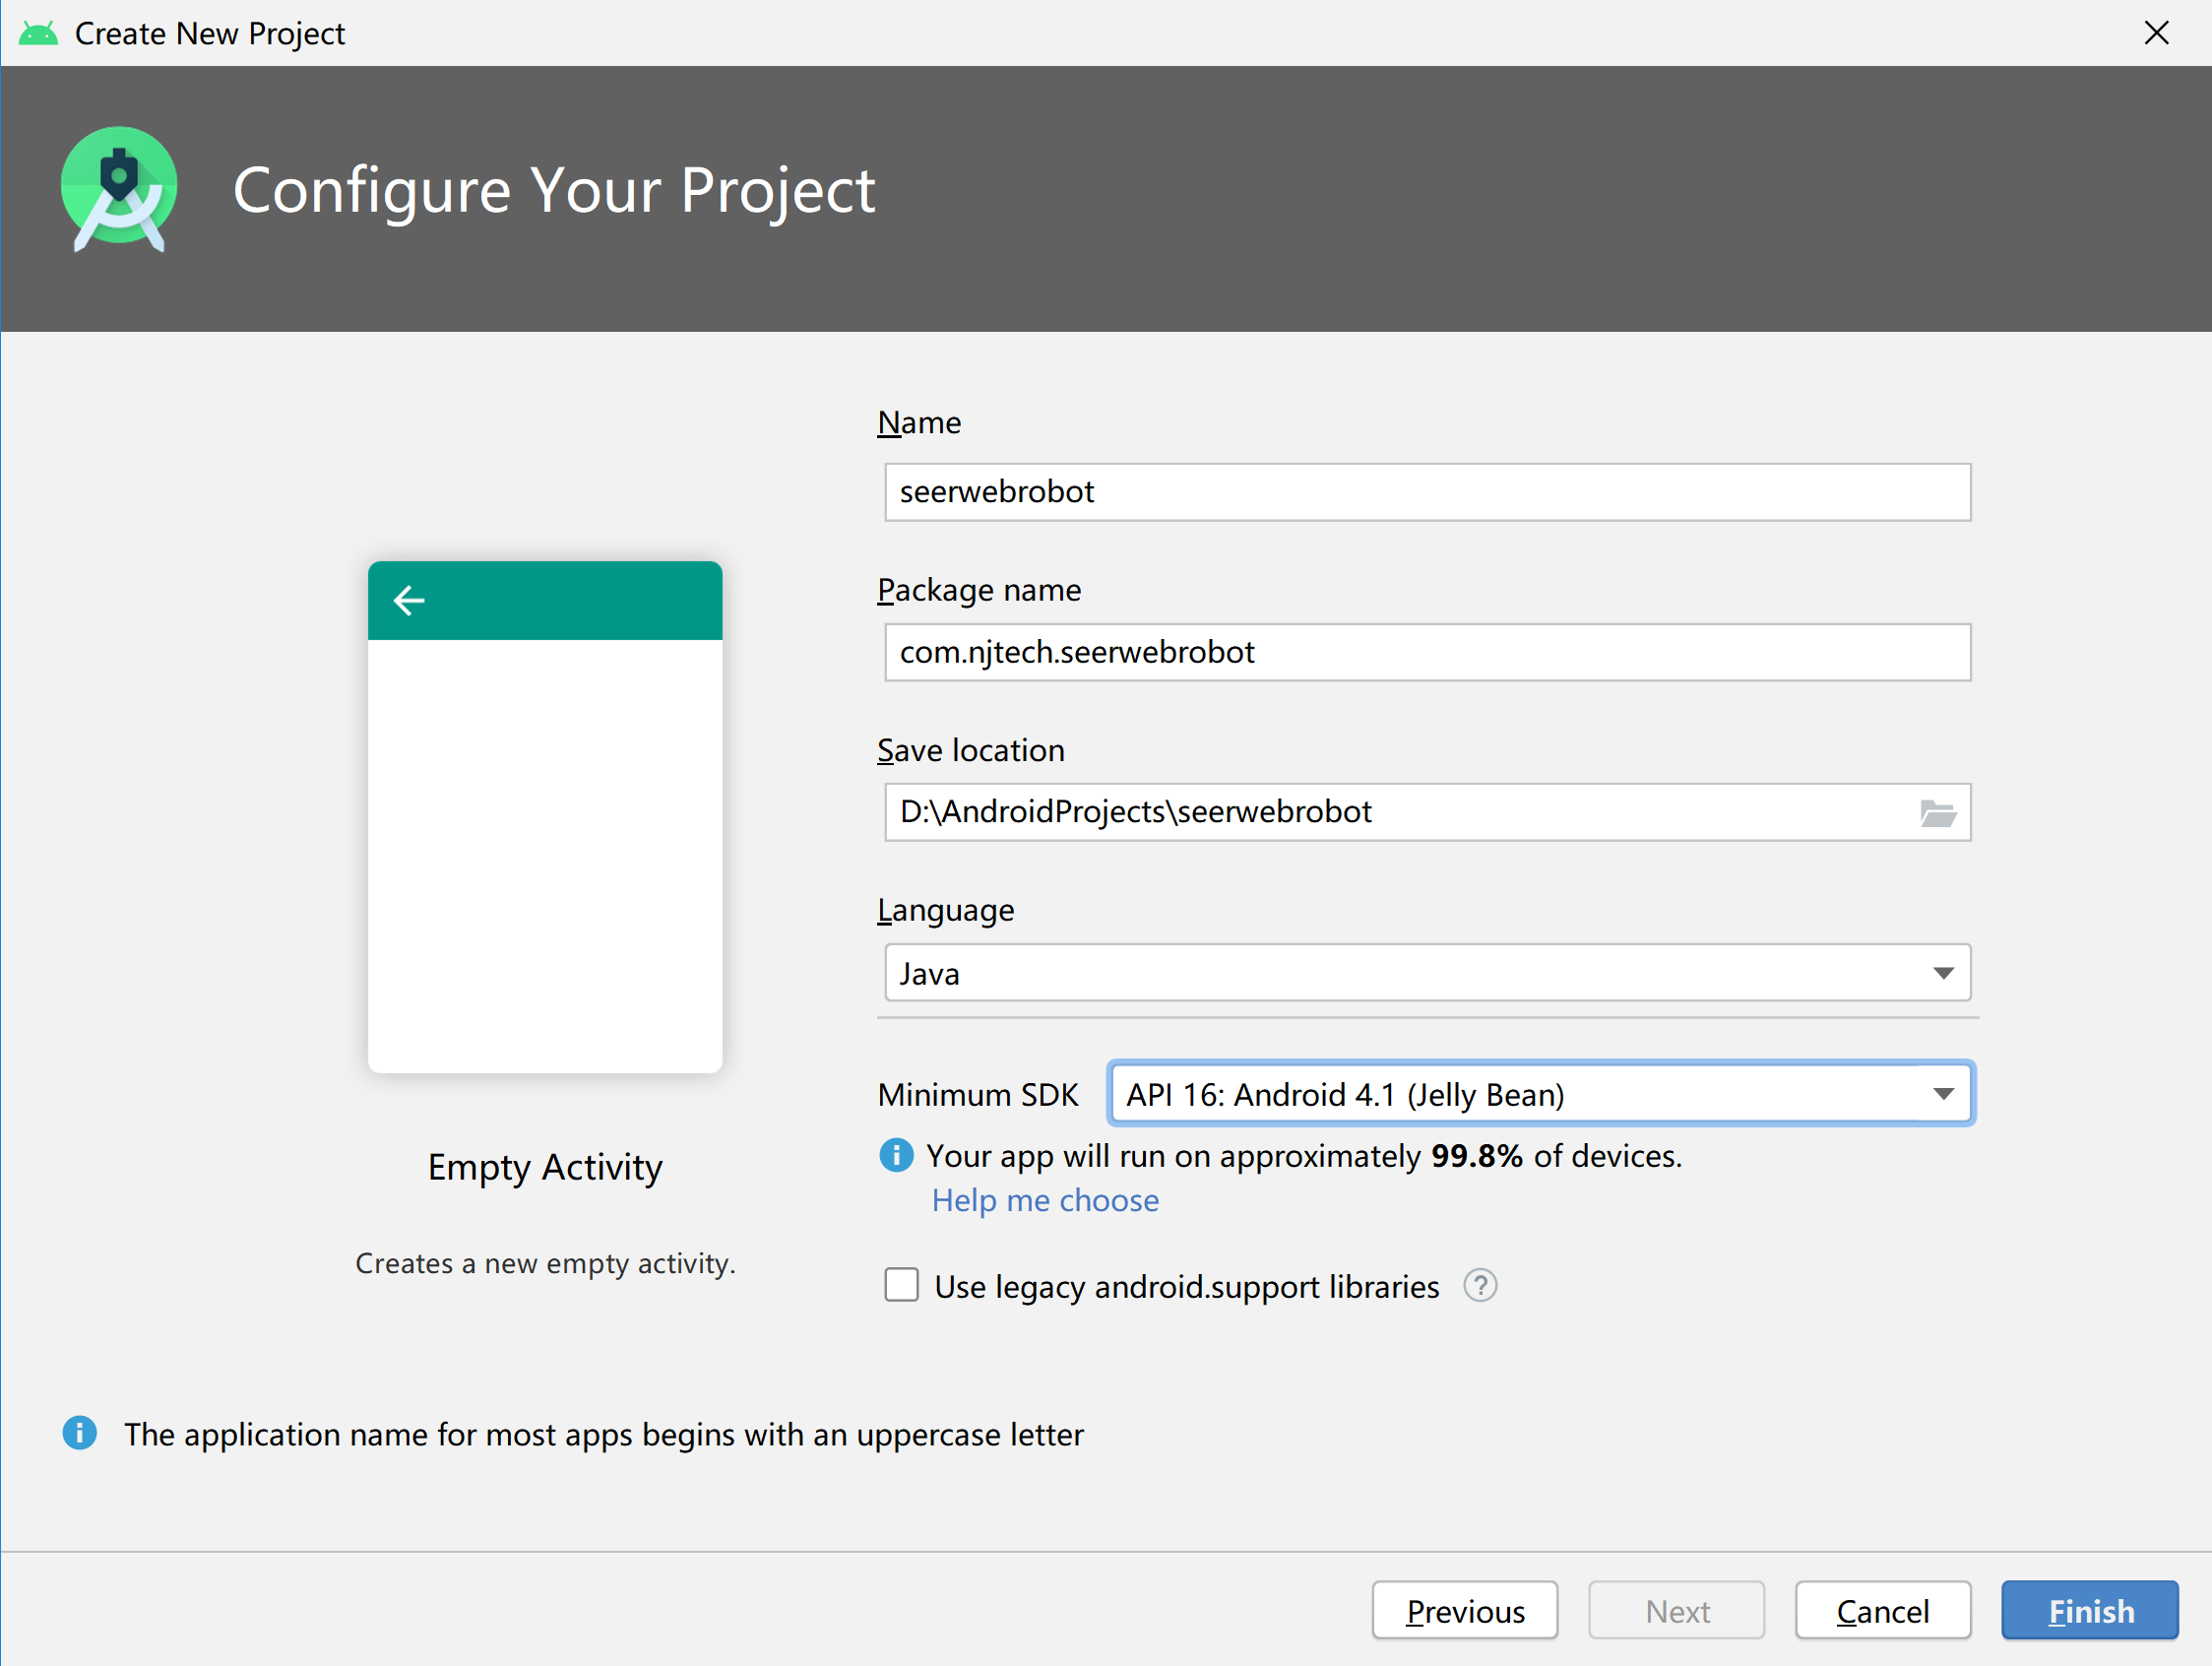
配置文件
打开build.gradle,在android{}中将minSdkVersion设置为21,然后指定编译Java文件的JDK版本:1
2
3
4
5// 指定编译Java文件的JDK版本
compileOptions {
targetCompatibility JavaVersion.VERSION_1_8
sourceCompatibility JavaVersion.VERSION_1_8
}
在dependencies依赖管理中添加依赖:1
2
3
4
5
6
7
8
9//屏幕适配
implementation 'me.jessyan:autosize:0.9.5'
//请求网络
implementation 'com.squareup.retrofit2:retrofit:2.8.1'
implementation 'com.squareup.retrofit2:converter-gson:2.8.1'
implementation 'com.jakewharton.retrofit:retrofit2-rxjava2-adapter:1.0.0'
//RxJava
implementation 'io.reactivex.rxjava2:rxjava:2.0.1'
implementation 'io.reactivex.rxjava2:rxandroid:2.0.1'
打开AndroidManifest.xml文件,添加网络授权:1
2<!-- 网络授权 -->
<uses-permission android:name="android.permission.INTERNET" />
在res文件夹下新建文件夹xml,并新建文件network_security_config.xml:1
2
3
4
<network-security-config>
<base-config cleartextTrafficPermitted="true" />
</network-security-config>
项目目录结构
整个APP目录结构分为java和res两个文件夹,其中java文件夹主要处理APP中的逻辑部分,res主要为资源文件,处理APP的界面显示部分。
在java文件夹下,为了提高代码的可读性,新建logic和ui2个文件,分别处理与界面无关的逻辑和与界面有关的逻辑部分,具体目录结构如下:
retrofit2简介
https://blog.csdn.net/xiao_nian/article/details/87802483
欢迎界面设置
设计理论

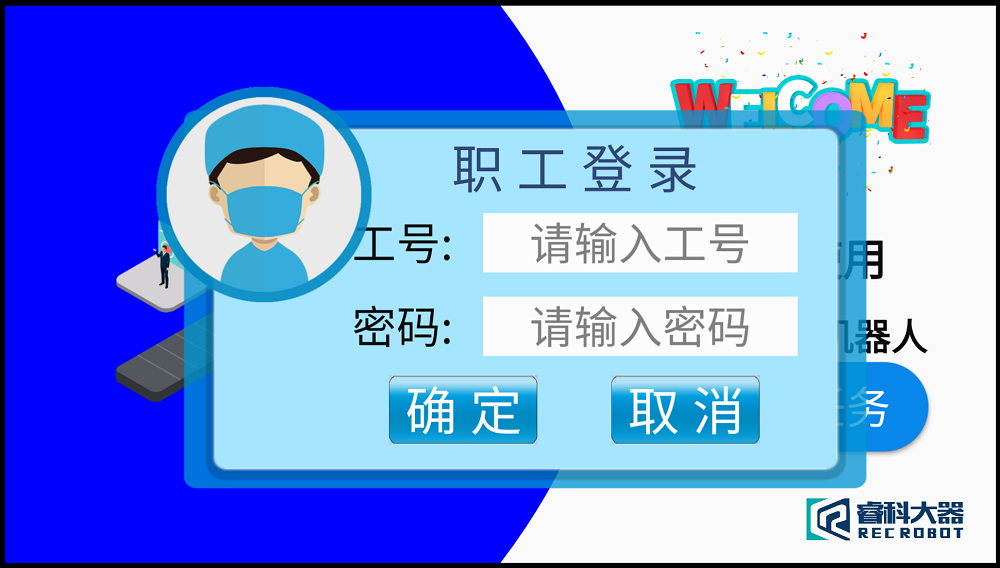
整体风格分为两栏,左侧为医院背景,右侧为文字介绍+功能按钮,点击下达任务可以进入登录界面,输入正确的职工信息,即可进入具体的任务界面。
其中圆弧形分割线为自定义的View,需要在java文件夹中添加具体实现。
界面实现
这里主要有2个界面,即欢迎界面和登录界面,其中登录界面对对话框形式。
activity_main.xml1
2
3
4
5
6
7
8
9
10
11
12
13
14
15
16
17
18
19
20
21
22
23
24
25
26
27
28
29
30
31
32
33
34
35
36
37
38
39
40
41
42
43
44
45
46
47
48
49
50
51
52
53
54
55
56
57
58
59
60
61
62
63
64
65
66
67
68
69
70
71
72
73
74
75
76
77
78
79
80
81
82
83
84
85
86
87
88
89
90
91
92
93
<androidx.constraintlayout.widget.ConstraintLayout xmlns:android="http://schemas.android.com/apk/res/android"
xmlns:app="http://schemas.android.com/apk/res-auto"
xmlns:tools="http://schemas.android.com/tools"
android:layout_width="match_parent"
android:layout_height="match_parent"
tools:context=".ui.activity.MainActivity">
<androidx.constraintlayout.widget.Guideline
android:id="@+id/v60"
android:layout_width="wrap_content"
android:layout_height="wrap_content"
android:orientation="vertical"
app:layout_constraintGuide_percent="0.60"/>
<com.njtech.seerwebrobot.ui.view.BackGroundView
android:id="@+id/backGroundView"
android:layout_width="match_parent"
android:layout_height="match_parent"/>
<ImageView
android:layout_width="300dp"
android:layout_height="300dp"
android:scaleType="fitCenter"
android:src="@drawable/control"
app:layout_constraintBottom_toBottomOf="parent"
app:layout_constraintEnd_toStartOf="@+id/v60"
app:layout_constraintStart_toStartOf="@+id/backGroundView"
app:layout_constraintTop_toTopOf="parent" />
<ImageView
android:id="@+id/img_welcome"
android:layout_width="285dp"
android:layout_height="120dp"
android:layout_marginTop="10dp"
android:scaleType="fitCenter"
android:src="@drawable/welcome"
app:layout_constraintEnd_toEndOf="parent"
app:layout_constraintStart_toStartOf="@+id/v60"
app:layout_constraintTop_toTopOf="parent" />
<TextView
android:id="@+id/tv_welcome"
android:layout_width="wrap_content"
android:layout_height="wrap_content"
android:layout_marginTop="20dp"
android:gravity="center"
android:text="欢迎使用"
android:textColor="@color/colorBlack"
android:textSize="30sp"
android:textStyle="bold"
app:layout_constraintEnd_toEndOf="parent"
app:layout_constraintStart_toStartOf="@+id/v60"
app:layout_constraintTop_toBottomOf="@+id/img_welcome" />
<TextView
android:id="@+id/tv_company_name"
android:layout_width="wrap_content"
android:layout_height="wrap_content"
android:layout_marginTop="15dp"
android:gravity="center"
android:text="医疗服务机器人"
android:textColor="@color/colorBlack"
android:textSize="25sp"
android:textStyle="bold"
app:layout_constraintEnd_toEndOf="@+id/backGroundView"
app:layout_constraintStart_toStartOf="@+id/v60"
app:layout_constraintTop_toBottomOf="@+id/tv_welcome" />
<Button
android:id="@+id/bt_add_task"
android:layout_width="170dp"
android:layout_height="60dp"
android:layout_marginBottom="15dp"
android:background="@drawable/shape_blue_corner"
android:text="下达任务"
android:textColor="@color/colorWhite"
android:textSize="30sp"
app:layout_constraintBottom_toTopOf="@+id/img_logo"
app:layout_constraintEnd_toEndOf="parent"
app:layout_constraintHorizontal_bias="0.53"
app:layout_constraintStart_toStartOf="@+id/v60" />
<ImageView
android:id="@+id/img_logo"
android:layout_width="150dp"
android:layout_height="60dp"
android:scaleType="centerCrop"
android:src="@drawable/logo"
app:layout_constraintBottom_toBottomOf="parent"
app:layout_constraintEnd_toEndOf="parent" />
</androidx.constraintlayout.widget.ConstraintLayout>
dialog_identity.xml1
2
3
4
5
6
7
8
9
10
11
12
13
14
15
16
17
18
19
20
21
22
23
24
25
26
27
28
29
30
31
32
33
34
35
36
37
38
39
40
41
42
43
44
45
46
47
48
49
50
51
52
53
54
55
56
57
58
59
60
61
62
63
64
65
66
67
68
69
70
71
72
73
74
75
76
77
78
79
80
81
82
83
84
85
86
87
88
89
90
91
92
93
94
95
96
97
98
99
100
101
102
103
104
105
106
107
108
109
110
111
112
113
114
115
116
117
118
119
120
121
122
123
124
125
126
127
128
129
130
131
132
133
134
135
136
137
138
139
140
141
142
143
144
145
146
147
148
149
150
151
152
153
154
155
156
157
158
159
160
161
162
163
164
165
166
167
168
169
170
171
172
173
174
175
176
177
178
179
180
181
182
183
184
185
186
187
188
189
190
191
192
193
194
195
196
197
198
199
200
201
202
203
204
205
206
207
208
209
210
211
212
213
214
215
<androidx.constraintlayout.widget.ConstraintLayout
xmlns:android="http://schemas.android.com/apk/res/android"
xmlns:app="http://schemas.android.com/apk/res-auto"
xmlns:tools="http://schemas.android.com/tools"
android:layout_width="match_parent"
android:layout_height="match_parent"
android:clipChildren="false">
<androidx.constraintlayout.widget.Guideline
android:id="@+id/h7"
android:layout_width="wrap_content"
android:layout_height="wrap_content"
android:orientation="horizontal"
app:layout_constraintGuide_percent="0.07" />
<androidx.constraintlayout.widget.Guideline
android:id="@+id/v6"
android:layout_width="wrap_content"
android:layout_height="wrap_content"
android:orientation="vertical"
app:layout_constraintGuide_percent="0.06" />
<ImageView
android:id="@+id/bg_dialog"
android:layout_width="0dp"
android:layout_height="0dp"
android:scaleType="fitXY"
app:layout_constraintBottom_toBottomOf="parent"
app:layout_constraintEnd_toEndOf="parent"
app:layout_constraintHorizontal_bias="0.0"
app:layout_constraintStart_toStartOf="@+id/v6"
app:layout_constraintTop_toTopOf="@+id/h7"
app:layout_constraintVertical_bias="0.0"
app:srcCompat="@drawable/bg_dialog" />
<TextView
android:id="@+id/tv_identity_title"
android:layout_width="wrap_content"
android:layout_height="wrap_content"
android:layout_marginTop="20dp"
android:gravity="center"
android:text="职 工 登 录"
android:textColor="#304877"
android:textSize="35sp"
app:layout_constraintBottom_toTopOf="@+id/h30"
app:layout_constraintEnd_toStartOf="@+id/v90"
app:layout_constraintStart_toStartOf="@+id/v30"
app:layout_constraintTop_toTopOf="@+id/h7" />
<androidx.constraintlayout.widget.Guideline
android:id="@+id/h30"
android:layout_width="wrap_content"
android:layout_height="wrap_content"
android:orientation="horizontal"
app:layout_constraintGuide_percent="0.3" />
<androidx.constraintlayout.widget.Guideline
android:id="@+id/h50"
android:layout_width="wrap_content"
android:layout_height="wrap_content"
android:orientation="horizontal"
app:layout_constraintGuide_percent="0.5" />
<androidx.constraintlayout.widget.Guideline
android:id="@+id/h70"
android:layout_width="wrap_content"
android:layout_height="wrap_content"
android:orientation="horizontal"
app:layout_constraintGuide_percent="0.7" />
<TextView
android:id="@+id/tv_identity_number"
android:layout_width="wrap_content"
android:layout_height="wrap_content"
android:text="工号:"
android:textColor="@color/colorBlack"
android:textSize="30sp"
app:layout_constraintBottom_toTopOf="@+id/h50"
app:layout_constraintStart_toStartOf="@+id/v30"
app:layout_constraintTop_toTopOf="@+id/h30" />
<TextView
android:id="@+id/tv_identity_password"
android:layout_width="wrap_content"
android:layout_height="wrap_content"
android:text="密码:"
android:textColor="@color/colorBlack"
android:textSize="30sp"
app:layout_constraintBottom_toTopOf="@+id/h70"
app:layout_constraintStart_toStartOf="@+id/tv_identity_number"
app:layout_constraintTop_toTopOf="@+id/h50" />
<EditText
android:id="@+id/et_identity_doctorNumber"
android:layout_width="0dp"
android:layout_height="wrap_content"
android:layout_marginStart="20dp"
android:layout_marginLeft="20dp"
android:layout_marginTop="8dp"
android:layout_marginBottom="8dp"
android:background="@color/colorWhite"
android:gravity="center"
android:lines="1"
android:singleLine="true"
android:textSize="30sp"
android:hint="请输入工号"
app:layout_constraintBottom_toTopOf="@+id/h50"
app:layout_constraintEnd_toStartOf="@+id/v90"
app:layout_constraintStart_toEndOf="@+id/tv_identity_number"
app:layout_constraintTop_toTopOf="@+id/h30" />
<androidx.constraintlayout.widget.Guideline
android:id="@+id/v90"
android:layout_width="wrap_content"
android:layout_height="wrap_content"
android:orientation="vertical"
app:layout_constraintGuide_percent="0.9" />
<EditText
android:id="@+id/et_identity_doctorPassword"
android:layout_width="0dp"
android:layout_height="wrap_content"
android:layout_marginStart="20dp"
android:layout_marginLeft="20dp"
android:layout_marginTop="8dp"
android:layout_marginBottom="8dp"
android:background="@color/colorWhite"
android:gravity="center"
android:inputType="textPassword"
android:lines="1"
android:singleLine="true"
android:textSize="30sp"
android:hint="请输入密码"
app:layout_constraintBottom_toTopOf="@+id/h70"
app:layout_constraintEnd_toStartOf="@+id/v90"
app:layout_constraintStart_toEndOf="@+id/tv_identity_password"
app:layout_constraintTop_toTopOf="@+id/h50" />
<Button
android:id="@+id/bt_identity_confirm"
android:layout_width="wrap_content"
android:layout_height="wrap_content"
android:background="@drawable/bg_bt_blue"
android:text="确 定"
android:textColor="@color/colorWhite"
android:textSize="35sp"
app:layout_constraintBottom_toTopOf="@+id/h90"
app:layout_constraintEnd_toStartOf="@+id/v60"
app:layout_constraintStart_toStartOf="@+id/v30"
app:layout_constraintTop_toTopOf="@+id/h70" />
<Button
android:id="@+id/bt_identity_cancel"
android:layout_width="wrap_content"
android:layout_height="wrap_content"
android:background="@drawable/bg_bt_blue"
android:text="取 消"
android:textColor="@color/colorWhite"
android:textSize="35sp"
app:layout_constraintBottom_toTopOf="@+id/h90"
app:layout_constraintEnd_toStartOf="@+id/v90"
app:layout_constraintHorizontal_bias="0.495"
app:layout_constraintStart_toStartOf="@+id/v60"
app:layout_constraintTop_toTopOf="@+id/h70" />
<androidx.constraintlayout.widget.Guideline
android:id="@+id/v30"
android:layout_width="wrap_content"
android:layout_height="wrap_content"
android:orientation="vertical"
app:layout_constraintGuide_percent="0.3" />
<ImageView
android:id="@+id/iv_identity_doctor"
android:layout_width="150dp"
android:layout_height="150dp"
app:layout_constraintBottom_toTopOf="@+id/h50"
app:layout_constraintEnd_toStartOf="@+id/v30"
app:layout_constraintStart_toStartOf="@+id/v6"
app:layout_constraintTop_toTopOf="@+id/h7"
app:srcCompat="@drawable/doctor" />
<androidx.constraintlayout.widget.Guideline
android:id="@+id/v60"
android:layout_width="wrap_content"
android:layout_height="wrap_content"
android:orientation="vertical"
app:layout_constraintGuide_percent="0.6" />
<androidx.constraintlayout.widget.Guideline
android:id="@+id/h90"
android:layout_width="wrap_content"
android:layout_height="wrap_content"
android:orientation="horizontal"
app:layout_constraintGuide_percent="0.9" />
<androidx.constraintlayout.widget.Guideline
android:id="@+id/h13"
android:layout_width="wrap_content"
android:layout_height="wrap_content"
android:orientation="horizontal"
app:layout_constraintGuide_percent="0.13" />
</androidx.constraintlayout.widget.ConstraintLayout>
界面逻辑功能实现
在ui->view文件夹下新建自定义分割线View:BackGroundView1
2
3
4
5
6
7
8
9
10
11
12
13
14
15
16
17
18
19
20
21
22
23
24
25
26
27
28
29
30
31
32
33
34
35
36
37
38
39
40
41
42
43
44
45
46
47
48
49
50/**
* 蓝白背景view
*/
public class BackGroundView extends View {
private Paint mPaint;
private Path mPath;
public BackGroundView(Context context) {
super(context);
init();
}
public BackGroundView(Context context, AttributeSet attrs) {
super(context, attrs);
init();
}
public BackGroundView(Context context, AttributeSet attrs, int defStyleAttr) {
super(context, attrs, defStyleAttr);
init();
}
private void init(){
mPath = new Path();
mPaint = new Paint();
mPaint.setAntiAlias(true);
mPaint.setStyle(Paint.Style.FILL_AND_STROKE);
}
protected void onDraw(Canvas canvas) {
super.onDraw(canvas);
drawBackGround(canvas);
}
/**
* 画背景
* @param canvas
*/
private void drawBackGround(Canvas canvas){
mPaint.setColor(Color.BLUE);
mPath.reset();
mPath.lineTo((float) getWidth()*1/2, 0);
mPath.quadTo((float) getWidth()*5/7, (float) getHeight()/2, (float) getWidth()*1/2, getHeight());
mPath.lineTo(0, getHeight());
mPath.close();
canvas.drawPath(mPath, mPaint);
}
}
对话框逻辑实现:IdentityDialog.java1
2
3
4
5
6
7
8
9
10
11
12
13
14
15
16
17
18
19
20
21
22
23
24
25
26
27
28
29
30
31
32
33
34
35
36
37
38
39
40
41
42
43
44
45
46
47
48
49
50
51
52
53
54
55
56
57
58
59
60
61
62
63
64
65
66
67
68
69
70
71
72
73
74
75
76
77
78
79
80
81
82
83
84
85
86
87
88
89
90
91
92
93
94
95
96
97
98
99
100
101
102
103public class IdentityDialog extends Dialog implements CustomAdapt, View.OnClickListener {
private Context context; // 上下文
private int layoutResID; // 布局文件id
private int[] listenedItem; // 监听的控件id
public IdentityDialog(Context context, int layoutResID, int[] listenedItem){
super(context, R.style.IdentityDialog);//加载dialog的样式
this.context = context;
this.layoutResID = layoutResID;
this.listenedItem = listenedItem;
}
private EditText etDoctorNumber;
private EditText etDoctorPassword;
private String doctorTruePassword; // 实际医生密码
protected void onCreate(Bundle savedInstanceState){
//提前设置Dialog的一些样式
Window dialogWindow = getWindow();
dialogWindow.setGravity(Gravity.CENTER);//设置dialog显示居中
//dialogWindow.setWindowAnimations();设置动画效果
setContentView(layoutResID);
WindowManager windowManager = ((Activity)context).getWindowManager();
Display display = windowManager.getDefaultDisplay();
WindowManager.LayoutParams lp = getWindow().getAttributes();
lp.width = display.getWidth()*3/4;// 设置dialog宽度为屏幕的4/5
lp.height = display.getHeight()*3/4;// 设置dialog高度为屏幕的4/5
getWindow().setAttributes(lp);
setCanceledOnTouchOutside(false);//点击外部Dialog消失
//给所有控件添加点击监听器
for(int id:listenedItem){
findViewById(id).setOnClickListener(this);
}
// 输入的工号
etDoctorNumber = findViewById(R.id.et_identity_doctorNumber);
// 输入的密码
etDoctorPassword = findViewById(R.id.et_identity_doctorPassword);
}
public void onClick(View view){
switch (view.getId()){
case R.id.bt_identity_confirm:
dismiss();
checkIdentity();
break;
case R.id.bt_identity_cancel:
Toast.makeText(context, "取消登录!", Toast.LENGTH_SHORT).show();
dismiss();
break;
}
}
/*
* 身份验证
* */
public void checkIdentity(){
checkPassword(etDoctorNumber.getText().toString(), etDoctorPassword.getText().toString());
}
/**
* 密码验证
* @param doctorNumber 工号
* @param doctorPassword 密码
*/
private void checkPassword(String doctorNumber, String doctorPassword) {
if(doctorNumber.isEmpty() || doctorPassword.isEmpty()){
Toast.makeText(context, "请输入工号和密码!", Toast.LENGTH_SHORT).show();
}else {
if (doctorNumber.equals("admin")) {
// 管理员密码密码匹配
if (doctorPassword.equals("admin")){
// Intent intent = new Intent(context, TaskActivity.class);
// 传入工号参数
// intent.putExtra("num", 10001);
/// context.startActivity(intent);
Toast.makeText(context, "登录成功!", Toast.LENGTH_SHORT).show();
}else{
Toast.makeText(context, "密码错误!", Toast.LENGTH_SHORT).show();
}
} else {
Toast.makeText(context, "登录成功!", Toast.LENGTH_SHORT).show();
}
}
}
/**
* 屏幕适配
*/
public boolean isBaseOnWidth() {
return false;
}
public float getSizeInDp() {
return 375;
}
}
添加对话框时,需要在res->values->styles.xml中添加对话框属性:1
2
3
4
5
6
7
8
9
10
11
12
13
14
15<!-- 显示个人信息对话框样式 -->
<style name="IdentityDialog" parent="android:Theme.Dialog">
<!-- 背景颜色及透明程度 -->
<item name="android:windowBackground">@android:color/transparent</item>
<!-- 是否半透明 -->
<item name="android:windowIsTranslucent">false</item>
<!-- 是否没有标题 -->
<item name="android:windowNoTitle">true</item>
<!-- 是否浮现在activity之上 -->
<item name="android:windowIsFloating">true</item>
<!-- 是否背景模糊 -->
<item name="android:backgroundDimEnabled">false</item>
<!-- 设置背景模糊的透明度-->
<item name="android:backgroundDimAmount">0.5</item>
</style>
欢迎界面逻辑实现:MainActivity.java:1
2
3
4
5
6
7
8
9
10
11
12
13
14
15
16
17
18
19
20
21
22
23
24
25
26
27
28
29
30
31
32
33
34
35
36
37
38
39
40
41
42public class MainActivity extends AppCompatActivity implements CustomAdapt, View.OnClickListener{
protected void onCreate(Bundle savedInstanceState) {
super.onCreate(savedInstanceState);
setContentView(R.layout.activity_main);
//隐藏状态栏
View decorView = getWindow().getDecorView();
decorView.setSystemUiVisibility(View.SYSTEM_UI_FLAG_LAYOUT_FULLSCREEN | View.SYSTEM_UI_FLAG_LAYOUT_STABLE);
getWindow().setStatusBarColor(Color.TRANSPARENT);
setContentView(R.layout.activity_main);
// 新增任务按钮
Button btAddTask = findViewById(R.id.bt_add_task);
btAddTask.setOnClickListener(this);
}
public void onClick(View view){
if (view.getId() == R.id.bt_add_task) {
// 跳转到自定义身份验证对话框
IdentityDialog identityDialog = new IdentityDialog(MainActivity.this,
R.layout.dialog_identity,
new int[]{R.id.bt_identity_confirm, R.id.bt_identity_cancel});
identityDialog.show();
}
}
/**
* 屏幕适配
*/
public boolean isBaseOnWidth() {
return false;
}
public float getSizeInDp() {
return 375;
}
}
选择机器人界面设置
设计理念
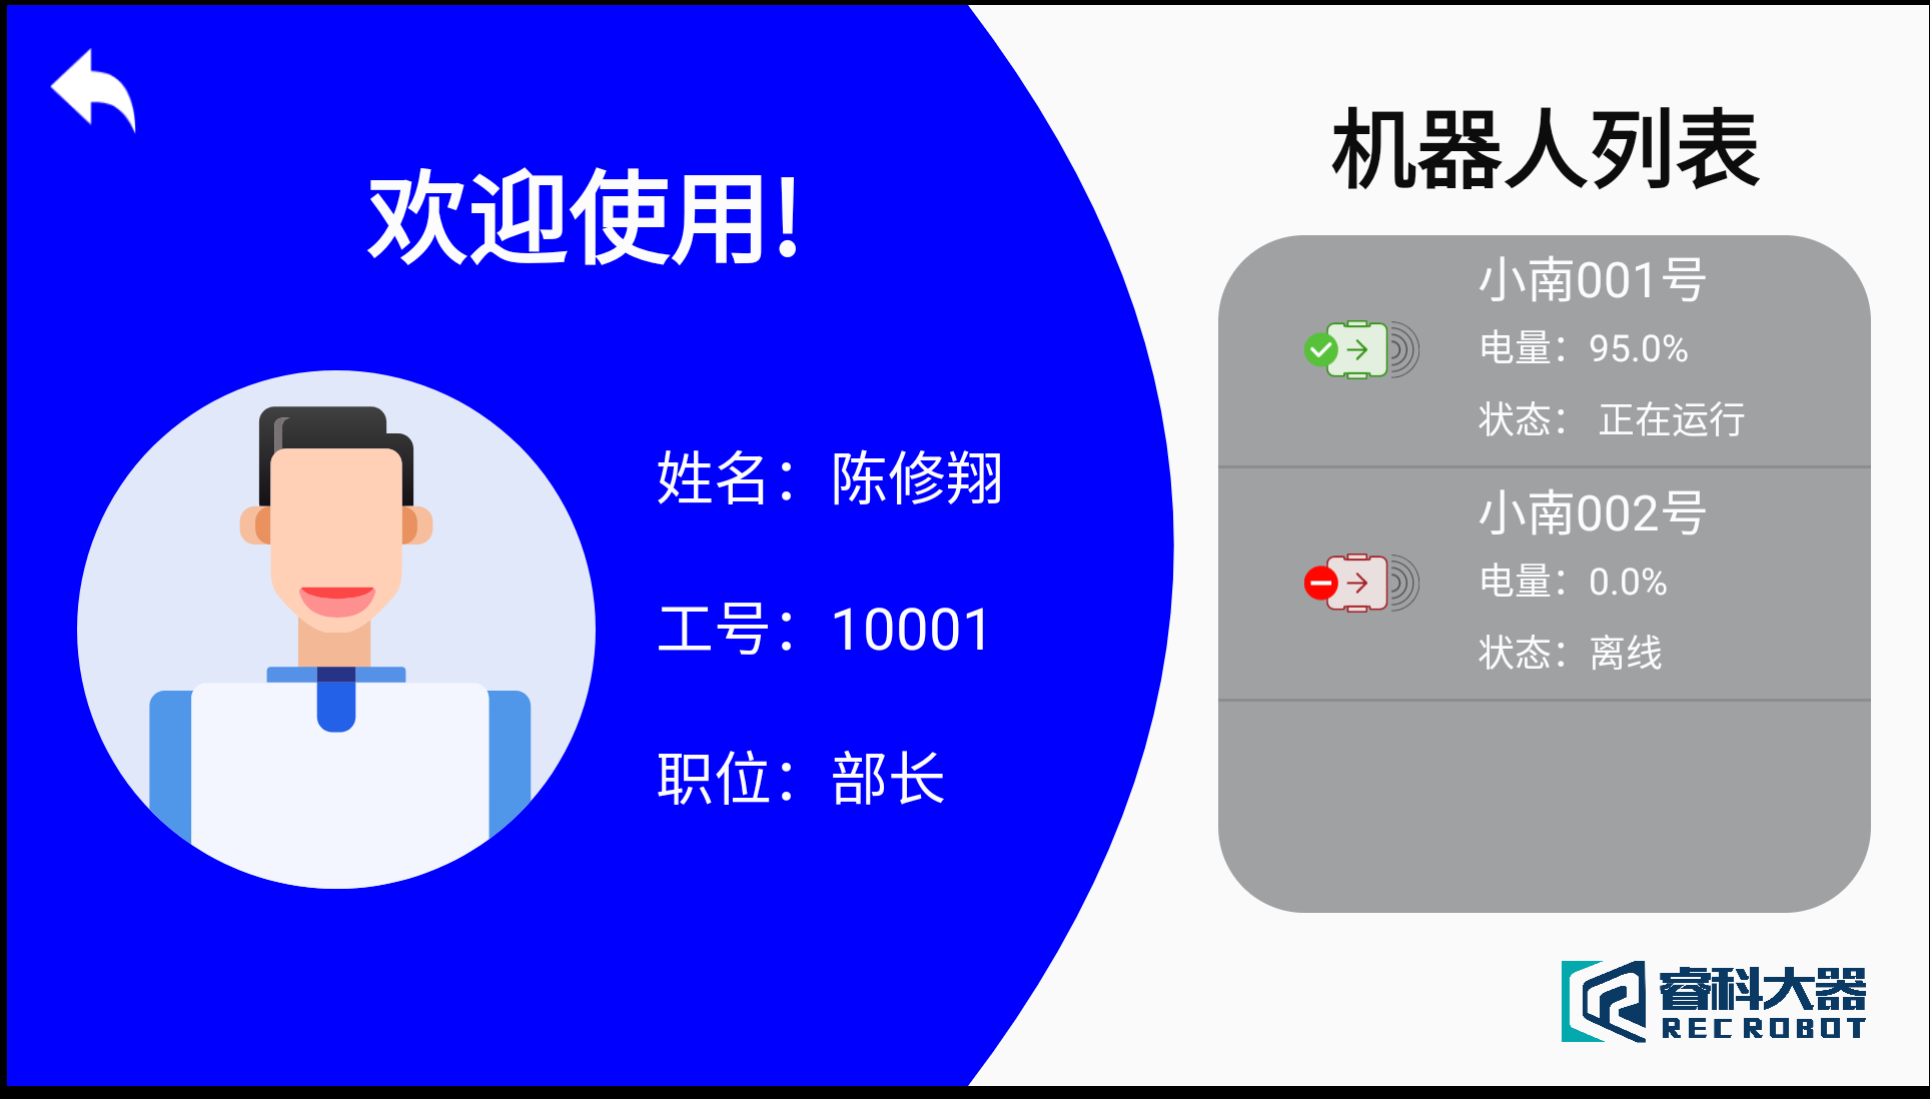
整体风格同欢迎界面,左侧为医生信息显示,右侧为机器人信息显示。
其中机器人信息为ListView,通过自定义设计适配器显示机器人的图标、名字、电量和状态信息。
点击相应的机器人信息即可切换到下达任务界面。
界面实现
新建空Activity,实现activity_task.xml:1
2
3
4
5
6
7
8
9
10
11
12
13
14
15
16
17
18
19
20
21
22
23
24
25
26
27
28
29
30
31
32
33
34
35
36
37
38
39
40
41
42
43
44
45
46
47
48
49
50
51
52
53
54
55
56
57
58
59
60
61
62
63
64
65
66
67
68
69
70
71
72
73
74
75
76
77
78
79
80
81
82
83
84
85
86
87
88
89
90
91
92
93
94
95
96
97
98
99
100
101
102
103
104
105
106
107
108
109
110
111
112
113
114
115
116
117
118
119
120
121
122
123
124
125
126
127
128
129
<androidx.constraintlayout.widget.ConstraintLayout xmlns:android="http://schemas.android.com/apk/res/android"
xmlns:app="http://schemas.android.com/apk/res-auto"
xmlns:tools="http://schemas.android.com/tools"
android:layout_width="match_parent"
android:layout_height="match_parent"
tools:context=".ui.activity.TaskActivity">
<androidx.constraintlayout.widget.Guideline
android:id="@+id/v60"
android:layout_width="wrap_content"
android:layout_height="wrap_content"
android:orientation="vertical"
app:layout_constraintGuide_percent="0.6"/>
<com.njtech.seerwebrobot.ui.view.BackGroundView
android:id="@+id/backGroundView"
android:layout_width="match_parent"
android:layout_height="match_parent"
app:layout_editor_absoluteX="16dp"
app:layout_editor_absoluteY="30dp"/>
<ImageView
android:id="@+id/img_back"
android:layout_width="30dp"
android:layout_height="30dp"
android:layout_marginStart="15dp"
android:layout_marginTop="15dp"
android:background="@drawable/back"
app:layout_constraintStart_toStartOf="parent"
app:layout_constraintTop_toTopOf="parent" />
<ImageView
android:id="@+id/img_doctor"
android:layout_width="180dp"
android:layout_height="180dp"
android:layout_marginTop="30dp"
android:src="@drawable/svg_doctor"
app:layout_constraintEnd_toStartOf="@+id/v60"
app:layout_constraintHorizontal_bias="0.11"
app:layout_constraintStart_toStartOf="@+id/backGroundView"
app:layout_constraintTop_toBottomOf="@+id/tv_welcome" />
<TextView
android:id="@+id/tv_task_doctorName"
android:layout_width="wrap_content"
android:layout_height="wrap_content"
android:layout_marginTop="150dp"
android:text="姓名:张三"
android:textColor="@color/colorWhite"
android:textSize="20sp"
app:layout_constraintEnd_toStartOf="@+id/v60"
app:layout_constraintHorizontal_bias="0.28"
app:layout_constraintStart_toEndOf="@+id/img_doctor"
app:layout_constraintTop_toTopOf="parent" />
<TextView
android:id="@+id/tv_task_doctorNumber"
android:layout_width="wrap_content"
android:layout_height="wrap_content"
android:layout_marginTop="25dp"
android:textColor="@color/colorWhite"
android:textSize="20sp"
android:text="工号:123456"
app:layout_constraintStart_toStartOf="@+id/tv_task_doctorName"
app:layout_constraintTop_toBottomOf="@+id/tv_task_doctorName" />
<TextView
android:id="@+id/tv_task_doctorJob"
android:layout_width="wrap_content"
android:layout_height="wrap_content"
android:layout_marginTop="25dp"
android:textSize="20sp"
android:textColor="@color/colorWhite"
android:text="职位:主治医生"
app:layout_constraintStart_toStartOf="@+id/tv_task_doctorName"
app:layout_constraintTop_toBottomOf="@+id/tv_task_doctorNumber" />
<TextView
android:id="@+id/tv_available"
android:layout_width="wrap_content"
android:layout_height="wrap_content"
android:layout_marginTop="30dp"
android:gravity="center"
android:text="机器人列表"
android:textColor="@color/colorBlack"
android:textSize="30sp"
android:textStyle="bold"
app:layout_constraintEnd_toEndOf="parent"
app:layout_constraintStart_toStartOf="@+id/v60"
app:layout_constraintTop_toTopOf="parent" />
<ListView
android:background="@drawable/shape_gray_corner"
android:id="@+id/lv_RobotInfo"
android:layout_width="0dp"
android:layout_height="0dp"
android:layout_marginStart="20dp"
android:layout_marginTop="10dp"
android:layout_marginEnd="20dp"
app:layout_constraintBottom_toTopOf="@+id/img_logo"
app:layout_constraintEnd_toEndOf="parent"
app:layout_constraintStart_toStartOf="@+id/v60"
app:layout_constraintTop_toBottomOf="@+id/tv_available" />
<ImageView
android:id="@+id/img_logo"
android:layout_width="150dp"
android:layout_height="60dp"
android:scaleType="centerCrop"
android:src="@drawable/logo"
app:layout_constraintBottom_toBottomOf="parent"
app:layout_constraintEnd_toEndOf="parent" />
<TextView
android:id="@+id/tv_welcome"
android:layout_width="wrap_content"
android:layout_height="wrap_content"
android:layout_marginTop="50dp"
android:gravity="center"
android:text="欢迎使用!"
android:textColor="@color/colorWhite"
android:textSize="35sp"
android:textStyle="bold"
app:layout_constraintEnd_toStartOf="@+id/v60"
app:layout_constraintStart_toStartOf="parent"
app:layout_constraintTop_toTopOf="parent" />
</androidx.constraintlayout.widget.ConstraintLayout>
适配器RobotInfoAdapter
处理一些比较复杂的数据显示。需要提供界面设计和界面逻辑功能实现。
界面实现adapter_robot_item.xml:1
2
3
4
5
6
7
8
9
10
11
12
13
14
15
16
17
18
19
20
21
22
23
24
25
26
27
28
29
30
31
32
33
34
35
36
37
38
39
40
41
42
43
44
45
46
47
<LinearLayout xmlns:android="http://schemas.android.com/apk/res/android"
android:orientation="horizontal"
android:layout_width="match_parent"
android:layout_height="80dp">
<ImageView
android:id="@+id/img_robot"
android:layout_width="40dp"
android:layout_height="40dp"
android:layout_gravity="center_vertical"
android:layout_marginLeft="30dp"/>
<LinearLayout
android:layout_width="0dp"
android:layout_height="match_parent"
android:layout_marginLeft="20dp"
android:layout_weight="1"
android:orientation="vertical">
<TextView
android:id="@+id/tv_robot_name"
android:layout_width="wrap_content"
android:layout_height="30dp"
android:layout_gravity="center_vertical"
android:textSize="17sp"
android:textColor="@color/colorWhite"
android:gravity="center" />
<TextView
android:id="@+id/tv_robot_power"
android:layout_width="wrap_content"
android:layout_height="0dp"
android:textColor="@color/colorWhite"
android:textSize="13sp"
android:layout_weight="1"/>
<TextView
android:id="@+id/tv_robot_status"
android:layout_width="wrap_content"
android:layout_height="0dp"
android:textColor="@color/colorWhite"
android:textSize="13sp"
android:layout_weight="1"/>
</LinearLayout>
</LinearLayout>
逻辑功能实现RobotInfoAdapter.java:1
2
3
4
5
6
7
8
9
10
11
12
13
14
15
16
17
18
19
20
21
22
23
24
25
26
27
28
29
30
31
32
33
34
35
36
37
38
39
40
41
42
43
44
45
46
47
48
49
50
51
52
53
54
55
56
57
58
59
60
61
62
63
64
65
66
67
68
69
70
71
72
73
74
75
76
77
78
79
80
81
82
83
84
85
86
87
88
89
90
91
92
93
94
95
96
97
98
99
100
101
102
103
104
105
106
107
108
109
110
111
112
113
114
115
116
117
118
119
120
121
122
123
124
125
126
127
128/**
* 机器人listView适配器
*/
public class RobotInfoAdapter extends ArrayAdapter<RobotInfo> {
private int resourceId;
private ImageView robotImage;
private TextView tvRobotName;
private TextView tvRobotPower;
private TextView tvRobotStatus;
// 房间名称映射 不能传入中文,暂时用这个方法
HashMap<String, String> nameMap = new HashMap<>();
private String startPoint;
private String startName;
private String endPoint;
private String endName;
private String targetName;
private String currentOrderStatus = "ERROR";
// 构造函数 需要activity,layout和list数据
public RobotInfoAdapter(Context context, int resourceId, List<RobotInfo> objects) {
super(context, resourceId, objects);
this.resourceId = resourceId;
}
public View getView(int position, View convertView, ViewGroup parent) {
View view = LayoutInflater.from(getContext()).inflate(resourceId, parent, false);
// 获取当前机器人信息
RobotInfo robotInfo = getItem(position);
initView(view);
setRobotName(robotInfo.getRobotName());
setRobotBatteryLevel(robotInfo.getRobotBatteryLevel());
setRobotTaskStatus(robotInfo.getRobotTaskStatus(), robotInfo.getRobotEmergencyStatus());
return view;
}
// 初始化控件信息
private void initView(View view) {
robotImage = view.findViewById(R.id.img_robot);
tvRobotName = view.findViewById(R.id.tv_robot_name);
tvRobotPower = view.findViewById(R.id.tv_robot_power);
tvRobotStatus = view.findViewById(R.id.tv_robot_status);
nameMap.put("101", "门诊");
nameMap.put("102", "病房");
nameMap.put("103", "护士站");
nameMap.put("201", "门诊");
nameMap.put("202", "病房");
nameMap.put("203", "护士站");
}
// 设置机器人名字
("SetTextI18n")
private void setRobotName(String robotName) {
switch (robotName){
case "AMB-01":
tvRobotName.setText("小南001号");
break;
case "AMB-02":
tvRobotName.setText("小南002号");
break;
default:
tvRobotName.setText("暂无登记!");
break;
}
}
// 设置机器人电量
("SetTextI18n")
private void setRobotBatteryLevel(Double robotBatteryLevel) {
tvRobotPower.setText("电量:" + robotBatteryLevel * 100 + "%");
}
// 设置机器人任务状态
private void setRobotTaskStatus(Integer robotTaskStatus, Boolean robotEmergencyStatus) {
if (robotEmergencyStatus){
tvRobotStatus.setText("状态: 异常");
robotImage.setImageResource(R.drawable.redagv);
}
else{
switch (robotTaskStatus){
case -1:
tvRobotStatus.setText("状态:离线");
robotImage.setImageResource(R.drawable.redagv);
break;
case 0:
tvRobotStatus.setText("状态: 正在休息");
robotImage.setImageResource(R.drawable.blueagv);
break;
case 2:
tvRobotStatus.setText("状态: 正在运行");
robotImage.setImageResource(R.drawable.greenagv);
break;
case 3:
tvRobotStatus.setText("状态: 任务暂停");
robotImage.setImageResource(R.drawable.redagv);
break;
case 4:
tvRobotStatus.setText("状态: 任务完成");
robotImage.setImageResource(R.drawable.blueagv);
break;
case 5:
tvRobotStatus.setText("状态: 任务失败");
robotImage.setImageResource(R.drawable.redagv);
break;
case 6:
tvRobotStatus.setText("状态: 任务取消");
robotImage.setImageResource(R.drawable.redagv);
break;
case -10000:
tvRobotStatus.setText("所有机器人均离线");
robotImage.setImageResource(R.drawable.redagv);
break;
default:
tvRobotStatus.setText("状态: 未知");
robotImage.setImageResource(R.drawable.ximenziagv);
break;
}
}
}
}
机器人状态的具体信息在这里设置。
界面逻辑功能实现
TaskActivity.java1
2
3
4
5
6
7
8
9
10
11
12
13
14
15
16
17
18
19
20
21
22
23
24
25
26
27
28
29
30
31
32
33
34
35
36
37
38
39
40
41
42
43
44
45
46
47
48
49
50
51
52
53
54
55
56
57
58
59
60
61
62
63
64
65
66
67
68
69
70
71
72
73
74
75
76
77
78
79
80
81
82
83
84
85
86
87
88
89
90
91
92
93
94
95
96
97
98
99
100
101
102
103
104
105
106
107
108
109
110
111
112
113
114
115
116
117
118
119
120
121
122
123
124
125
126
127
128
129
130
131
132
133
134
135
136
137
138
139
140
141
142
143
144
145
146
147
148
149
150
151
152
153
154
155
156
157
158
159
160
161
162
163
164
165
166
167
168
169
170
171
172
173
174
175
176
177
178
179
180
181
182
183
184
185
186
187
188
189
190
191
192
193
194
195
196
197
198
199
200
201
202
203
204
205
206
207
208
209
210
211
212
213
214
215
216
217
218
219
220
221
222
223
224
225
226
227
228
229
230
231
232
233
234
235
236
237
238public class TaskActivity extends AppCompatActivity implements CustomAdapt, View.OnClickListener {
private String doctorNumber;
private ImageView imgBack;
private TextView tvTaskDoctorName;
private TextView tvTaskDoctorNumber;
private TextView tvTaskDoctorJob;
//当前可用机器人列表
private ListView lvRobotInfo;
//当前可用机器人数据源
private List<RobotInfo> RobotInfoList = new ArrayList<>();
//listView适配器
private RobotInfoAdapter robotInfoAdapter;
private List<String> allRobots = new ArrayList<>() ; // 所有可用机器人列表
private List<String> allOfflineRobots = new ArrayList<>(); // 所有离线机器人列表
private ScheduledExecutorService requestPool; //定时请求服务器线程池
protected void onCreate(Bundle savedInstanceState) {
super.onCreate(savedInstanceState);
//隐藏状态栏
View decorView = getWindow().getDecorView();
decorView.setSystemUiVisibility(View.SYSTEM_UI_FLAG_LAYOUT_FULLSCREEN | View.SYSTEM_UI_FLAG_LAYOUT_STABLE);
getWindow().setStatusBarColor(Color.TRANSPARENT);
setContentView(R.layout.activity_task);
//获取之前activitity的值
Intent intent = getIntent();
doctorNumber = intent.getStringExtra("doctorNumber");
// 初始化控件
initView();
// 初始化ListView适配器
initListView();
// 设置界面医生信息
setDoctorInfo(doctorNumber);
}
private void initView() {
imgBack = findViewById(R.id.img_back);
imgBack.setOnClickListener(this);
tvTaskDoctorName = findViewById(R.id.tv_task_doctorName);
tvTaskDoctorNumber = findViewById(R.id.tv_task_doctorNumber);
tvTaskDoctorJob = findViewById(R.id.tv_task_doctorJob);
// 初始化可用机器人列表
allRobots = Arrays.asList(getResources().getStringArray(R.array.allRobot));
allOfflineRobots.add("AMB-01");
allOfflineRobots.add("AMB-02");
}
private void initListView() {
// 创建构造器,初始化ListView
lvRobotInfo = findViewById(R.id.lv_RobotInfo);
robotInfoAdapter = new RobotInfoAdapter(TaskActivity.this, R.layout.adapter_robot_item, RobotInfoList);
lvRobotInfo.setAdapter(robotInfoAdapter);
// 设置ListView监听器
lvRobotInfo.setOnItemClickListener(((parent, view, position, id) -> {
// 通过定时调用后端接口实时获取机器人信息
RobotInfo robotInfo = RobotInfoList.get(position);
// 急停按下或者任务状态异常
if(!robotInfo.getRobotEmergencyStatus() &&
(robotInfo.getRobotTaskStatus() == 0 || robotInfo.getRobotTaskStatus() == 4
|| robotInfo.getRobotTaskStatus() == 6)){
Toast.makeText(TaskActivity.this, "你已选择" + robotInfo.getRobotName(), Toast.LENGTH_SHORT).show();
//点击具体的空闲车辆切换到下任务界面
Intent intent = new Intent(TaskActivity.this, AddTaskActivity.class);
intent.putExtra("robotName", robotInfo.getRobotName()); //将选中车辆的名称传给下个界面
startActivity(intent);
}else{
Toast.makeText(TaskActivity.this, "不可选择", Toast.LENGTH_SHORT).show();
}
}));
}
private void setDoctorInfo(String doctorNumber) {
SeerService seerService = SeerServiceCreator.getInstance().create(SeerService.class);
seerService.getDoctorInfoByEmployeeId(Integer.parseInt(doctorNumber))
.subscribeOn(Schedulers.io())
.observeOn(AndroidSchedulers.mainThread())
.subscribe(new Consumer<DoctorResponse>() {
public void accept(DoctorResponse doctorResponse) throws Exception {
// Log.d("hahaha", String.valueOf(ruikedaqiResponse.getMessage()));
if(doctorResponse.getData().getDoctorUserList()!=null){
String doctorName = doctorResponse.getData().getDoctorUserList().get(0).getName();
Integer doctorNumber = doctorResponse.getData().getDoctorUserList().get(0).getEmployeeId();
String doctorJob = doctorResponse.getData().getDoctorUserList().get(0).getJob();
setTextView(doctorName, doctorNumber, doctorJob); // 设置文本内容
}
}
}, new Consumer<Throwable>() {
public void accept(Throwable throwable) throws Exception {
Toast.makeText(TaskActivity.this, throwable.getMessage(), Toast.LENGTH_SHORT).show();
}
});
}
/**
* 设置文本控件内容
*/
("SetTextI18n")
public void setTextView(String doctorName, Integer doctorNum, String doctorJob){
tvTaskDoctorName.setText("姓名:" + doctorName);
tvTaskDoctorNumber.setText("工号:" + doctorNum);
tvTaskDoctorJob.setText("职位:" + doctorJob);
}
public void onClick(View view){
// 返回到上一个界面
if (view.getId() == R.id.img_back){
finish();
}
}
/**
* 定时获取到小车信息
*/
private void getRobotInfoInformation() {
SeerService seerService = SeerServiceCreator.getInstance().create(SeerService.class);
// 切换回主线程并订阅
seerService.getAllRobotsInfo().subscribeOn(Schedulers.io())
.observeOn(AndroidSchedulers.mainThread())
.subscribe(new Consumer<RobotAllInfoResponse>() {
public void accept(RobotAllInfoResponse robotAllInfoResponse) throws Exception {
RobotInfoList.clear(); //每次更新时清掉上一次的数据
// allOfflineTankRobots = Arrays.asList(getResources().getStringArray(R.array.allTankRobot));
// RobotInfo RobotInfo = null;
if(robotAllInfoResponse.getData().getAllRobotInfoList()!=null){
List<RobotAllInfo> robotAllInfoList = robotAllInfoResponse.getData().getAllRobotInfoList();
for (int i=0; i<robotAllInfoList.size(); i++){
RobotAllInfo robotAllInfo = robotAllInfoList.get(i);
for (String robotArray : allRobots) {
if (robotArray.equals(robotAllInfo.getVehicleId())) {
// 如果此时的robotId为机器人列表中的值,则表示此时该机器人处于在线状态
RobotInfo RobotInfo = new RobotInfo(robotAllInfo.getVehicleId(),
robotAllInfo.getBatteryLevel(),
robotAllInfo.getTaskStatus(),
robotAllInfo.getEmergency());
// 添加在线机器人
RobotInfoList.add(RobotInfo);
allOfflineRobots.remove(robotArray);
// Log.d("hahaha", String.valueOf(allOfflineTankRobots.get(0)));
}
}
}
//添加离线机器人
for(String offlineRobotArray: allOfflineRobots){
RobotInfo RobotInfo = new RobotInfo(offlineRobotArray, 0.0,
-1, false);
RobotInfoList.add(RobotInfo);
}
}else{
// 此时表示所有机器人均离线
RobotInfo RobotInfo = new RobotInfo("robotALL", 0.0,
-10000, false);
RobotInfoList.add(RobotInfo);
}
// 通知Adapter更新
robotInfoAdapter.notifyDataSetChanged();
}
}, new Consumer<Throwable>() {
public void accept(Throwable throwable) throws Exception {
// Log.d("hahaha", String.valueOf(throwable));
Toast.makeText(TaskActivity.this, "错误信息为: " + throwable.getMessage(), Toast.LENGTH_SHORT).show();
}
});
// Log.d("hahaha", "循环");
}
/**
* 定时向服务器请求机器人数据
*/
protected void onResume() {
super.onResume();
startRequest(); //定时向服务器请求数据
}
/**
* 停止请求服务器
*/
protected void onPause() {
super.onPause();
requestPool.shutdownNow();
}
/**
* 定时向服务器请求机器人状态数据
*/
private void startRequest() {
final TimerTask task = new TimerTask() {
public void run() {
//execute task
getRobotInfoInformation();
}
};
requestPool = Executors.newScheduledThreadPool(1);
requestPool.scheduleAtFixedRate(task, 0, 1000, TimeUnit.MILLISECONDS);
}
/**
* 屏幕适配
*/
public boolean isBaseOnWidth() {
return false;
}
public float getSizeInDp() {
return 375;
}
}
首先定时从后端获取robotInfo数据,然后依次添加到 List<RobotInfo> RobotInfoList列表中,并根据Adapter的自定义规则显示在界面上。
下达任务界面设置
设计理念
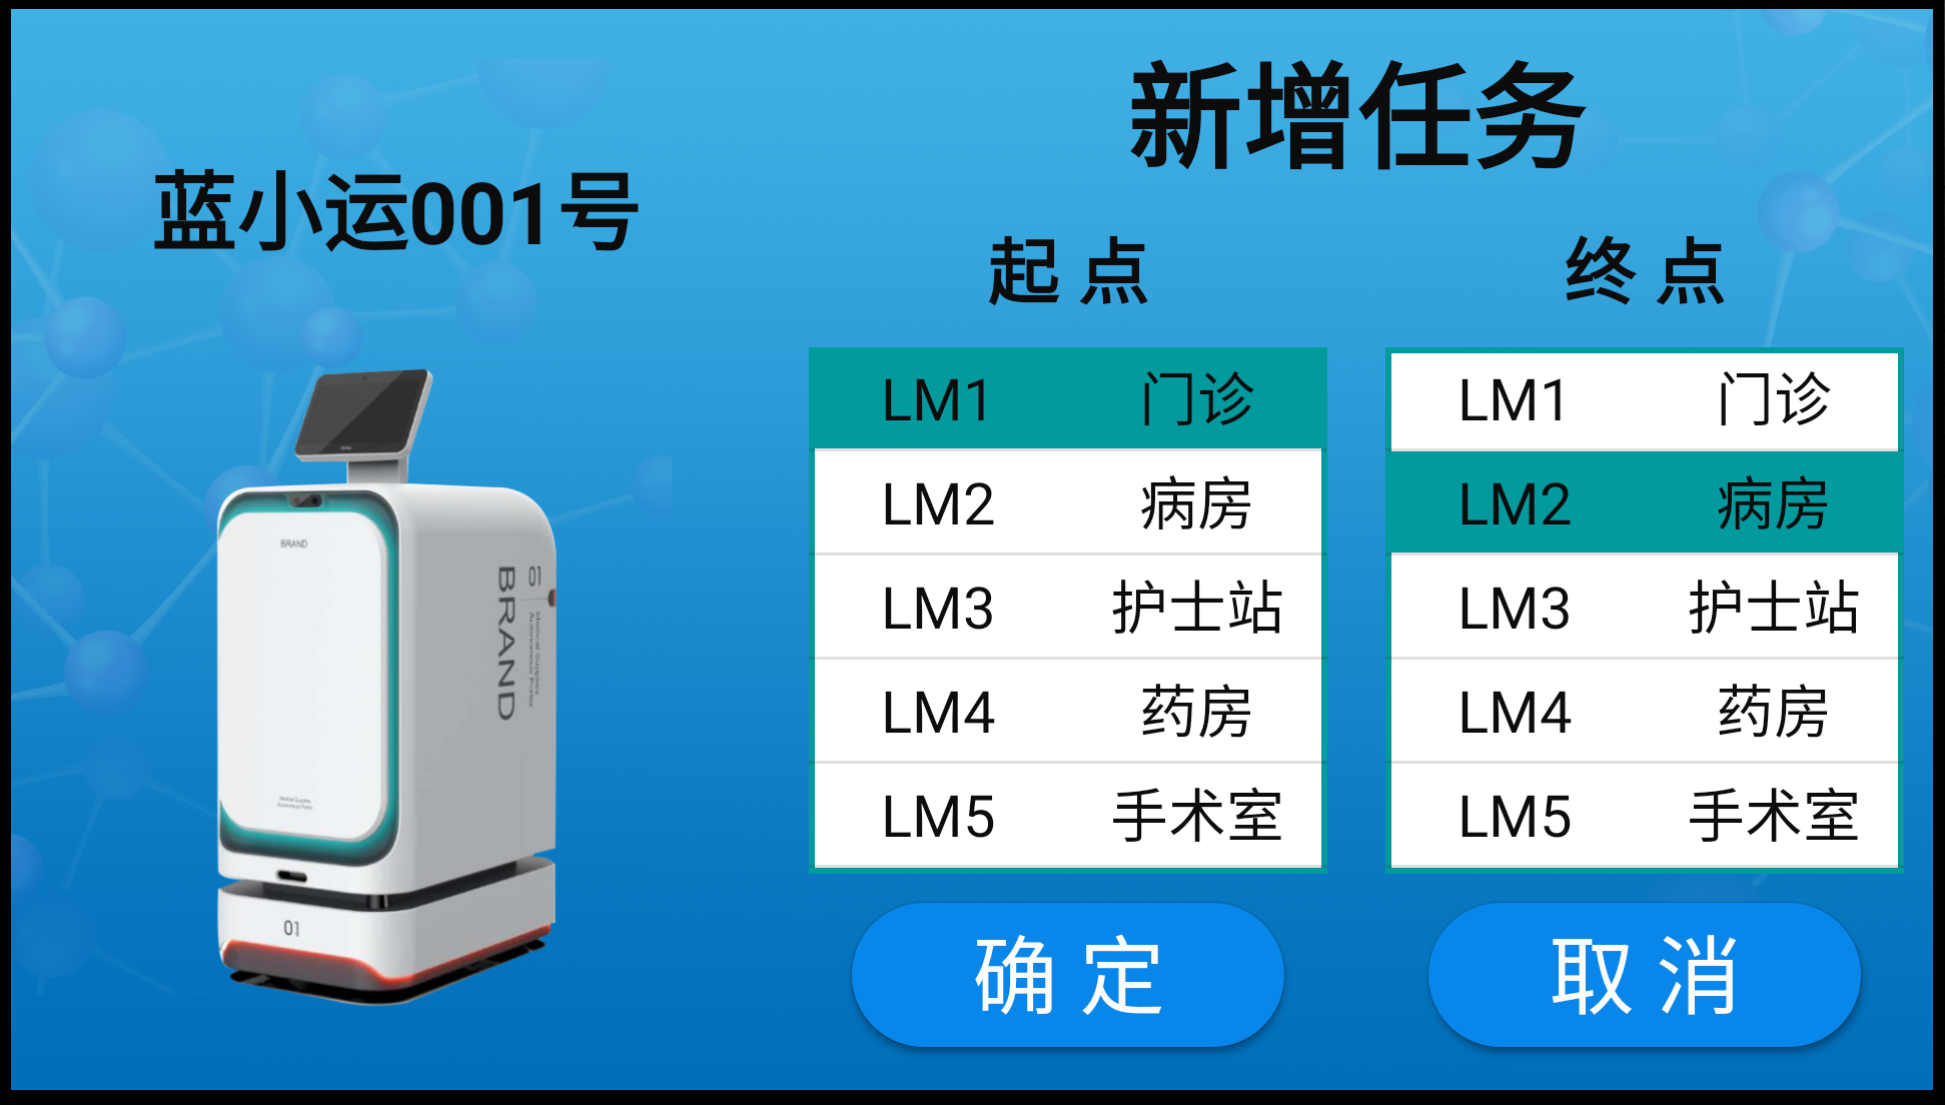
左侧为机器人信息显示,右侧为新增任务功能。
其中起点和终点信息均为ListView,通过自定义设计适配器显示起点/终点的房间号和房间名。
选择相应的起点和终点即可新增任务。
界面设计
新建空Activity,实现activity_add_task.xml:1
2
3
4
5
6
7
8
9
10
11
12
13
14
15
16
17
18
19
20
21
22
23
24
25
26
27
28
29
30
31
32
33
34
35
36
37
38
39
40
41
42
43
44
45
46
47
48
49
50
51
52
53
54
55
56
57
58
59
60
61
62
63
64
65
66
67
68
69
70
71
72
73
74
75
76
77
78
79
80
81
82
83
84
85
86
87
88
89
90
91
92
93
94
95
96
97
98
99
100
101
102
103
104
105
106
107
108
109
110
111
112
113
114
115
116
117
118
119
120
121
122
123
124
125
126
127
128
129
130
131
132
133
134
135
136
137
138
139
140
141
142
143
144
145
146
147
148
149
150
151
152
153
154
155
156
157
158
159
160
161
162
163
164
165
166
167
168
169
<androidx.constraintlayout.widget.ConstraintLayout xmlns:android="http://schemas.android.com/apk/res/android"
xmlns:app="http://schemas.android.com/apk/res-auto"
xmlns:tools="http://schemas.android.com/tools"
android:layout_width="match_parent"
android:layout_height="match_parent"
tools:context=".ui.activity.AddTaskActivity">
<ImageView
android:id="@+id/imageView"
android:layout_width="0dp"
android:layout_height="0dp"
android:scaleType="centerCrop"
app:layout_constraintBottom_toBottomOf="parent"
app:layout_constraintEnd_toEndOf="parent"
app:layout_constraintHorizontal_bias="0.0"
app:layout_constraintStart_toStartOf="parent"
app:layout_constraintTop_toTopOf="parent"
app:layout_constraintVertical_bias="1.0"
app:srcCompat="@drawable/bg_blue" />
<androidx.constraintlayout.widget.Guideline
android:id="@+id/v20"
android:layout_width="wrap_content"
android:layout_height="wrap_content"
android:orientation="vertical"
app:layout_constraintGuide_percent="0.2" />
<androidx.constraintlayout.widget.Guideline
android:id="@+id/v40"
android:layout_width="wrap_content"
android:layout_height="wrap_content"
android:orientation="vertical"
app:layout_constraintGuide_percent="0.4" />
<androidx.constraintlayout.widget.Guideline
android:id="@+id/v70"
android:layout_width="wrap_content"
android:layout_height="wrap_content"
android:orientation="vertical"
app:layout_constraintGuide_percent="0.7" />
<androidx.constraintlayout.widget.Guideline
android:id="@+id/v50"
android:layout_width="wrap_content"
android:layout_height="wrap_content"
android:orientation="vertical"
app:layout_constraintGuide_percent="0.5" />
<TextView
android:id="@+id/tv_add_task"
android:layout_width="wrap_content"
android:layout_height="wrap_content"
android:layout_marginTop="10dp"
android:text="新增任务"
android:textColor="@color/colorBlack"
android:textSize="40sp"
android:textStyle="bold"
app:layout_constraintEnd_toEndOf="parent"
app:layout_constraintStart_toStartOf="@+id/v40"
app:layout_constraintTop_toTopOf="parent" />
<TextView
android:id="@+id/tv_add_task_robotName"
android:layout_width="wrap_content"
android:layout_height="wrap_content"
android:layout_marginTop="50dp"
android:text="机器人"
android:textColor="@color/colorBlack"
android:textSize="30sp"
android:textStyle="bold"
app:layout_constraintEnd_toStartOf="@+id/v40"
app:layout_constraintStart_toStartOf="parent"
app:layout_constraintTop_toTopOf="parent" />
<ImageView
android:id="@+id/img_add_task_robotImg"
android:layout_width="250dp"
android:layout_height="250dp"
android:layout_marginTop="20dp"
android:scaleType="fitXY"
app:layout_constraintBottom_toBottomOf="parent"
app:layout_constraintEnd_toStartOf="@+id/v40"
app:layout_constraintHorizontal_bias="0.372"
app:layout_constraintStart_toStartOf="parent"
app:layout_constraintTop_toBottomOf="@+id/tv_add_task_robotName" />
<TextView
android:id="@+id/tv_add_task_startPosition"
android:layout_width="wrap_content"
android:layout_height="wrap_content"
android:layout_marginTop="10dp"
android:text="起 点"
android:textColor="@color/colorBlack"
android:textSize="25sp"
android:textStyle="bold"
app:layout_constraintEnd_toStartOf="@+id/v70"
app:layout_constraintStart_toStartOf="@+id/v40"
app:layout_constraintTop_toBottomOf="@+id/tv_add_task" />
<TextView
android:id="@+id/tv_add_task_endPosition"
android:layout_width="wrap_content"
android:layout_height="wrap_content"
android:text="终 点"
android:textColor="@color/colorBlack"
android:textSize="25sp"
android:textStyle="bold"
app:layout_constraintEnd_toEndOf="parent"
app:layout_constraintStart_toStartOf="@+id/v70"
app:layout_constraintTop_toTopOf="@+id/tv_add_task_startPosition" />
<ListView
android:id="@+id/lv_add_task_startName"
android:layout_width="0dp"
android:layout_height="0dp"
android:layout_marginStart="10dp"
android:layout_marginTop="10dp"
android:layout_marginEnd="10dp"
android:layout_marginBottom="10dp"
android:background="@drawable/shape_gray_corner_2"
app:layout_constraintBottom_toTopOf="@+id/bt_add_task_confirm"
app:layout_constraintEnd_toStartOf="@+id/v70"
app:layout_constraintStart_toStartOf="@+id/v40"
app:layout_constraintTop_toBottomOf="@+id/tv_add_task_startPosition" />
<ListView
android:id="@+id/lv_add_task_endName"
android:layout_width="0dp"
android:layout_height="0dp"
android:layout_marginStart="10dp"
android:layout_marginTop="10dp"
android:layout_marginEnd="10dp"
android:layout_marginBottom="10dp"
android:background="@drawable/shape_gray_corner_2"
app:layout_constraintBottom_toTopOf="@+id/bt_add_task_cancel"
app:layout_constraintEnd_toEndOf="parent"
app:layout_constraintStart_toStartOf="@+id/v70"
app:layout_constraintTop_toBottomOf="@+id/tv_add_task_endPosition" />
<Button
android:id="@+id/bt_add_task_confirm"
android:layout_width="150dp"
android:layout_height="50dp"
android:layout_marginBottom="15dp"
android:background="@drawable/shape_blue_corner"
android:text="确 定"
android:textColor="@color/colorWhite"
android:textSize="30sp"
app:layout_constraintBottom_toBottomOf="parent"
app:layout_constraintEnd_toStartOf="@+id/v70"
app:layout_constraintStart_toStartOf="@+id/v40" />
<Button
android:id="@+id/bt_add_task_cancel"
android:layout_width="150dp"
android:layout_height="50dp"
android:layout_marginBottom="15dp"
android:background="@drawable/shape_blue_corner"
android:text="取 消"
android:textColor="@color/colorWhite"
android:textSize="30sp"
app:layout_constraintBottom_toBottomOf="parent"
app:layout_constraintEnd_toEndOf="parent"
app:layout_constraintStart_toStartOf="@+id/v70" />
</androidx.constraintlayout.widget.ConstraintLayout>
适配器PositionNameAdapter
界面实现adapter_position_name_item.xml:1
2
3
4
5
6
7
8
9
10
11
12
13
14
15
16
17
18
19
20
21
22
23
24
25
26
27
28
29
30
31
<LinearLayout xmlns:android="http://schemas.android.com/apk/res/android"
android:orientation="horizontal"
android:layout_width="match_parent"
android:layout_height="match_parent"
>
<TextView
android:id="@+id/tv_position_room_number"
android:layout_width="0dp"
android:layout_height="35dp"
android:layout_weight="1"
android:layout_gravity="center"
android:gravity="center"
android:textSize="20sp"
android:textColor="@color/colorBlack"
/>
<TextView
android:id="@+id/tv_position_name"
android:layout_width="0dp"
android:layout_height="35dp"
android:layout_weight="1"
android:layout_gravity="center"
android:gravity="center"
android:textSize="20sp"
android:textColor="@color/colorBlack"
/>
</LinearLayout>
逻辑功能实现PositionNameAdapter.java:1
2
3
4
5
6
7
8
9
10
11
12
13
14
15
16
17
18
19
20
21
22
23
24
25
26
27/**
* 起始点目标点listView适配器
*/
public class PositionNameAdapter extends ArrayAdapter<PositionName> {
private int resourceId;
// 构造函数 需要activity,layout和list数据
public PositionNameAdapter(Context context, int resourceId, List<PositionName> objects) {
super(context, resourceId, objects);
this.resourceId = resourceId;
}
("SetTextI18n")
public View getView(int position, View convertView, ViewGroup parent) {
PositionName positionName = getItem(position);
View view = LayoutInflater.from(getContext()).inflate(resourceId, parent, false);
TextView tvPositionName = view.findViewById(R.id.tv_position_name);
TextView tvPositionRoomNumber = view.findViewById(R.id.tv_position_room_number);
tvPositionName.setText(positionName.getRoomName());
tvPositionRoomNumber.setText(positionName.getRoomNumber());
return view;
}
}
界面逻辑功能实现
AddTaskActivity.java:1
2
3
4
5
6
7
8
9
10
11
12
13
14
15
16
17
18
19
20
21
22
23
24
25
26
27
28
29
30
31
32
33
34
35
36
37
38
39
40
41
42
43
44
45
46
47
48
49
50
51
52
53
54
55
56
57
58
59
60
61
62
63
64
65
66
67
68
69
70
71
72
73
74
75
76
77
78
79
80
81
82
83
84
85
86
87
88
89
90
91
92
93
94
95
96
97
98
99
100
101
102
103
104
105
106
107
108
109
110
111
112
113
114
115
116
117
118
119
120
121
122
123
124
125
126
127
128
129
130
131
132
133
134
135
136
137
138
139
140
141
142
143
144
145
146
147
148
149
150
151
152
153
154
155
156
157
158
159
160
161
162
163
164
165
166
167
168
169
170
171
172
173
174
175
176
177
178
179
180
181
182
183
184
185
186
187
188
189
190
191
192
193
194
195
196
197
198
199
200
201
202
203
204
205
206
207
208
209
210
211
212
213
214
215
216
217
218
219
220
221
222
223
224
225
226
227
228
229public class AddTaskActivity extends AppCompatActivity implements CustomAdapt, View.OnClickListener {
private String robotName;
private Button btAddTaskConfirm;
private Button btAddTaskCancel;
private TextView tvAddTaskRobotName;
private ImageView ivAddTaskRobotImg;
//起始点名字列表
private ListView lvAddTaskStartName;
//起始点名字列表数据源
private List<PositionName> startNameList = new ArrayList<>();
//listView适配器
private PositionNameAdapter startNameAdapter;
private String startNameSelect = "";
private String startNumberSelect = "";
private String[] startNameArrays;
private String[] startNumberArrays;
//目标点名字列表
private ListView lvAddTaskEndName;
//目标点名字列表数据源
private List<PositionName> endNameList = new ArrayList<>();
//listView适配器
private PositionNameAdapter endNameAdapter;
private String endNameSelect = "";
private String endNumberSelect = "";
private String[] endNameArrays;
private String[] endNumberArrays;
protected void onCreate(Bundle savedInstanceState) {
super.onCreate(savedInstanceState);
//隐藏状态栏
View decorView = getWindow().getDecorView();
decorView.setSystemUiVisibility(View.SYSTEM_UI_FLAG_LAYOUT_FULLSCREEN | View.SYSTEM_UI_FLAG_LAYOUT_STABLE);
getWindow().setStatusBarColor(Color.TRANSPARENT);
setContentView(R.layout.activity_add_task);
//从上一个界面中获取到车辆名称
Intent intent = getIntent();
robotName = intent.getStringExtra("robotName");
// 初始化控件
initView();
// 初始化起始点listView
initStartNameAdapter();
// 初始化目标点listView
initEndNameAdapter();
}
private void initView() {
btAddTaskConfirm = findViewById(R.id.bt_add_task_confirm);
btAddTaskCancel = findViewById(R.id.bt_add_task_cancel);
btAddTaskConfirm.setOnClickListener(this);
btAddTaskCancel.setOnClickListener(this);
tvAddTaskRobotName = findViewById(R.id.tv_add_task_robotName);
ivAddTaskRobotImg = findViewById(R.id.img_add_task_robotImg);
switch (robotName){
case "AMB-01":
tvAddTaskRobotName.setText("蓝小运001号");
ivAddTaskRobotImg.setBackgroundResource(R.drawable.tank008);
break;
case "tank009":
tvAddTaskRobotName.setText("蓝小运002号");
ivAddTaskRobotImg.setBackgroundResource(R.drawable.tank009);
break;
}
}
private void initStartNameAdapter() {
// 添加起始点
startNameArrays = getResources().getStringArray(R.array.startName);
startNumberArrays = getResources().getStringArray(R.array.startNumber);
// 起始点list列表
for (int i = 0; i < startNameArrays.length;i++){
startNameList.add(new PositionName(startNameArrays[i], startNumberArrays[i]));
}
//初始化ListView
lvAddTaskStartName = findViewById(R.id.lv_add_task_startName);
startNameAdapter = new PositionNameAdapter(AddTaskActivity.this, R.layout.adapter_position_name_item, startNameList);
lvAddTaskStartName.setAdapter(startNameAdapter);
//listView设置监听器
lvAddTaskStartName.setOnItemClickListener((parent, view, position, id)->{
PositionName startName = startNameList.get(position);
startNumberSelect = startName.getRoomNumber();
startNameSelect = startName.getRoomName();
// 设置颜色
Drawable drawable = getResources().getDrawable(R.color.colorXimenzi);
lvAddTaskStartName.setSelector(drawable);
// 添加提示信息
Toast.makeText(AddTaskActivity.this, "你已选择 " + startName.getRoomNumber()
+ " " + startName.getRoomName(), Toast.LENGTH_SHORT).show();
});
}
private void initEndNameAdapter() {
// 添加目标点
endNameArrays = getResources().getStringArray(R.array.endName);
endNumberArrays = getResources().getStringArray(R.array.endNumber);
// 目标点list列表
for (int i = 0; i < endNameArrays.length;i++){
endNameList.add(new PositionName(endNameArrays[i], endNumberArrays[i]));
}
//初始化ListView
lvAddTaskEndName = findViewById(R.id.lv_add_task_endName);
endNameAdapter = new PositionNameAdapter(AddTaskActivity.this, R.layout.adapter_position_name_item, endNameList);
lvAddTaskEndName.setAdapter(endNameAdapter);
//listView设置监听器
lvAddTaskEndName.setOnItemClickListener((parent, view, position, id)->{
PositionName endName = endNameList.get(position);
endNumberSelect = endName.getRoomNumber();
endNameSelect = endName.getRoomName();
// 设置颜色
Drawable drawable = getResources().getDrawable(R.color.colorXimenzi);
lvAddTaskEndName.setSelector(drawable);
// 添加提示信息
Toast.makeText(AddTaskActivity.this, "你已选择 " + endName.getRoomNumber()
+ " " + endName.getRoomName(), Toast.LENGTH_SHORT).show();
});
}
public void onClick(View view) {
switch (view.getId()){
case R.id.bt_add_task_confirm:
boolean isOK = checkTask();
// 成功则添加任务
if (isOK){
addTask(); //添加任务
finish(); //返回上一个界面
} else {
Toast.makeText(AddTaskActivity.this, "任务未设置完成或任务设置失败!", Toast.LENGTH_SHORT).show();
}
break;
case R.id.bt_add_task_cancel:
finish(); //取消按钮直接返回上个界面
break;
}
}
private boolean checkTask() {
if(!startNumberSelect.equals("") && !endNumberSelect.equals("")){
switch (startNumberSelect){
case "LM1":
case "LM2":
case "LM3":
case "LM4":
case "LM5":
break;
default:
return false;
}
switch (endNumberSelect){
case "LM1":
case "LM2":
case "LM3":
case "LM4":
case "LM5":
break;
default:
return false;
}
return true;
}else {
return false;
}
}
private void addTask() {
String robotIp = "192.168.3.99";
String taskId = "12345678";
RobotTask robotTask = new RobotTask(robotIp, startNumberSelect, endNumberSelect, taskId);
// Log.d("hahaha", robotTask.toString());
SeerService seerService = SeerServiceCreator.getInstance().create(SeerService.class);
seerService.addTask(robotTask)
.subscribeOn(Schedulers.io())
.observeOn(AndroidSchedulers.mainThread())
.subscribe(new Consumer<RobotTaskResponse>() {
public void accept(RobotTaskResponse robotTaskResponse) throws Exception {
// Log.d("hahaha", String.valueOf(robotTaskResponse.getMessage()));
if (robotTaskResponse.isSuccess()) {
Toast.makeText(AddTaskActivity.this, "下达任务成功!", Toast.LENGTH_SHORT).show();
} else {
// 无账号
Toast.makeText(AddTaskActivity.this, "下达任务失败!" + robotTaskResponse.getMessage(), Toast.LENGTH_SHORT).show();
}
}
}, new Consumer<Throwable>() {
public void accept(Throwable throwable) throws Exception {
// Log.d("hahaha", String.valueOf(throwable));
Toast.makeText(AddTaskActivity.this, "下达任务失败!" + throwable, Toast.LENGTH_SHORT).show();
}
});
}
/**
* 屏幕适配
*/
public boolean isBaseOnWidth() {
return false;
}
public float getSizeInDp() {
return 375;
}
}