平台
操作系统:Ubuntu16.04+Windows 10
Web前端框架:Vue.js + EChart.js + Element UI
Web后端框架:Spring Boot
Unity web插件:Embedded Browser
Unity PDF插件:iTextSharp
方案说明
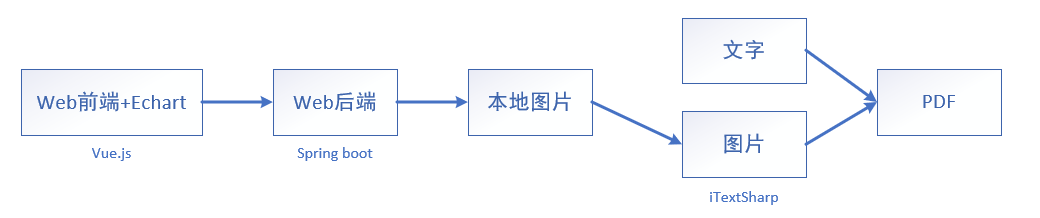
PDF主要分为两部分,即文字+图片。文字部分可以直接由iTextSharp插件提供的库函数编写,图片部分首先需要根据Web前端和EChart插件生成图表信息,然后通过axios交互技术,将此信息传递给Web后端,并生成本地图片文件,最后再由iTextSharp插件读取本地图片并写入PDF中。
Web前端——生成图表
环境配置
安装EChart:1
npm install echarts --save
安装Element UI:1
npm i element-ui -S
安装axios:1
npm install axios -S
安装qs:1
npm install qs -S
然后在main.js中声明:1
2
3
4
5
6
7
8
9
10
11
12
13
14
15
16
17
18
19
20
21import Vue from 'vue'
import App from './App'
import qs from 'qs'
import axios from 'axios'
import ElementUI from 'element-ui'
import 'element-ui/lib/theme-chalk/index.css'
import echarts from 'echarts'
import router from './router'
Vue.config.productionTip = false
Vue.prototype.$qs = qs
Vue.prototype.$axios = axios
Vue.prototype.$echarts = echarts
Vue.use(ElementUI)
生成EChart
1 | <template> |
这里通过vue的axios技术将EChart的信息(getDataURL()),传递给web后端,并开放出服务器地址、图片保存路径和图片名字参数供Unity调用。
这里需要使用过qs插件来封装参数信息,否则web后端会接收不到。
值得注意的是,必须要将和Unity交互的函数赋值给window,否则Unity无法调用。
build打包
最后通过npm run build生成dist文件夹,并将整个文件夹复制到Unity工程文件夹目录中的BrowserAssets文件夹中(和Assets同级文件夹,没有则新建)。
Web后端——保存图表
保存图片接口
controller层:1
2
3
4
5
6
7
8
9
10
11
12
13
14
15
16
17
18
19
20
21
22
23
24
25
26
27
28
29
30
31
32
33
34
35
36
37
38
39
40
41
42
43
44
45
46
47
48
49
50
51
52
53
54import org.apache.commons.lang3.StringUtils;
import org.apache.tomcat.util.codec.binary.Base64;
import org.apache.tomcat.util.http.fileupload.IOUtils;
import org.springframework.util.ClassUtils;
import org.springframework.web.bind.annotation.*;
import java.io.File;
import java.io.FileOutputStream;
import java.io.IOException;
import java.io.OutputStream;
(originPatterns = "*", methods = {RequestMethod.GET, RequestMethod.POST})
public class EchartController {
(value = "EChart/getImage")
public void getEChartFromVue(String imgInfo, String imagePath, String imageName) {
if (StringUtils.isBlank(imgInfo)) {
System.out.println("imgInfo为空,未从前台获取到base64图片信息!");
return;
}
// 传递过程中 "+" 变为了 " ".
String newImgInfo = imgInfo.replaceAll(" ", "+");
File file = new File(imagePath + imageName);
decodeBase64(newImgInfo, file);
}
/**
* 解析Base64位信息并输出到某个目录下面.
* @param base64Info base64串
* @param imgPath 生成的文件路径
*/
private void decodeBase64(String base64Info, File imgPath) {
if (StringUtils.isEmpty(base64Info)) {
return;
}
// 数据中:data:image/png;base64,iVBORw0KGgoAAAANSUhEUgAABI4AAAEsCAYAAAClh/jbAAA ... 在"base64,"之后的才是图片信息
String[] arr = base64Info.split("base64,");
// 将图片输出到系统某目录.
OutputStream out = null;
try {
// 使用了Apache commons codec的包来解析Base64
byte[] buffer = Base64.decodeBase64(arr[1]);
out = new FileOutputStream(imgPath);
out.write(buffer);
} catch (IOException e) {
e.printStackTrace();
//log.error("解析Base64图片信息并保存到某目录下出错!", e);
} finally {
IOUtils.closeQuietly(out);
}
}
}
交互问题
这里主要需要解决2个问题:跨域和Https协议。
跨域问题即Web前后端交互时数据的安全性问题,添加注解CrossOrigin即可。
Https协议问题主要是因为在Unity的Web插件Embedded Browser中,默认只能访问https协议的网站,而基于Spring Boot生成的后端默认是基于http协议的,因此需要将其更改为https协议。
首先在任意目录下,输入cmd命令:1
keytool -genkey -alias tomcat -storetype PKCS12 -keyalg RSA -keysize 2048 -keystore keystore.p12 -validity 3650
然后根据提示输入密码等其他信息,生成keystore.p12 SSL证书文件。
然后将此文件复制到Spring Boot工程文件夹下的resources文件夹下,并更改application.properties文件:
1 | =classpath:keystore.p12 |
此时,启动后端程序,即可通过https:// 来访问。
最后还需要在Embedded Browser插件中,找到BrowserNative.cs脚本,并找到commandLineSwitches变量,在最后一行,添加"--ignore-certificate-errors"字段,将任何https网站的私有证书都进行了忽略并信任。
编译打包
最后点击右侧栏中的Maven控件,依次点击Lifecycle中的clean和package功能生成Jar包文件。
Unity——生成PDF
环境配置
首先将Embedded Browser包导入到工程中,然后将itextsharp所需的dll等库文件放置在Assets中的Plugins->PDF文件夹中。
功能实现
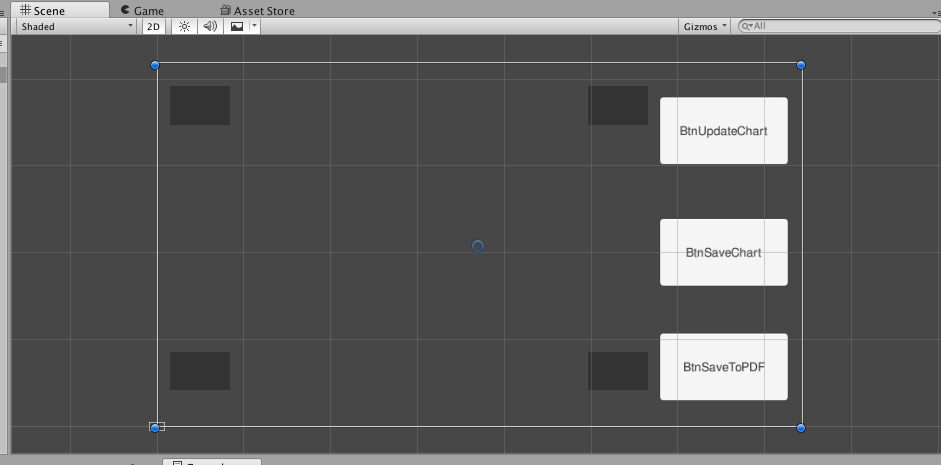
界面主要包括Embedded Browser的BrowserGUI控件和3个功能按钮。
Controller.cs:1
2
3
4
5
6
7
8
9
10
11
12
13
14
15
16
17
18
19
20
21
22
23
24
25
26
27
28
29
30
31
32
33
34
35
36
37
38
39
40
41
42
43
44
45
46
47
48
49
50
51
52
53
54
55
56
57
58
59
60
61
62
63
64
65
66
67
68
69
70
71
72
73
74
75
76
77
78
79
80
81
82
83
84
85
86
87
88
89
90
91
92
93
94
95
96
97
98
99
100
101
102
103
104
105
106
107
108
109
110
111
112
113
114
115
116
117
118using System.Collections;
using System.Collections.Generic;
using System;
using UnityEngine;
using UnityEngine.UI;
using ZenFulcrum.EmbeddedBrowser;
using iTextSharp.text.pdf;
using iTextSharp.text;
using System.Threading;
public class Controller : MonoBehaviour {
public Browser browser;
private string serverIp;
private string imagePath;
private string imageName;
// Start is called before the first frame update
void Start()
{
// 添加按钮对象
List<string> btnsName = new List<string>();
btnsName.Add("BtnUpdateChart");
btnsName.Add("BtnSaveChart");
btnsName.Add("BtnSaveToPDF");
foreach (string btnName in btnsName)
{
GameObject btnObj = GameObject.Find(btnName);
Button btn = btnObj.GetComponent<Button>();
btn.onClick.AddListener(delegate () {
this.OnClick(btnObj);
});
}
}
// 响应按钮点击事件
public void OnClick(GameObject sender)
{
switch (sender.name)
{
case "BtnUpdateChart":
// browser.CallFunction("updateChart", 1, 10).Done();
browser.CallFunction("updateChartAuto").Done();
break;
case "BtnSaveChart":
SaveChart();
break;
case "BtnSaveToPDF":
CreatePDF();
break;
default:
Debug.Log("none");
break;
}
}
// Update is called once per frame
void Update()
{
}
public void SaveChart(){
// 这里更改为https,否则无法访问(Unity机制)
serverIp = "https://192.168.64.131:8080";
imagePath = "/home/cxx/";
imageName = "123.png";
browser.CallFunction("saveChart", serverIp, imagePath, imageName).Done();
}
public void CreatePDF(){
SaveChart();
Thread.Sleep (2000);
//使用字体
//BaseFont bf = BaseFont.CreateFont("/usr/share/fonts/truetype/ubuntu-font-family/UbuntuMono-R.ttf", BaseFont.IDENTITY_H, BaseFont.NOT_EMBEDDED);
// 创建 PDF 文档
iTextSharp.text.Document document = new iTextSharp.text.Document();
// 创建写入器实例,PDF 文件将会保存到这里
iTextSharp.text.pdf.PdfWriter.GetInstance(document,
new System.IO.FileStream("/home/cxx/demo.pdf", System.IO.FileMode.Create)
);
// 打开文档
document.Open();
//iTextSharp.text.Font font = new iTextSharp.text.Font(bf);
//写入一个段落, Paragraph
//Paragraph title = new Paragraph("Estun Medical Report", font);
Paragraph title = new Paragraph("Estun Medical Report");
document.Add(title);
//添加图片
try
{
iTextSharp.text.Image image = iTextSharp.text.Image.GetInstance("/home/cxx/123.png");
document.Add(image);
Debug.Log("Save image Success!");
System.Console.WriteLine("Save image Success!");
}
catch( System.Net.WebException e)
{
Debug.Log("no image file!");
}
document.Close();
}
}
这里使用字体时,在build打包后出现一定的问题,可以使用默认的字体代替。
build打包
最后打包运行,添加--logFile参数可以查看运行日志:
./***.x86_64 -logFile /path/to/logfile.txt