平台
Ubuntu16.04
turtlebot2
RPLIDAR A1/2(思岚)
Ubuntu与ROS系统安装
turtlebot配置
安装turtlebot库
升级软件版本1
sudo apt-get update
安装依赖库:1
sudo apt-get install ros-kinetic-turtlebot
安装turtlebot下的功能包(也可以根据需要安装):1
sudo apt-get install ros-kinetic-turtlebot-*
测试
检查硬件连接
打开turtlebot2电源,将turtlebot2的USB线接入工控机(PC机)的USB口(最好是USB3.0),然后打开终端,启动ROS。1
roscore
再打开一个终端,输入检测命令:1
ls /dev/kobuki

显示相应设备即可。
如果没有显示,则执行:1
rosrun kobuki_ftdi create_udev_rules
检查底盘及电机
打开电源,再打开一个终端,输入启动底盘命令:1
roslaunch turtlebot_bringup minimal.launch
不报错,听到声音即可。
再打开一个终端,输入键盘操作底盘命令:1
roslaunch turtlebot_teleop keyboard_teleop.launch
根据提示信息,输入指令字母,turtlebot能动即可。
激光雷达配置
安装驱动
需要下载思岚官网提供的激光雷达驱动包。
创建工程文件夹
1 | mkdir catkin_ws # 可以是其他名字 |
下载并编译
1 | git clone https://github.com/Slamtec/rplidar_ros.git |
添加环境变量
1 | source devel/setup.bash |
设置串口权限
使激光雷达串口可以读和写。
检查端口号
1 | dmesg | grep ttyUSB* |

有cp210x对应的USB口即可。(RPLIDAR A系列激光雷达使用的是cp210x串口驱动)。
设置权限
1 | sudo gedit /etc/udev/rules.d/70-ttyusb.rules |
打开后,输入:1
KERNEL=="ttyUSB[0-9]*", MODE="0666"
运行如下程序,查看权限,有两个rw即可。1
ls -l /dev |grep ttyUSB*
设置激光雷达串口的权限:1
sudo chmod 777 /dev/ttyUSB0
注意这里的USB0和之前显示的要保持一致,如果下次更换USB接口可能需要更改数字。
添加环境变量
添加别名:1
echo "export TURTLEBOT_LASER_SENSOR=rplidar" >> ~/.bashrc
转至rplidar_ros文件夹,输入命令:1
./scripts/create_udev_rules.sh
测试激光雷达
1 | roslaunch rplidar_ros rplidar.launch |
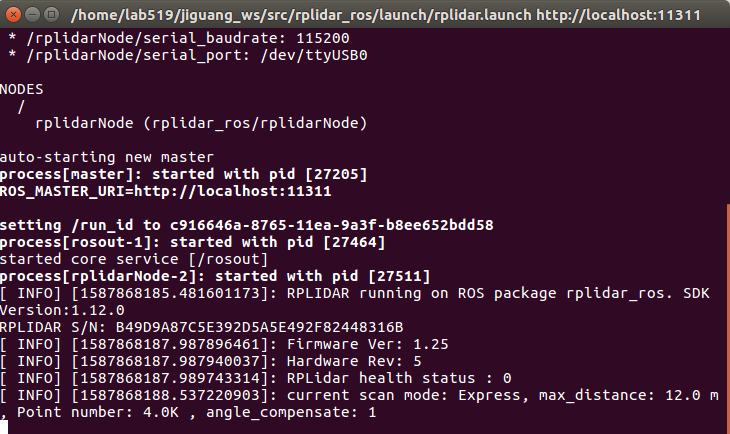
无错误,激光雷达正常运转即可。
激光雷达再分析
学而不思则罔,思而不学则殆。
打开src/rplidar_ros/launch/rplidar.launch,可以看到里面调用了一个rplidarNode的节点,并为其设置了一些参数。打开src/rplidar_ros/文件夹下的CMakeLists.txt文件夹,可以找到add_executable()中的rplidarNode节点,而该节点真正的定义是在src/rplidar_ros/src文件夹下的node.cpp文件,找到main函数即可看到该节点的定义。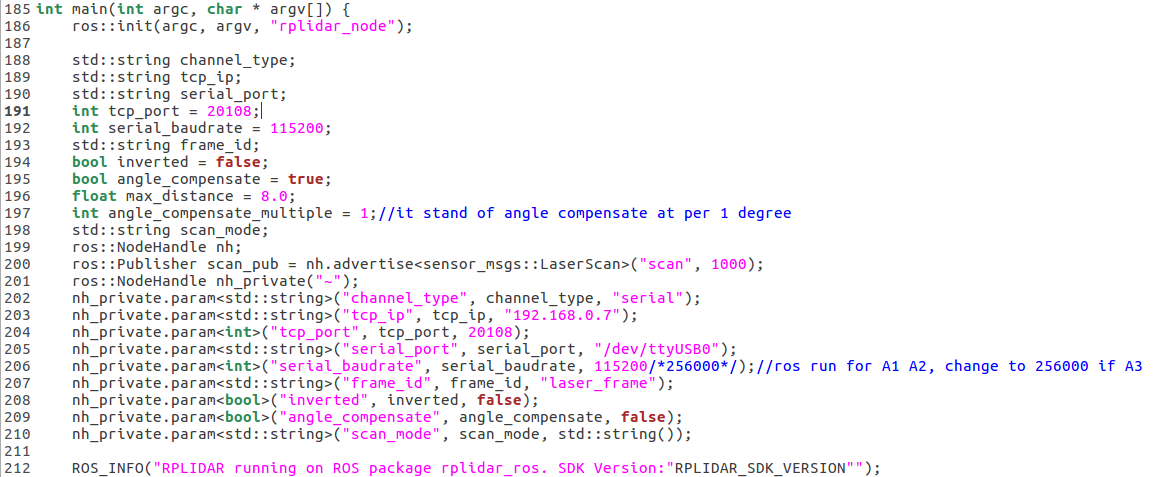
从这段代码中可以看出,该节点订阅了一个sensor_msgs::LaserScan的消息类型,该消息类型也是ros中自带的激光雷达数据类型。打开/opt/ros/kinetic/share/sensor_msgs/msg/LaserScan.msg即可查看该数据类型。然后紧跟着定义了一些参数,这也是rplidar.launch里面的参数。对该数据类型的具体处理在pubulish_scan()函数中。
运行roslaunch rplidar_ros rplidar.launch,并通过简单的指令可以查看当前节点、话题和消息的内容:
rosnode list:显示所有节点。
rostopic list:显示所有话题。
rqt_graph:图形化显示节点和话题之间的关系。
rostopic info topic名称:查看话题信息。
rostopic type topic名称:查看话题的消息类型。
rosmsg show message名称 查看消息数据结构。
rostopic echo topic名称:显示话题上发布的具体消息。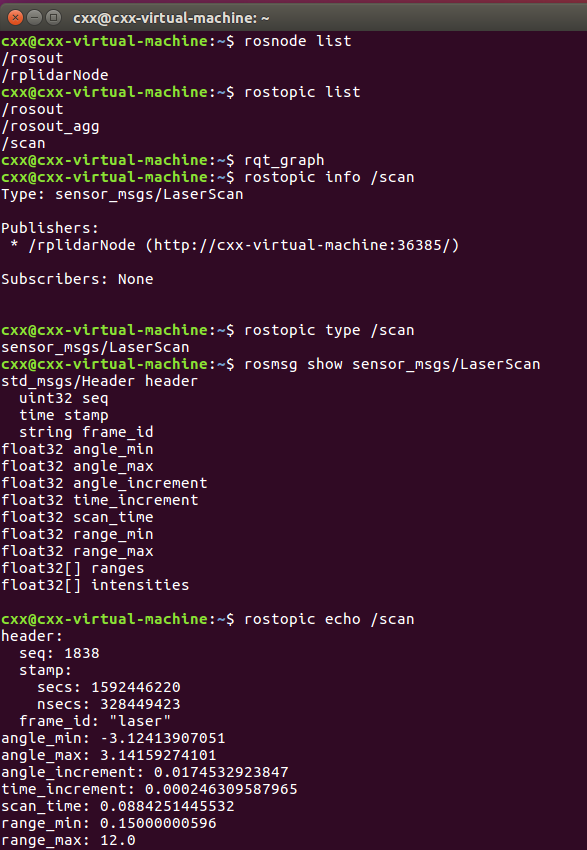
如果想在rviz界面中显示激光雷达数据,先在终端输入rviz打开界面,然后点击Add添加LaserScan话题,并在Topic里面选择目前的laser话题。但是现在仍然看不到激光雷达数据,因为目前的坐标系是map,而激光雷达需要的是laser坐标系,所以在Global Options中的Fixed Frame选项手动输入laser,最终的设置及效果如下: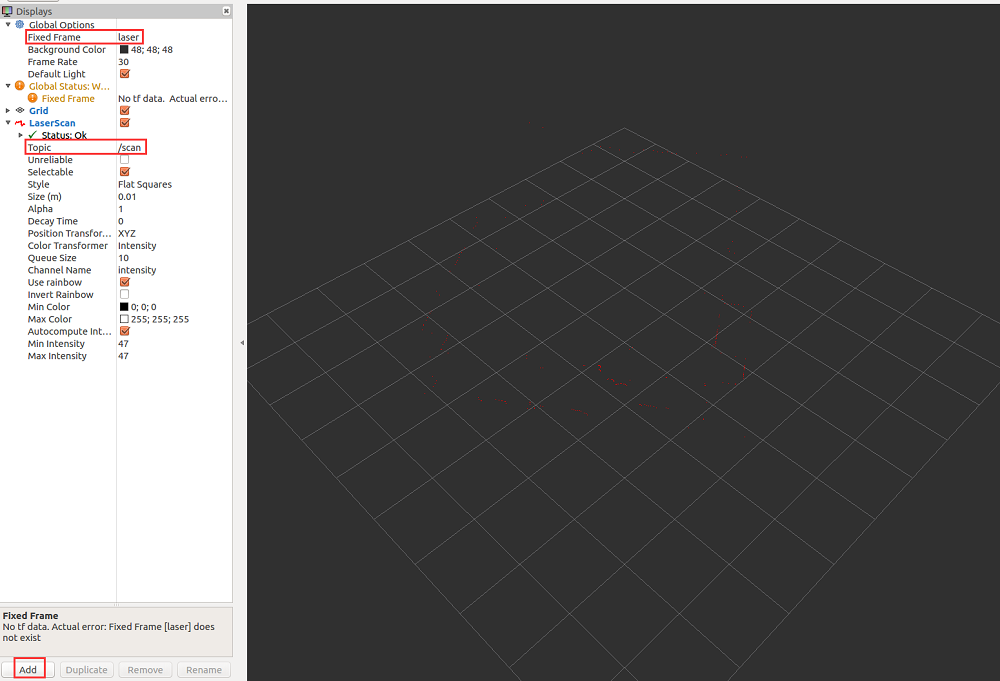
当然也可以直接输入rplidar官方配置好的launch文件:1
roslaunch rplidar_ros view_rplidar.launch
基于hector-slam的定位与建图
平台
硬件:RPLIDAR A1,算法:hector-slam。
安装算法包
具体操作见上(注意一定要编译)。算法包网址:1
git clone https://github.com/NickL77/RPLidar_Hector_SLAM
注:hector-slam软件包中自带rplidar_ros包,为了避免因为2个同名的包导致错误产生,可以在环境变量中将之前的激光雷达环境注释掉,后续的建图算法也建议这么操作。
定位与建图
打开激光雷达:1
roslaunch rplidar_ros rplidar.launch
运行建图算法:1
roslaunch hector_slam_launch tutorial.launch
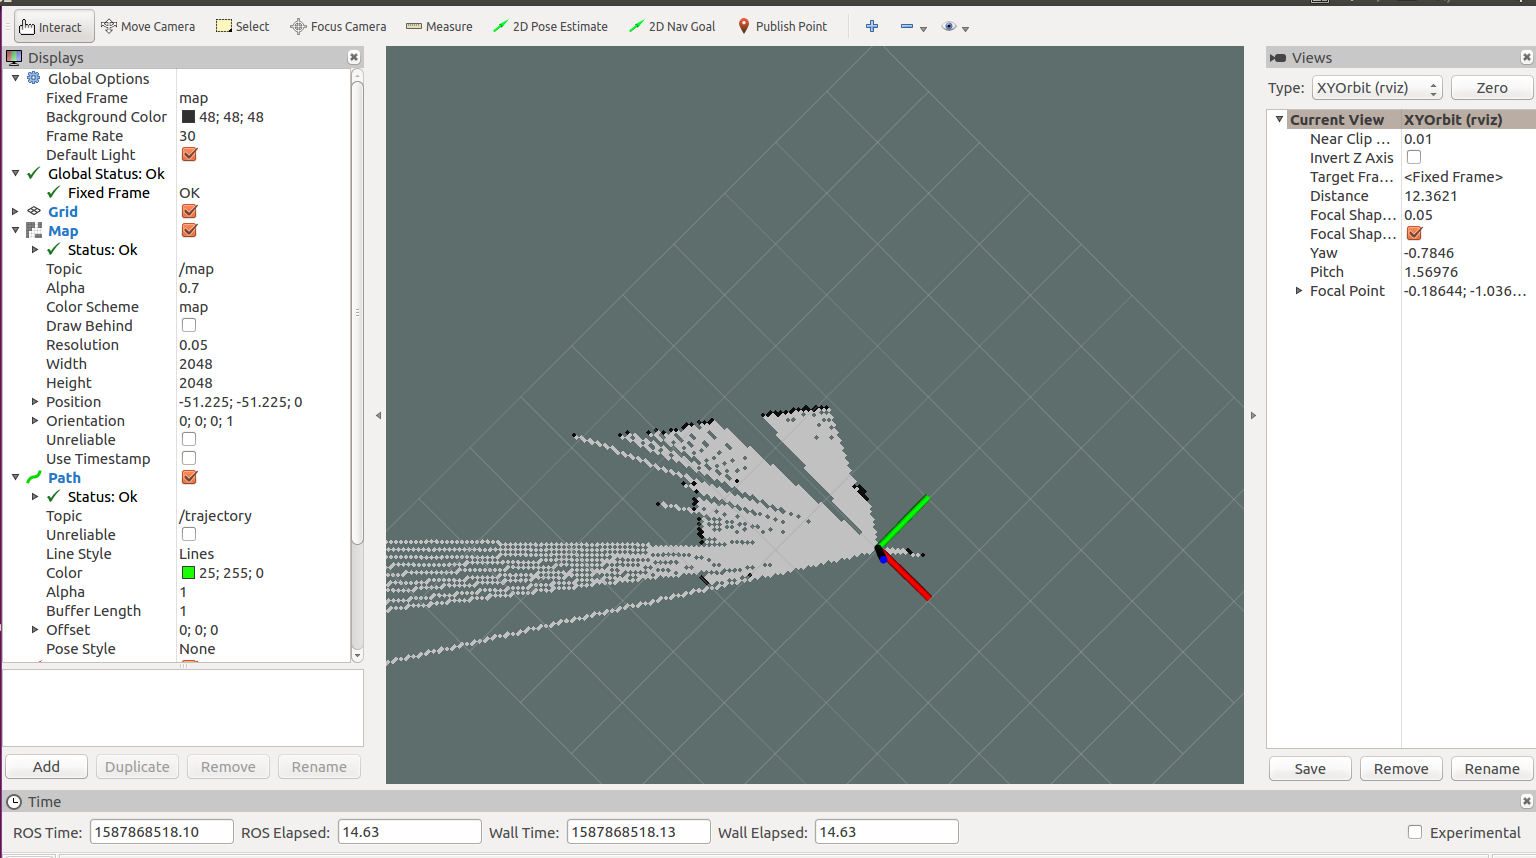
然后手推turtlebot或使用之前的键盘控制指令使其移动,在rviz界面中可以看到地图的更新。
基于Gmapping的定位与建图
Gmapping简介
Gmapping的程序框架是依托Open_slam(OpenSLAM.org的目标是为SLAM研究人员提供一个平台,使他们能够发布自己的算法。OpenSLAM.org成立于2006年,并于2018年移至github。目前开源的项目有:OpenSLAM.org),该框架主要分成slam_gmapping和openslam_gmapping。slam_gmapping是openslam_gampping在ros下的二次封装,真正的核心代码实现都在openslam_gampping里面。
平台
硬件:RPLIDAR A2,算法:Gmapping。
下载源代码
Gmapping算法在安装ros时已经安装好,当然也可以通过下载源代码编译安装。
首先新建工作空间gmapping_ws(也可以是其他名字),然后新建src文件夹,并下载gmapping源代码:1
2git clone https://github.com/ros-perception/openslam_gmapping.git
git clone https://github.com/ros-perception/slam_gmapping.git
然后下载rplidar源代码:1
git clone https://github.com/Slamtec/rplidar_ros.git
最后下载turtlebot底盘驱动源代码:1
git clone https://github.com/Cxx0822/turtlebot_move_base.git
编译
首先打开src/rplidar_ros/launch文件夹,新建my_rplidar.launch文件:1
2
3
4
5
6
7
8
9
10
11<launch>
<node name="rplidarNode" pkg="rplidar_ros" type="rplidarNode" output="screen">
<param name="serial_port" type="string" value="/dev/ttyUSB0"/>
<param name="serial_baudrate" type="int" value="115200"/><!--A1/A2 -->
<!--param name="serial_baudrate" type="int" value="256000"--><!--A3 -->
<param name="frame_id" type="string" value="laser"/>
<param name="inverted" type="bool" value="false"/>
<param name="angle_compensate" type="bool" value="true"/>
</node>
<node pkg="tf" type="static_transform_publisher" name="base_to_laser" args="0.0 0.0 0.4 0 0.0 0.0 base_link laser 100"/>
</launch>
该launch文件一共包含2个ros节点,一个是启动雷达节点rplidarNode,一个是tf坐标变换节点static_transform_publisher。其参数为:1
static_transform_publisher x y z yaw pitch roll frame_id child_frame_id period_in_ms
在这里表示的是turtlebot基坐标到雷达坐标的转换,这里的0.4指的是安装高度。
然后打开src/slam_gmapping/gmapping/launch文件夹,现建my_gmapping_rplidar.launch文件:1
2
3
4
5
6
7
8
9
10
11
12
13
14
15
16
17
18
19
20
21
22
23
24
25
26
27
28
29
30
31
32
33
34
35
36
37
38
39
40
41
42
43
44
45
46
47
48
49
50
<launch>
<arg name="scan_topic" default="scan" />
<arg name="base_frame" default="base_footprint"/>
<arg name="odom_frame" default="odom"/>
<node pkg="gmapping" type="slam_gmapping" name="slam_gmapping" output="screen">
<param name="base_frame" value="$(arg base_frame)"/>
<param name="odom_frame" value="$(arg odom_frame)"/>
<param name="map_update_interval" value="0.01"/>
<param name="maxUrange" value="4.0"/>
<param name="maxRange" value="5.0"/>
<param name="sigma" value="0.05"/>
<param name="kernelSize" value="3"/>
<param name="lstep" value="0.05"/>
<param name="astep" value="0.05"/>
<param name="iterations" value="5"/>
<param name="lsigma" value="0.075"/>
<param name="ogain" value="3.0"/>
<param name="lskip" value="0"/>
<param name="minimumScore" value="30"/>
<param name="srr" value="0.01"/>
<param name="srt" value="0.02"/>
<param name="str" value="0.01"/>
<param name="stt" value="0.02"/>
<param name="linearUpdate" value="0.05"/>
<param name="angularUpdate" value="0.0436"/>
<param name="temporalUpdate" value="-1.0"/>
<param name="resampleThreshold" value="0.5"/>
<param name="particles" value="8"/>
<!--
<param name="xmin" value="-50.0"/>
<param name="ymin" value="-50.0"/>
<param name="xmax" value="50.0"/>
<param name="ymax" value="50.0"/>
make the starting size small for the benefit of the Android client's memory...
-->
<param name="xmin" value="-1.0"/>
<param name="ymin" value="-1.0"/>
<param name="xmax" value="1.0"/>
<param name="ymax" value="1.0"/>
<param name="delta" value="0.05"/>
<param name="llsamplerange" value="0.01"/>
<param name="llsamplestep" value="0.01"/>
<param name="lasamplerange" value="0.005"/>
<param name="lasamplestep" value="0.005"/>
<remap from="scan" to="$(arg scan_topic)"/>
</node>
</launch>
该文件主要包含一个slam_gmapping节点,并设置了参数,最后将scan话题重映射到scan_topic中。具体参数解释可参考:GMAPPING的参数设置
turtlebot_move_base部分已经修改好,直接用即可。
最后创建一个功能包:turtlebot_gmapping:1
catkin_create_pkg turtlebot_gmapping std_msgs roscpp rospy
然后进入该功能包,新建launch文件夹,并新建my_gmapping.launch文件:1
2
3
4
5
6
7
8
9
10
11
12
13
14
15
16
17
<launch>
<!-- Define laser type-->
<arg name="laser_type" default="rplidar" />
<!-- laser driver -->
<include file="$(find rplidar_ros)/launch/my_$(arg laser_type).launch" />
<!-- Gmapping -->
<include file="$(find gmapping)/launch/my_gmapping_$(arg laser_type).launch"/>
<!-- Move base -->
<include file="$(find turtlebot_move_base)/launch/includes/move_base.launch.xml"/>
<!-- Rviz-->
<include file="$(find turtlebot_rviz_launchers)/launch/view_navigation.launch"/>
</launch>
该launch文件相当于是之前的一个整合。一共包含四个部分:启动雷达,启动建图,启动底盘控制和启动rviz。
然后回到工作空间编译,添加环境变量即可。
测试
首先打开turtlebot底盘:1
roslaunch turtlebot_bringup minimal.launch
然后打开gmapping建图算法:1
roslaunch turtlebot_gmapping my_gmapping.launch
最后启动键盘控制程序,开始建图:1
roslaunch turtlebot_teletop keyboard_teletop.launch
同样的,我们也可以使用ros自带的工具rqt_graph查看整个流程。
其中单独的底盘节点状态图如图所示: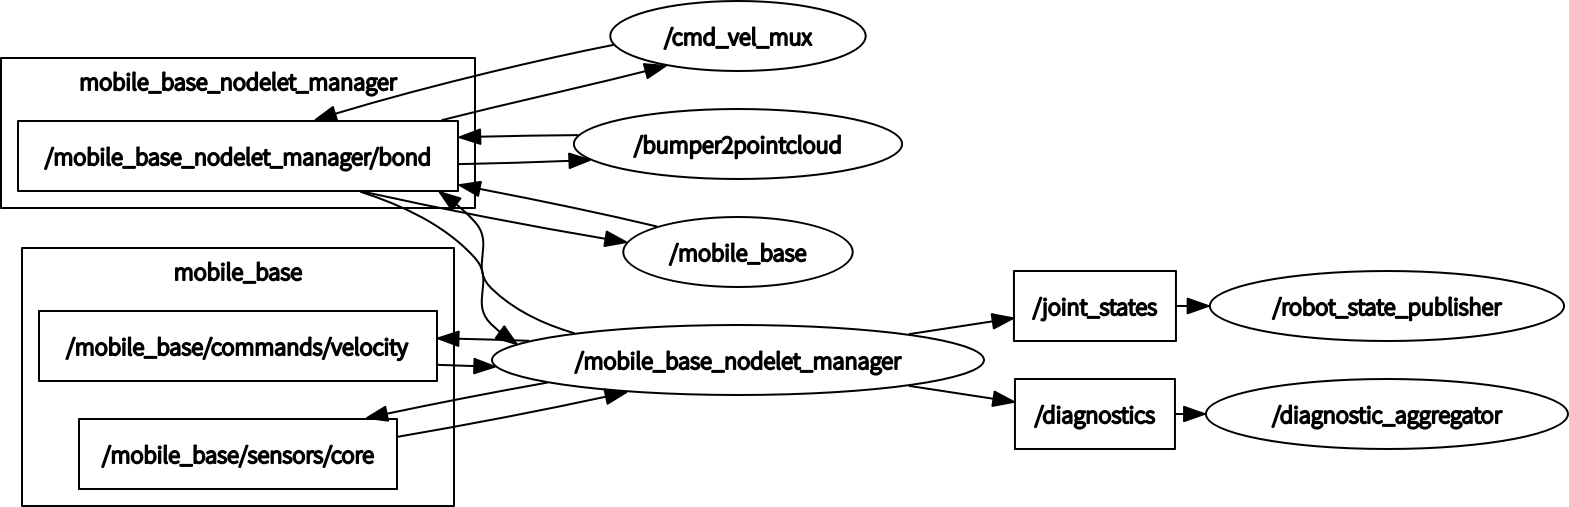
单独的gmapping节点状态图如图所示: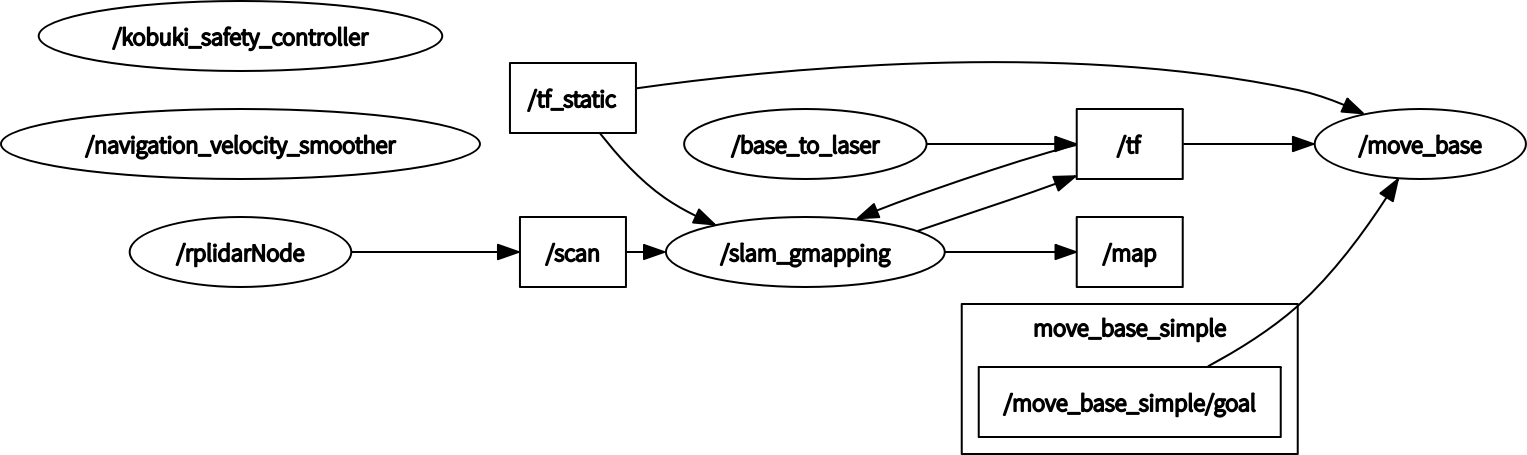
所有节点状态图如图所示: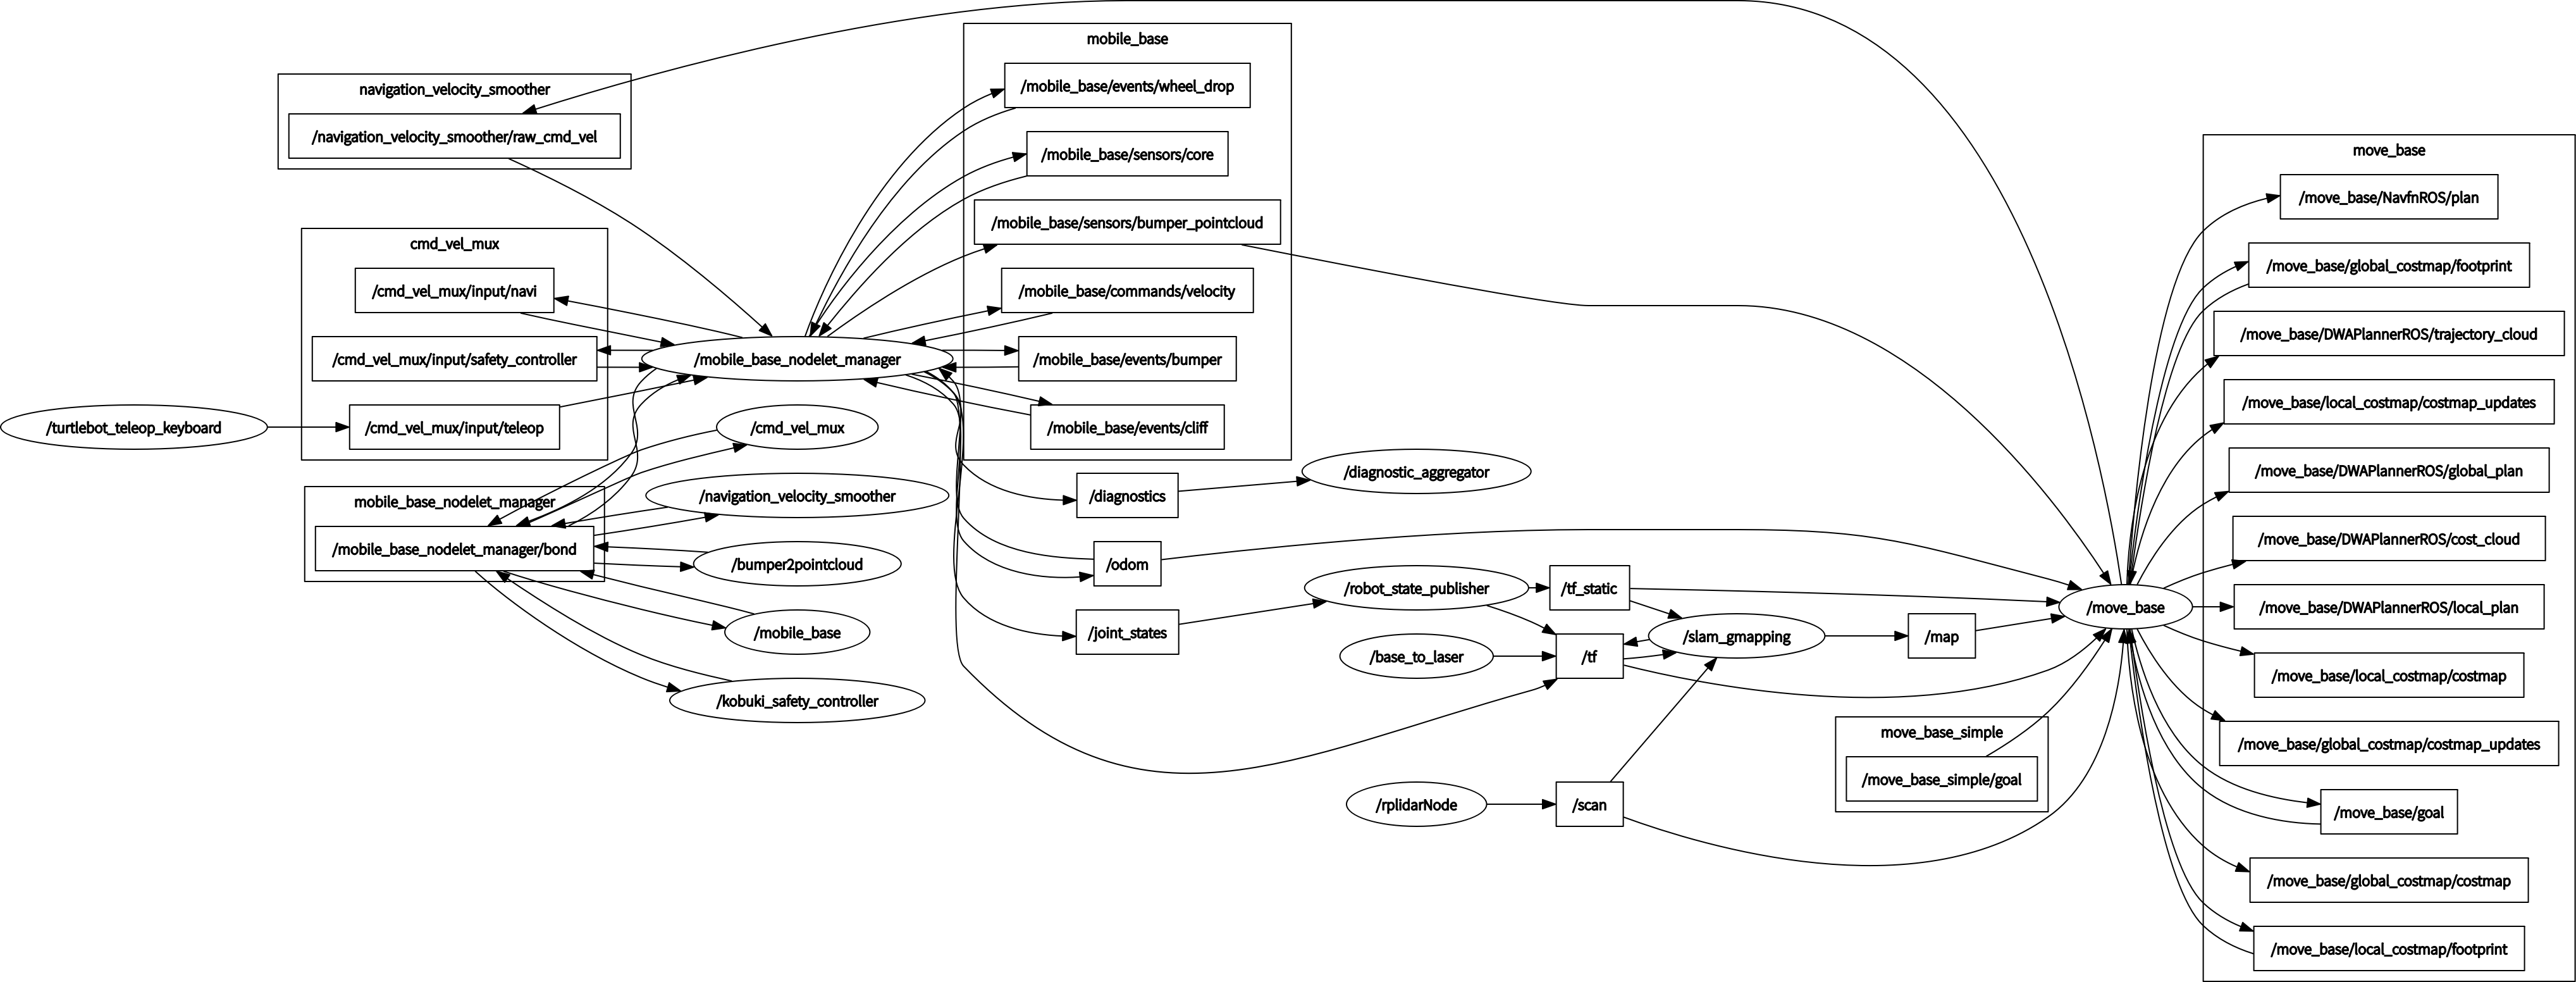
这里椭圆表示节点名字,也就是launch文件启动节点的name值,矩形表示话题。
附:
turtlebot有一个官方的工具包,里面包含了大量的建图等算法,可以直接使用。
新建工作空间,并下载源代码:1
2
3mkdir -p ~/turbot_ws/src
cd ~/turbot_ws/src
git clone https://github.com/ncnynl/turtlebot_apps
然后下载turbot工具包:1
git clone https://github.com/ncnynl/turbot
回到工作空间编译并添加至环境变量。
依次执行以下命令建图:1
2
3
4roslaunch turbot_bringup minimal.launch
roslaunch turbot_slam laser_gmapping_demo.launch
roslaunch turbot_rviz nav.launch
roslaunch turbot_teleop keyboard.launch
参考博客:Turtlebot + Rplidar A2使用Gmapping建图与导航
基于Cartographer的定位与建图
平台
硬件:RPLIDAR A2,算法:Cartographer。
Cartographer简介
2016年10月5日,谷歌宣布开放一个名为cartographer的即时定位与地图建模库,开发人员可以使用该库实现机器人在二维或三维条件下的定位及建图功能。cartograhper的设计目的是在计算资源有限的情况下,实时获取相对较高精度的2D地图。考虑到基于模拟策略的粒子滤波方法在较大环境下对内存和计算资源的需求较高,cartographer采用基于图网络的优化方法。目前cartographer主要基于激光雷达来实现SLAM,谷歌希望通过后续的开发及社区的贡献支持更多的传感器和机器人平台,同时不断增加新的功能。
Cartographer的安装
安装依赖库protobuf3
注:这里需要安装3.6以上的版本。1
2
3
4
5
6
7
8
9
10
11sudo apt-get install autoconf autogen
git clone https://github.com/protocolbuffers/protobuf.git
cd protobuf
git submodule update --init --recursive
./autogen.sh
./configure
make
# 这一步可能会报错,无视就好
make check
sudo make install
sudo ldconfig
注:需要分开依次执行,下同。
检查安装的版本号:1
protoc --version
安装Cartographer
安装wstool,rosdep,ninja工具:1
2sudo apt-get update
sudo apt-get install python-wstool python-rosdep ninja-build
创建工作空间carto_ws(可以是其他名字),并初始化。1
2
3mkdir carto_ws
cd carto_ws
wstool init src
1 | wstool merge -t src https://raw.githubusercontent.com/googlecartographer/cartographer_ros/master/cartographer_ros.rosinstall |
如果报错或长时间未安装,则更改下载地址:cd src/,gedit .rosinstall。
将最后一个git来源网址由https://ceres-solver.googlesource.com/ceres-solver.git改为https://github.com/ceres-solver/ceres-solver.git。
回到工作空间,重新执行:1
wstool update -t src
1 | sudo rosdep init # 报错可忽视 |
注:如果报错,未设置环境变量,则执行以下命令:1
2echo "source /opt/ros/kinetic/setup.bash" >> ~/.bashrc
source ~/.bashrc
重新执行:1
rosdep install --from-paths src --ignore-src --rosdistro=${ROS_DISTRO} -y
最终出现:#All required rosdeps installed successfully。
编译
1 | catkin_make_isolated --install --use-ninja |
注:如果这里报错,检查一下protoc的版本,至少是3.6的,如果不是,按照上文重新安装protoc依赖库。安装时间较长,和系统性能有关,约10-15分钟。
测试
1 | # Download the 2D backpack example bag. |
如果报错,检查下是否刷新了环境变量(source ~/carto_ws/install_isolated/setup.bash)。
参考博客
安装cartographer_turtlebot
首先下载rplidar驱动:1
git clone https://github.com/Slamtec/rplidar_ros.git
然后和gmapping类似,添加坐标变换节点。(参考上文gmapping部分)
然后下载cartographer_turtlebot源代码:1
git clone https://github.com/cartographer-project/cartographer_turtlebot
修改配置文件
首先打开src/cartographer_ros/cartographer_ros/configuration_files/revo_lds.lua,将tracking_frame和published_frame改为rplidar的frame_id,即将原来的替换成laser。
注:实际测试时发现,运行时会报错,需要将里面的 use_pose_extrapolator的true改为on。
然后打开src/cartographer_turtlebot/cartographer_turtlebot/launch,新建turtlebot_lidar.launch文件:1
2
3
4
5
6
7
8
9
10
11
12
13
14
15
16
17
18
19
20
21
22
23
24
25<launch>
<arg name="configuration_basename"/>
<include file="$(find turtlebot_bringup)/launch/minimal.launch" />
<node name="cartographer_node" pkg="cartographer_ros"
type="cartographer_node" args="
-configuration_directory
$(find cartographer_turtlebot)/configuration_files
-configuration_basename $(arg configuration_basename)"
output="screen">
<remap from="scan" to="/scan" />
</node>
<node name="flat_world_imu_node" pkg="cartographer_turtlebot"
type="cartographer_flat_world_imu_node" output="screen">
<remap from="imu_in" to="/mobile_base/sensors/imu_data_raw" />
<remap from="imu_out" to="/imu" />
</node>
<node name="rviz" pkg="rviz" type="rviz" required="true"
args="-d $(find cartographer_turtlebot
)/configuration_files/demo_turtlebot.rviz" />
</launch>
再新增启动文件:turtlebot_carto.launch1
2
3
4
5<launch>
<include file="$(find cartographer_turtlebot)/launch/turtlebot_lidar.launch">
<arg name="configuration_basename" value="turtlebot_urg_lidar_2d.lua" />
</include>
</launch>
然后回到工作空间,编译(catkin_make_isolated --install –use-ninja)并刷新环境变量即可。
测试
首先运行激光雷达:1
roslaunch rplidar_ros rplidar.launch
然后启动建图程序:1
roslaunch cartographer_turtlebot turtlebot_carto.launch
参考博客
使用Turtlebot 2和Rplidar A2实现Cartographer
Jetson TX2 使用 Rplidar A2 实现 Cartographer