AlexNet
简介
网络结构
该网络包含8个带权重的层;前5层是卷积层,剩下的3层是全连接层。最后一层全连接层的输出是1000维softmax的输入,softmax会产生1000类标签。
卷积层C1
该层的处理流程是:卷积—>ReLU—>池化—>归一化。
卷积:输入图像是227×227×3,使用96个11×11×3的卷积核,步长为4,不边缘填充,所以得到的FeatureMap为55×55×96。(55=(227-11)/4+1)
ReLU:将卷积层输出的FeatureMap输入到ReLU函数中。
池化:使用3×3步长为2的池化单元,输出为27×27×96。(27=(55−3)/2+1)
局部响应归一化:使用k=2,n=5,α=10−4,β=0.75进行局部归一化,输出的仍然为27×27×96,输出分为两组,每组的大小为27×27×48。
卷积层C2
该层的处理流程是:卷积—>ReLU—>池化—>归一化
卷积:输入是2组27×27×48。使用2组,每组128个尺寸为5×5×48的卷积核,边缘填充padding=2,卷积的步长为1。则输出的FeatureMap为2组,每组的大小为27×27×128。一共是27×27×256。(27=(27+2∗2−5)/1+1)
ReLU:将卷积层输出的FeatureMap输入到ReLU函数中。
池化运算的尺寸为3×3,步长为2,池化后图像的尺寸为13=(27−3)/2+1,所以输出为13×13×256。
局部响应归一化:使用k=2,n=5,α=10−4,β=0.75进行局部归一化,输出的仍然为13×13×256,输出分为2组,每组的大小为13×13×128。
卷积层C3
该层的处理流程是:卷积—>ReLU
卷积:输入是13×13×256,使用2组共384个尺寸为3×3×256的卷积核,边缘填充padding=1,卷积的步长为1。则输出的FeatureMap为13×13×384。(13=(13+2∗1−3)/1+1)
ReLU:将卷积层输出的FeatureMap输入到ReLU函数中。
卷积层C4
该层的处理流程是:卷积—>ReLU
卷积:输入是13×13×384,分为两组,每组为13×13×192。使用2组,每组192个尺寸为3×3×192的卷积核,边缘填充padding=1,卷积的步长为1。则输出的FeatureMap为13×13×384,分为两组,每组为13×13×192。(13=(13+2∗1−3)/1+1)
ReLU:将卷积层输出的FeatureMap输入到ReLU函数中。
卷积层C5
该层处理流程为:卷积—>ReLU—>池化
卷积:输入为13×13×384,分为两组,每组为13×13×192。使用2组,每组为128个尺寸为3×3×192的卷积核,边缘填充padding=1,卷积的步长为1。则输出的FeatureMap为13×13×256。(13=(13+2∗1−3)/1+1)
ReLU:将卷积层输出的FeatureMap输入到ReLU函数中。
池化:池化运算的尺寸为3×3,步长为2,池化后图像的尺寸为(13−3)/2+1=6,即池化后的输出为6×6×256
全连接层FC6
该层的流程为:(卷积)全连接 —>ReLU —>Dropout
卷积->全连接:输入为6×6×256,该层有4096个卷积核,每个卷积核的大小为6×6×256。由于卷积核的尺寸刚好与待处理特征图(输入)的尺寸相同,即卷积核中的每个系数只与特征图(输入)尺寸的一个像素值相乘,一一对应,因此,该层被称为全连接层。
由于卷积核与特征图的尺寸相同,卷积运算后只有一个值,因此,卷积后的像素层尺寸为4096×1×1,即有4096个神经元。
ReLU:这4096个运算结果通过ReLU激活函数生成4096个值。
Dropout:抑制过拟合,随机的断开某些神经元的连接或者是不激活某些神经元。
全连接层FC7
流程为:全连接—>ReLU—>Dropout
全连接:输入为4096的向量。
ReLU:这4096个运算结果通过ReLU激活函数生成4096个值。
Dropout:抑制过拟合,随机的断开某些神经元的连接或者是不激活某些神经元。
输出层
第七层输出的4096个数据与第八层的1000个神经元进行全连接,经过训练后输出1000个float型的值,这就是预测结果。
参数数量
卷积层的参数 = 卷积核的数量 * 卷积核 + 偏置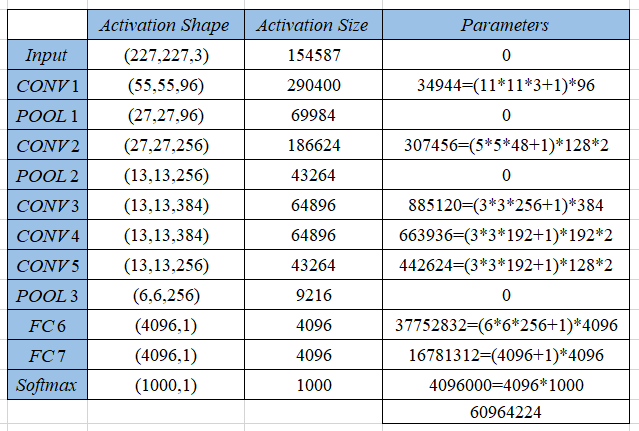
TensorFlow实现
VGG
简介
VGGNet是牛津大学计算机视觉组(Visual Geometry Group)和Google DeepMind公司的研究员一起研发的深度卷积神经网络。
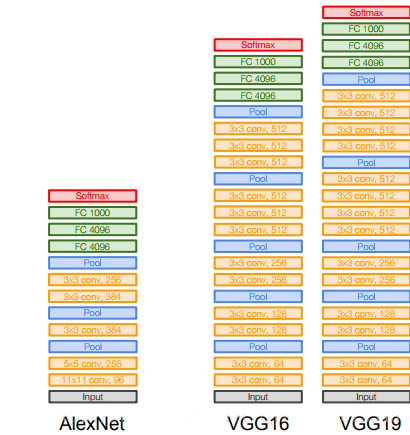
VGG在AlexNet基础上做了改进,整个网络都使用了同样大小的3*3卷积核尺寸和2*2最大池化尺寸,网络结构简洁。
网络结构
VGG一共有五组卷积,每组卷积之后紧接着最大池化层,后面接上三个全连接层,最后softmax输出。一共有两种形式,即VGG16和VGG19,后面的数字含义为卷积层和全连接层的个数,不包括池化层。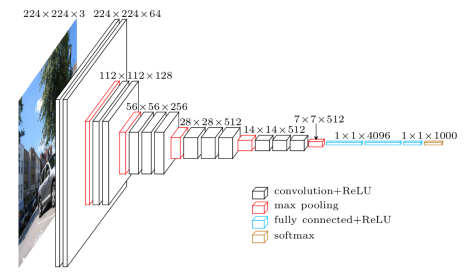
第一组卷积
2个卷积层+1个池化层
卷积层:conv3 - 64,卷积核为3×3×3,步长为1,填充为1,共64个,输出为:224*224*64,(224=(224+2∗1−3)/1+1)。(输入图像是224×224×3) 第2个卷积层结构不变,输出不变,下同。
池化层:池化核为2×2,步长为2,填充为0,共64个,输出为:112*112*64,(112=(224+2∗0−2)/2+1)。
第二组卷积
2个卷积层+1个池化层
卷积层:conv3 - 128,卷积核为3×3×3,步长为1,填充为1,共128个,输出为:112*112*128,(112=(112+2∗1−3)/1+1)。
池化层:池化核为2×2,步长为2,填充为0,共128个,输出为:56*56*128,(56=(112+2∗0−2)/2+1)。
第三组卷积
2个卷积层+1个池化层
卷积层:conv3 - 256,卷积核为3×3×3,步长为1,填充为1,共256个,输出为:56*56*256,(56=(56+2∗1−3)/1+1)。
池化层:池化核为2×2,步长为2,填充为0,共256个,输出为:28*28*256,(28=(56+2∗0−2)/2+1)。
第四组卷积
2个卷积层+1个池化层
卷积层:conv3 - 512,卷积核为3×3×3,步长为1,填充为1,共512个,输出为:28*28*512,(28=(28+2∗1−3)/1+1)。
池化层:池化核为2×2,步长为2,填充为0,共512个,输出为:14*14*512,(14=(28+2∗0−2)/2+1)。
第五组卷积
2个卷积层+1个池化层
卷积层:conv3 - 512,卷积核为3×3×3,步长为1,填充为1,共512个,输出为:14*14*512,(14=(14+2∗1−3)/1+1)。
池化层:池化核为2×2,步长为2,填充为0,共512个,输出为:7*7*512,(7=(14+2∗0−2)/2+1)。
全连接层和输出层
和AlexNet类似。
参数数量
改进
- 去掉了
LRN层,作者发现深度网络中LRN的作用并不明显,干脆取消了。 - 采用更小的卷积核-
3x3,Alexnet中使用了更大的卷积核,比如有7x7的,因此VGG相对于Alexnet而言,参数量更少。 - 池化核变小,
VGG中的池化核是2x2,stride为2,Alexnet池化核是3x3,步长为2。
这样做改进都是有一些原因的,首先为了更好的探究深度对网络的影响,必须要解决参数量的问题,更深的网络意味着更多的参数,训练更困难,使用大卷积核时尤其明显。作者通过分析,认为由于卷积神经网络的特性,3x3大小的卷积核足以捕捉到横、竖以及斜对角像素的变化。使用大卷积核会带来参数量的爆炸不说,而且图像中会存在一些部分被多次卷积,可能会给特征提取带来困难,所以在VGG中,普遍使用3x3的卷积。
TensorFlow实现
GoogLeNet
TensorFlow实现
项目文件结构说明
数据集预处理
数据集下载
生成train.txt和val.txt
制作tfrecords数据格式
tfrecords数据格式简介
TFRecords文件包含了tf.train.Example协议内存块(protocol buffer)(协议内存块包含了字段Features)。我们可以写一段代码获取你的数据,将数据填入到Example协议内存块(protocol buffer),将协议内存块序列化为一个字符串, 并且通过tf.python_io.TFRecordWriter写入到TFRecords文件。
从TFRecords文件中读取数据, 可以使用tf.TFRecordReader的tf.parse_single_example解析器。这个操作可以将Example协议内存块(protocol buffer)解析为张量。
写入tfrecords数据
一个Example中包含Features,Features里包含Feature的字典。最后,Feature里包含有一个FloatList,或者ByteList,或者Int64List。1
2
3
4
5
6
7
8
9
10
11
12
13
14
15
16
17
18
19
20
21
22
23def create_records(image_dir, file, output_record_dir, resize_height, resize_width, shuffle):
images_list, labels_list = load_labels_file(file, 1, shuffle)
writer = tf.python_io.TFRecordWriter(output_record_dir)
for i, [image_name, labels] in enumerate(zip(images_list, labels_list)):
image_path = os.path.join(image_dir, images_list[i])
if not os.path.exists(image_path):
print('Err:no image', image_path)
continue
image = read_image(image_path, resize_height, resize_width)
image_raw = image.tostring()
label = labels[0]
example = tf.train.Example(features=tf.train.Features(feature={
'image_raw': _bytes_feature(image_raw),
'height': _int64_feature(image.shape[0]),
'width': _int64_feature(image.shape[1]),
'depth': _int64_feature(image.shape[2]),
'label': _int64_feature(label)
}))
writer.write(example.SerializeToString())
writer.close()
首先利用load_labels_file()函数(后面会给出其定义,下同)将images和labels加载进来,然后创建一个TFRecordWriter对象,这个对象就负责把记录写到指定的文件中,其函数参数为TFRecords,即文件路径。然后利用read_image()读取图片,最后将数据填入到Example协议内存块,其中图片的格式为字符串格式,其他均为整型格式。
附:辅助函数定义:1
2
3
4
5
6
7
8
9
10
11
12
13
14
15
16
17
18
19
20
21
22
23
24
25
26
27
28
29
30
31
32
33
34
35
36
37
38
39
40
41
42
43
44
45
46
47
48
49
50
51
52
53
54
55
56
57
58
59
60
61
62
63
64
65
66
67
68
69
70
71
72
73
74
75
76
77
78
79
80
81
82
83
84
85
86
87
88
89
90
91
92
93
94
95
96# -*-coding: utf-8 -*-
import tensorflow as tf
import numpy as np
import os
import cv2
import matplotlib.pyplot as plt
import random
from PIL import Image
# 生成整型的属性
def _int64_feature(value):
return tf.train.Feature(int64_list=tf.train.Int64List(value=[value]))
# 生成字符串型的属性
def _bytes_feature(value):
return tf.train.Feature(bytes_list=tf.train.BytesList(value=[value]))
# 生成实数型的属性
def float_list_feature(value):
return tf.train.Feature(float_list=tf.train.FloatList(value=value))
def get_example_nums(tf_records_filenames):
nums = 0
for record in tf.python_io.tf_record_iterator(tf_records_filenames):
nums += 1
return nums
def show_image(title, image):
plt.imshow(image)
plt.axis('on')
plt.title(title)
plt.show()
def load_labels_file(filename, labels_num=1, shuffle=False):
images = []
labels = []
with open(filename) as f:
lines_list = f.readlines()
if shuffle:
random.shuffle(lines_list)
for lines in lines_list:
line = lines.rstrip().split(' ')
label = []
for i in range(labels_num):
label.append(int(line[i + 1])) # 单label,即line[1]就是label
images.append(line[0])
labels.append(label)
return images, labels
def read_image(filename, resize_height, resize_width, normalization=False):
bgr_image = cv2.imread(filename)
if len(bgr_image.shape) == 2:
print("Warning:gray image", filename)
bgr_image = cv2.cvtColor(bgr_image, cv2.COLOR_GRAY2BGR)
rgb_image = cv2.cvtColor(bgr_image, cv2.COLOR_BGR2RGB)
if resize_height > 0 and resize_width > 0:
rgb_image = cv2.resize(rgb_image, (resize_width, resize_height))
rgb_image = np.asanyarray(rgb_image)
if normalization:
rgb_image = rgb_image / 255.0
return rgb_image
def get_batch_images(images, labels, batch_size, labels_nums, one_hot=False, shuffle=False, num_threads=1):
min_after_dequeue = 200
capacity = min_after_dequeue + 3 * batch_size # 保证capacity必须大于min_after_dequeue参数值
if shuffle:
images_batch, labels_batch = tf.train.shuffle_batch([images, labels],
batch_size=batch_size,
capacity=capacity,
min_after_dequeue=min_after_dequeue,
num_threads=num_threads)
else:
images_batch, labels_batch = tf.train.batch([images, labels],
batch_size=batch_size,
capacity=capacity,
num_threads=num_threads)
if one_hot:
labels_batch = tf.one_hot(labels_batch, labels_nums, 1, 0)
return images_batch, labels_batch
整体比较简单,就不多做解释了。
读取tfrecords数据
一旦生成了TFRecords文件,为了高效地读取数据,TF中使用队列(queue)读取数据。1
2
3
4
5
6
7
8
9
10
11
12
13
14
15
16
17
18
19
20
21
22
23
24
25
26
27
28
29
30
31
32def read_records(filename, resize_height, resize_width, type=None):
filename_queue = tf.train.string_input_producer([filename])
reader = tf.TFRecordReader()
_, serialized_example = reader.read(filename_queue)
features = tf.parse_single_example(
serialized_example,
features={
'image_raw': tf.FixedLenFeature([], tf.string),
'height': tf.FixedLenFeature([], tf.int64),
'width': tf.FixedLenFeature([], tf.int64),
'depth': tf.FixedLenFeature([], tf.int64),
'label': tf.FixedLenFeature([], tf.int64)
}
)
tf_image = tf.decode_raw(features['image_raw'], tf.uint8)
tf_height = features['height']
tf_width = features['width']
tf_depth = features['depth']
tf_label = tf.cast(features['label'], tf.int32)
tf_image = tf.reshape(tf_image, [resize_height, resize_width, 3])
if type is None:
tf_image = tf.cast(tf_image, tf.float32)
elif type == 'normalization':
tf_image = tf.cast(tf_image, tf.float32) * (1. / 255.0)
elif type == 'standardization':
tf_imag = tf.cast(tf_image, tf.float32) * (1. / 255) - 0.5
return tf_image, tf_label
首先利用string_input_producer()将字符串输出到一个输入管道队列,然后利用parse_single_example()解析器解析。
测试
1 | def batch_test(record_file, resize_height, resize_width): |